Skip to content
 Safe Mode is a diagnostic startup mode that loads your Windows PC with only essential drivers and services, making it the go-to solution for troubleshooting system crashes, malware infections, and driver conflicts. To boot into Safe Mode on Windows 10 or 11, you can use multiple methods including the Settings menu, Shift + Restart, or the System Configuration tool, but there are important considerations to keep in mind depending on your Windows version and system status.
Introduction
Safe Mode has been a cornerstone of troubleshooting feature in Windows operating systems for decades. When your PC won’t start normally, behaves erratically, or suffers from software conflicts, Safe Mode provides a minimal environment where you can diagnose and fix issues without interference from third-party applications or problematic drivers.
As of October 14, 2025, Microsoft officially ended support for Windows 10, though the operating system continues to function. If you’re still using Windows 10, it’s important to note that while Safe Mode remains fully operational, you’ll no longer receive security updates or technical support from Microsoft. This makes troubleshooting tools like Safe Mode even more critical for maintaining system stability.
This comprehensive guide covers how to boot into Safe Mode on Windows 10, Windows 11, older Windows versions, and even Mac computers. Whether you’re a beginner or an experienced user, you’ll find step-by-step instructions tailored to your situation.
What Is Safe Mode?
Safe Mode is a special diagnostic startup mode in Windows that loads only the minimum required drivers and services necessary to run the operating system. When you boot into Safe Mode, Windows disables most third-party software, startup programs, and non-essential drivers, creating a clean environment for troubleshooting.
In Safe Mode, your screen resolution will be lower than usual, typically 640×480 or 800×600, and many visual effects are disabled. You’ll see “Safe Mode” displayed in each corner of your desktop, confirming you’re running in this diagnostic environment.
Types of Safe Mode
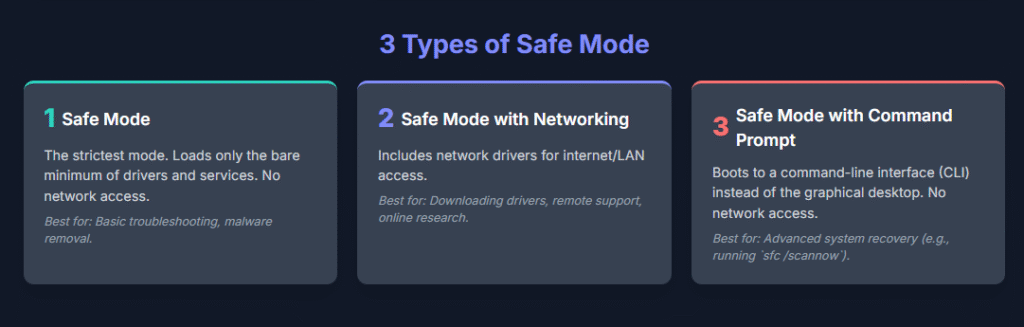
Windows offers three distinct Safe Mode options, each designed for specific troubleshooting scenarios:
| Safe Mode Type | Network Access | Interface | Best Used For |
|---|---|---|---|
| Safe Mode | No | Standard Windows GUI | Basic troubleshooting, malware removal, uninstalling software |
| Safe Mode with Networking | Yes | Standard Windows GUI | Downloading drivers, accessing online resources, remote support |
| Safe Mode with Command Prompt | No | Command line only | Advanced troubleshooting, system recovery, running command-line tools |
Why You Might Need to Boot in Safe Mode
There are several common scenarios where booting into Safe Mode becomes necessary for PC troubleshooting:
System Won’t Start Normally: When Windows crashes during startup or displays continuous error messages, Safe Mode can help you access the system to fix the underlying problem.
Malware or Virus Infections: Since most malware programs don’t load in Safe Mode, this environment makes it easier to run antivirus scans and remove malicious software without interference.
Driver Conflicts: After installing new hardware or updating drivers, your system might become unstable. Safe Mode lets you roll back problematic drivers or uninstall conflicting software.
Software Installation Issues: If a recently installed program causes system crashes or prevents Windows from starting, Safe Mode allows you to uninstall the problematic application safely.
System Performance Problems: When your PC runs extremely slowly or freezes frequently, Safe Mode helps determine whether the issue stems from Windows itself or from third-party software.
How to Boot Windows 10 into Safe Mode
Windows 10 offers multiple methods for accessing Safe Mode, depending on whether your system can boot normally or is completely unresponsive.
Method 1: Using the Settings Menu
This is the easiest method when your Windows 10 PC is working normally but experiencing issues.
Step 1: Click the Start button, then select Settings (the gear icon).
Step 2: Navigate to Update & Security, then click Recovery in the left sidebar.
Step 3: Under the Advanced startup section, click Restart now.
Step 4: Your PC will restart to a blue screen. Select Troubleshoot from the options.
Step 5: Click Advanced options, then select Startup Settings.
Step 6: Click the Restart button.
Step 7: After your PC restarts again, you’ll see a numbered list of startup options. Press the corresponding number key:
- Press 4 or F4 for Safe Mode
- Press 5 or F5 for Safe Mode with Networking
- Press 6 or F6 for Safe Mode with Command Prompt
Method 2: Using Shift + Restart
This quick method works from either the login screen or the Start menu.
Step 1: On the Windows 10 login screen or Start menu, click the Power button.
Step 2: Hold down the Shift key on your keyboard and click Restart while continuing to hold Shift.
Step 3: Your PC will reboot into the Windows Recovery Environment (blue screen).
Step 4: Follow Steps 4-7 from Method 1 above to select your desired Safe Mode option.
Method 3: Using System Configuration (MSConfig)
This method is useful if you need to boot into Safe Mode multiple times for extended troubleshooting.
Step 1: Press Windows + R keys simultaneously to open the Run dialog box.
Step 2: Type msconfig and press Enter.
Step 3: In the System Configuration window, click the Boot tab.
Step 4: Under Boot options, check the box next to Safe boot.
Step 5: Select your preferred Safe Mode type:
- Minimal: Standard Safe Mode
- Network: Safe Mode with Networking
- Alternate shell: Safe Mode with Command Prompt
Step 6: Click OK, then click Restart when prompted.
Important: To exit Safe Mode and return to normal startup, repeat these steps and uncheck the Safe boot option, then restart your PC.
Method 4: Using the F8 Key (Legacy Method)
The F8 key method worked reliably in Windows 7, but Microsoft reduced the detection window to nearly zero in Windows 10, making this method largely ineffective on modern systems with fast boot times. However, you can manually re-enable F8 functionality if needed.
To re-enable F8 boot menu:
Step 1: Right-click the Start button and select Command Prompt (Admin) or Windows PowerShell (Admin).
Step 2: Type the following command and press Enter:
textbcdedit /set {default} bootmenupolicy legacy
Step 3: Close the command window and restart your PC.
Step 4: During restart, repeatedly tap the F8 key before the Windows logo appears.
Step 5: Use arrow keys to select your desired Safe Mode option from the Advanced Boot Options menu.
How to Boot Windows 11 into Safe Mode
The process for accessing Safe Mode on Windows 11 is nearly identical to Windows 10, with only minor navigational differences in the Settings interface.
Method 1: Using the Settings Menu
Step 1: Click the Start button, then select Settings.
Step 2: In Settings, click System in the left sidebar (it’s usually selected by default).
Step 3: Scroll down and click Recovery.
Step 4: Under Advanced startup, click the Restart now button next to “Advanced startup”.
Step 5: Click Restart now again when prompted that your PC will restart.
Step 6: After restarting to the blue screen, select Troubleshoot > Advanced options > Startup Settings > Restart.
Step 7: When your PC restarts, press 4, 5, or 6 to select your Safe Mode option.
Method 2: Using Shift + Restart
Step 1: Click the Start button and select the Power icon.
Step 2: Hold Shift and click Restart.
Step 3: Follow the Troubleshoot path described in Method 1, Step 6-7.
Method 3: Using System Configuration (MSConfig)
The MSConfig method for Windows 11 is identical to Windows 10. Follow the same steps outlined in the Windows 10 section above.
How to Boot into Safe Mode from Windows Recovery Environment
When your PC won’t start normally or is stuck in a boot loop, you can force it into the Windows Recovery Environment to access Safe Mode.
Step 1: Press and hold your PC’s power button for about 10 seconds to force shutdown.
Step 2: Press the power button again to turn on your PC.
Step 3: As soon as you see the Windows logo or manufacturer logo, press and hold the power button again to force shutdown.
Step 4: Repeat Steps 2-3 two more times (total of 3 forced shutdowns).
Step 5: On the fourth startup, Windows will automatically enter the Recovery Environment showing “Preparing Automatic Repair” or “Diagnosing your PC”.
Step 6: When you see the Automatic Repair screen, click Advanced options.
Step 7: Select Troubleshoot > Advanced options > Startup Settings > Restart.
Step 8: After restart, press 4, 5, or 6 to boot into your chosen Safe Mode option.
How to Boot Older Windows Versions into Safe Mode
For users still running Windows 7, Windows 8, or Windows 8.1, the F8 method remains the most reliable approach.
Windows 7, Windows 8, and Windows 8.1
Step 1: Restart your computer.
Step 2: Immediately start tapping the F8 key repeatedly before the Windows logo appears.
Step 3: The Advanced Boot Options menu will appear with a black background.
Step 4: Use the arrow keys to highlight your desired Safe Mode option:
- Safe Mode
- Safe Mode with Networking
- Safe Mode with Command Prompt
Step 5: Press Enter to boot into the selected mode.
Troubleshooting tip: If F8 doesn’t work, try tapping it earlier in the boot process, or try using the Shift + Restart method from the login screen if available in your Windows version.
How to Boot Mac into Safe Mode
Mac computers use a different process for accessing Safe Mode, and the method varies depending on whether you have an Apple Silicon Mac or an Intel-based Mac.
For Mac with Apple Silicon (M1, M2, M3, M4 chips)
Step 1: Click the Apple menu in the top-left corner and select Shut Down.
Step 2: Wait for your Mac to completely shut down (screen black, all lights off).
Step 3: Press and hold the Power button until you see “Loading startup options” on the screen.
Step 4: Select your startup disk (usually “Macintosh HD”).
Step 5: Press and hold the Shift key, then click Continue in Safe Mode.
Step 6: Your Mac will restart automatically. When the login window appears, you should see “Safe Boot” in the menu bar at the top of the screen.
For Intel-based Mac
Step 1: Shut down or restart your Mac.
Step 2: Immediately press and hold the Shift key as soon as you hear the startup sound or see the Apple logo.
Step 3: Continue holding the Shift key until the login window appears.
Step 4: Log in to your Mac. You should see “Safe Boot” displayed in the menu bar.
Verifying Mac Safe Mode
To confirm your Mac is running in Safe Mode:
Step 1: Hold the Option key and click the Apple menu.
Step 2: Select System Information.
Step 3: Click Software in the sidebar.
Step 4: Look at the Boot Mode field:
- Safe: Your Mac is in Safe Mode
- Normal: Your Mac is not in Safe Mode
Safe Mode Methods Comparison Table
| Method | Windows 10 | Windows 11 | When PC Won’t Boot | Time Required | Difficulty Level |
|---|---|---|---|---|---|
| Settings Menu | ✓ | ✓ | ✗ | 2-3 minutes | Easy |
| Shift + Restart | ✓ | ✓ | ✗ | 2-3 minutes | Easy |
| MSConfig | ✓ | ✓ | ✗ | 1-2 minutes | Easy |
| F8 Key | Limited | Limited | ✓ | 1-2 minutes | Moderate |
| Recovery Environment | ✓ | ✓ | ✓ | 5-7 minutes | Moderate |
What to Do Once You’re in Safe Mode
Once successfully booted into Safe Mode, you can perform various troubleshooting tasks:
Run Antivirus Scans: Use Windows Defender or your installed antivirus software to scan for and remove malware that might be causing system problems.
Uninstall Problematic Software: Open Settings > Apps > Apps & features, then uninstall any recently installed programs that might be causing conflicts.
Update or Roll Back Drivers: Open Device Manager (right-click Start > Device Manager), locate problematic devices, and either update drivers or roll back to previous versions.
Run System File Checker: Open Command Prompt as administrator and run sfc /scannow to repair corrupted system files.
Perform System Restore: If your problems started recently, use System Restore to revert your PC to an earlier point when it was working properly.
Disable Startup Programs: Open Task Manager (Ctrl + Shift + Esc), go to the Startup tab, and disable programs that might be causing startup issues.
Troubleshooting: PC Keeps Booting into Safe Mode
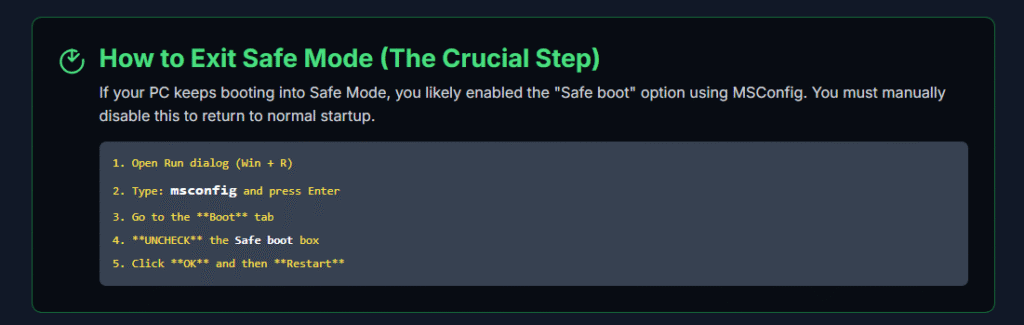
If your computer continuously boots into Safe Mode even when you don’t want it to, the Safe boot option is likely enabled in System Configuration.
Step 1: Press Windows + R to open the Run dialog.
Step 2: Type msconfig and press Enter.
Step 3: Click the Boot tab.
Step 4: Uncheck the box next to Safe boot.
Step 5: Click OK, then click Restart.
Your PC should now boot normally into standard Windows mode.
Operating System Compatibility Table
| Operating System | Safe Mode Available | Primary Access Method | F8 Key Works | Support Status (October 2025) |
|---|---|---|---|---|
| Windows 11 | Yes | Settings/Shift+Restart | No (unless enabled) | Fully supported |
| Windows 10 | Yes | Settings/Shift+Restart | No (unless enabled) | Support ended Oct 14, 2025 |
| Windows 8.1 | Yes | F8 key | Yes | Support ended Jan 10, 2023 |
| Windows 7 | Yes | F8 key | Yes | Support ended Jan 14, 2020 |
| macOS (all versions) | Yes | Shift key at startup | N/A | Varies by version |
Benefits of Using Safe Mode for Troubleshooting
Safe Mode provides several key advantages for diagnosing and fixing PC problems:
Isolated Environment: By loading only essential drivers and services, Safe Mode eliminates interference from third-party software, making it easier to identify the root cause of problems.
Malware Protection: Most viruses and malware don’t load in Safe Mode, allowing you to run antivirus scans and removal tools more effectively.
System Stability: Even if your PC crashes constantly in normal mode, it often remains stable in Safe Mode, giving you a working environment to implement fixes.
Driver Management: You can safely update, roll back, or uninstall problematic drivers without risk of system crashes during the process.
Data Recovery: When your PC won’t boot normally, Safe Mode often provides access to your files so you can back up important data before attempting more drastic recovery measures.
Frequently Asked Questions
What’s the difference between Safe Mode and Safe Mode with Networking?
Safe Mode loads only essential drivers without network connectivity, while Safe Mode with Networking includes network drivers that enable internet and local network access. Use Safe Mode with Networking when you need to download drivers, access online troubleshooting resources, or receive remote technical support. However, be cautious about internet browsing in this mode since security protections are minimal.
Why doesn’t the F8 key work on my Windows 10 or 11 PC?
Microsoft reduced the F8 detection window to less than 200 milliseconds in Windows 10 and 11 to enable faster boot times. This makes it nearly impossible to press F8 at the right moment. You can re-enable the F8 boot menu using the command bcdedit /set {default} bootmenupolicy legacy in an administrator Command Prompt, but using the Settings menu or Shift + Restart methods is generally more reliable.
Can I use Safe Mode if my PC won’t turn on at all?
If your PC won’t power on at all (no lights, no fans), Safe Mode won’t help because the issue is likely hardware-related. However, if your PC powers on but won’t load Windows, you can force it into the Windows Recovery Environment by performing three forced shutdowns in a row, then accessing Safe Mode through the Automatic Repair screen.
Will Safe Mode delete my files?
No, Safe Mode does not delete any of your personal files, documents, photos, or installed programs. It simply loads Windows with minimal drivers and services. All your data remains intact and accessible in Safe Mode.
How do I exit Safe Mode and return to normal Windows?
Simply restart your computer normally, and it will boot back into regular Windows mode. If your PC keeps booting into Safe Mode, open System Configuration (msconfig), go to the Boot tab, uncheck “Safe boot,” click OK, and restart.
Can I access the internet in Safe Mode?
Not in standard Safe Mode, but yes if you boot into Safe Mode with Networking. This option loads network drivers along with the minimal Windows components, enabling internet connectivity while still providing the diagnostic benefits of Safe Mode.
Is Safe Mode available on all Windows versions?
Yes, Safe Mode has been a feature in every version of Windows from Windows 95 through Windows 11. The access methods have changed over time, but the functionality remains available across all Windows operating systems.
Does Safe Mode work differently on laptops versus desktop PCs?
No, the Safe Mode functionality and access methods are identical on laptops and desktop PCs. The only potential difference is that some laptop manufacturers may have customized boot key combinations, though this is rare for Safe Mode access.
Tips for Successful Safe Mode Troubleshooting
Based on my professional experience reviewing and troubleshooting PCs, here are some practical tips:
Start with Safe Mode with Networking: Unless you’re specifically troubleshooting network issues or dealing with suspected malware, Safe Mode with Networking is usually the most practical option since it gives you internet access for downloading drivers or looking up solutions.
Keep a List of Recent Changes: Before entering Safe Mode, mentally note any recent software installations, driver updates, or system changes. This helps narrow down the cause of your problems.
Try Systematic Elimination: If you’re not sure what’s causing the issue, use Safe Mode to systematically disable or uninstall recent additions to your system one at a time, restarting in normal mode after each change to see if the problem is resolved.
Document Your Steps: When troubleshooting complex issues, keep notes of what you try in Safe Mode. This prevents repeating unsuccessful steps and helps if you need to seek professional assistance.
Back Up First When Possible: If Safe Mode gives you access to a PC that won’t boot normally, prioritize backing up your important files before attempting repairs that might result in data loss.
Common Safe Mode Troubleshooting Scenarios
| Problem | Recommended Safe Mode Type | Typical Solution |
|---|---|---|
| Malware infection | Safe Mode | Run antivirus scan, remove infected files |
| Recent driver causing crashes | Safe Mode | Roll back or uninstall problematic driver |
| Software won’t uninstall | Safe Mode | Use Windows Installer or third-party uninstaller |
| Screen resolution problems | Safe Mode with Networking | Download and install updated graphics drivers |
| Startup programs causing issues | Safe Mode | Disable startup items via Task Manager |
| System files corrupted | Safe Mode with Command Prompt | Run sfc /scannow and DISM commands |
Conclusion
Safe Mode remains one of the most powerful and accessible troubleshooting tools available in Windows, providing a minimal diagnostic environment where you can identify and fix problems that prevent your PC from running normally. Whether you’re dealing with malware, driver conflicts, software issues, or system crashes, knowing how to access and use Safe Mode effectively can save you hours of frustration and potentially expensive repair costs.
While the methods for accessing Safe Mode have evolved from the simple F8 key press in older Windows versions to the more menu-driven approaches in Windows 10 and 11, the fundamental purpose remains unchanged: creating a clean, stable environment for diagnosing and resolving PC problems. With the multiple access methods outlined in this guide, you should be able to boot into Safe Mode regardless of your Windows version or system status.
Remember that Safe Mode is a diagnostic tool, not a permanent solution. Once you’ve identified and fixed the underlying problem, always restart your PC in normal mode to ensure everything works correctly with all your regular programs and drivers loaded. If problems persist even in Safe Mode, it may indicate more serious hardware issues that require professional diagnosis.