Skip to content
 To check how much RAM your PC has, press Windows + R, type msinfo32, and press Enter, you’ll see “Installed RAM” under System Summary showing your total memory. However, to get complete details about RAM speed, type, usage, and available slots, you’ll need additional methods like Task Manager, Command Prompt, or third-party tools like CPU-Z, which I’ll cover in detail below.
Introduction
Random Access Memory (RAM) is one of the most critical components affecting your computer’s performance. Whether you’re troubleshooting slowdowns, planning an upgrade, or simply curious about your system specifications, knowing how to check your RAM is an essential skill for any PC user.
In this comprehensive guide, I’ll walk you through multiple methods to check your RAM on Windows 10, Windows 11, and Mac computers. You’ll learn how to find not just the amount of RAM installed, but also crucial details like speed, type (DDR4 vs DDR5), available slots, and real-time usage statistics. Based on my professional experience reviewing PCs and hardware, understanding your RAM configuration is the first step toward optimizing system performance.
As of October 2025, RAM technology continues to evolve, with DDR5 becoming increasingly mainstream for new builds while DDR4 remains widely used and perfectly capable for most users. This guide covers both technologies and helps you make informed decisions about your memory needs.
What Is RAM and Why Does It Matter?
Random Access Memory (RAM) is a type of ultra-fast, temporary storage that your computer uses to hold data that’s actively being processed. Think of your hard drive or SSD as a filing cabinet where all your data is stored permanently, and RAM as your desk where you place files you’re currently working on. The larger your desk (more RAM), the more projects you can keep open simultaneously without slowing down.
Unlike storage drives, RAM is volatile memory, meaning it loses all its contents when you power off your computer. This temporary nature allows RAM to operate at speeds roughly 10 times faster than SSDs and 50 times faster than traditional hard drives. When your computer runs out of available RAM, it starts using your much slower storage drive as “virtual memory,” causing noticeable performance drops, freezing, and lag.
Modern applications, especially web browsers, video editing software, and games, are increasingly RAM-hungry. Chrome alone can easily consume 2-4GB of RAM with multiple tabs open. Understanding your RAM capacity and usage helps you determine whether sluggish performance stems from insufficient memory or other hardware bottlenecks.
How to Check RAM on Windows 10
Windows 10 provides several built-in methods to check your RAM specifications, each offering different levels of detail.
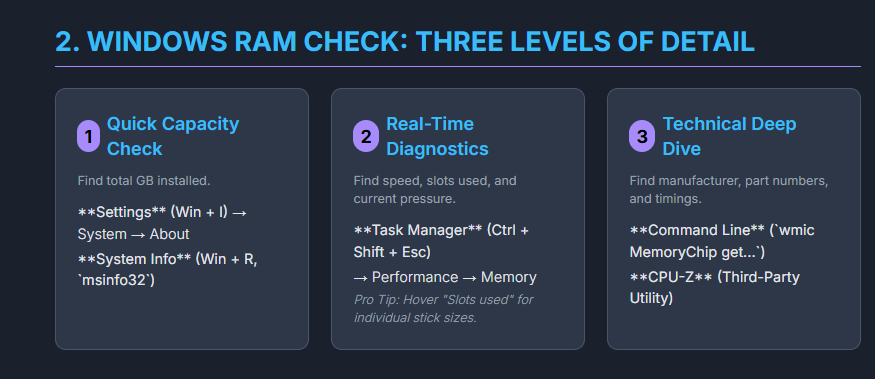
Method 1: Using System Settings
This is the quickest method for checking your total installed RAM capacity.
Step 1: Click the Start button, then select Settings (gear icon).
Step 2: Navigate to System, then click About in the left sidebar.
Step 3: Scroll down to Device specifications.
Step 4: Look for the line labeled Installed RAM. This shows your total memory, for example, “16.0 GB.”
This method gives you a quick overview but doesn’t provide details about RAM speed, type, or usage patterns.
Method 2: Using Task Manager
Task Manager offers more detailed information including RAM speed, form factor, and real-time usage statistics.
Step 1: Right-click the taskbar and select Task Manager, or press Ctrl + Shift + Esc.
Step 2: Click the Performance tab at the top.
Step 3: Select Memory from the left sidebar.
Step 4: Review the detailed information displayed:
- Total RAM capacity at the top
- Available RAM showing how much is free
- Speed (measured in MHz, e.g., 3200 MHz)
- Slots used (e.g., “2 of 4” means two slots occupied)
- Form factor (DIMM for desktops, SO-DIMM for laptops)
- Hardware reserved memory
Pro tip: Hover your mouse over the “Slots used” section to see exactly how much RAM is installed in each individual slot. In my testing, I discovered this feature is incredibly useful when planning upgrades, as it shows whether you need to replace existing sticks or simply add more to empty slots.
Method 3: Using System Information
For comprehensive technical details about your RAM, the System Information utility provides extensive specifications.
Step 1: Press Windows + R to open the Run dialog.
Step 2: Type msinfo32 and press Enter.
Step 3: In the System Information window, look at the System Summary section.
Step 4: Find the line labeled Installed Physical Memory (RAM) to see total capacity.
This tool also shows other useful information like BIOS version, processor details, and Windows version, making it valuable for overall system diagnosis.
Method 4: Using Command Prompt
Command-line tools provide detailed technical specifications that aren’t always visible through graphical interfaces.
Step 1: Press Windows + R, type cmd, and press Enter.
Step 2: Type the following command and press Enter:
textwmic MemoryChip get DeviceLocator, Manufacturer, Speed, Capacity
Step 3: Review the output showing:
- DeviceLocator: Which slot each RAM stick occupies
- Manufacturer: RAM brand (e.g., Samsung, Micron, SK Hynix)
- Speed: RAM frequency in MHz
- Capacity: Size of each stick in bytes (divide by 1,073,741,824 to convert to GB)
For a simpler total memory check, use:
textsysteminfo | findstr /C:"Total Physical Memory"
Method 5: Using PowerShell
PowerShell offers an alternative command-line method with slightly different formatting.
Step 1: Press Windows + X and select Windows PowerShell or Windows Terminal.
Step 2: Type the following command and press Enter:
textGet-CimInstance -ClassName Win32_PhysicalMemory | Format-Table DeviceLocator, Manufacturer, Speed, Capacity
Step 3: Review the formatted table showing detailed specifications for each RAM module.
PowerShell commands often provide cleaner, more readable output than Command Prompt, making them ideal for users comfortable with scripting.
How to Check RAM on Windows 11
Windows 11’s interface differs slightly from Windows 10, but the underlying tools remain largely the same.
Method 1: Using Settings
Step 1: Click the Start button, then select Settings.
Step 2: Click System in the left sidebar (usually selected by default).
Step 3: Scroll down and click About.
Step 4: Under Device specifications, locate Installed RAM showing your total memory.
Method 2: Using Task Manager
Step 1: Right-click the Start button or taskbar and select Task Manager (or press Ctrl + Shift + Esc).
Step 2: Click Performance tab.
Step 3: Select Memory from the left panel.
Step 4: View comprehensive RAM details including:
- Total capacity
- Speed (MHz)
- Form factor
- Slots used
- Memory type (DDR4 or DDR5)
Task Manager in Windows 11 has a slightly refreshed interface but provides identical information to Windows 10.
Method 3: Command Prompt and PowerShell
The command-line methods for Windows 11 are identical to Windows 10. Use the same wmic and Get-CimInstance commands detailed in the Windows 10 section above.
How to Check RAM Slots Without Opening Your PC
Knowing how many RAM slots you have and which ones are occupied is crucial when planning upgrades.
Using Task Manager
Step 1: Open Task Manager (Ctrl + Shift + Esc).
Step 2: Go to Performance > Memory.
Step 3: Look at Slots used (e.g., “2 of 4”).
Step 4: Hover your mouse cursor over “Slots used” to see a tooltip showing RAM capacity in each occupied slot.
Using Command Prompt
Step 1: Open Command Prompt as administrator.
Step 2: To see total available slots, type:
textwmic Memphysical get MemoryDevices
Step 3: To see which slots are occupied, type:
textwmic MemoryChip get BankLabel, DeviceLocator, Capacity
This shows each RAM stick’s location and size, helping you determine if you have empty slots for expansion.
Using PowerShell
Step 1: Open PowerShell as administrator.
Step 2: Type:
textGet-WmiObject -Class "Win32_PhysicalMemoryArray"
This shows total memory slots available on your motherboard.
Step 3: To see occupied slots:
textGet-WmiObject -Class "Win32_PhysicalMemory" | Format-Table BankLabel, DeviceLocator, Capacity
Using Third-Party Tools: CPU-Z
CPU-Z is a free, trusted utility that provides extremely detailed hardware information, particularly useful for checking RAM specifications.
Downloading and Installing CPU-Z
Step 1: Visit the official CPU-Z website at cpuid.com/softwares/cpu-z.html.
Step 2: Download the latest version (as of October 2025, version 2.17 is current).
Step 3: Install and launch the program.
Checking RAM with CPU-Z
Step 1: Open CPU-Z after installation.
Step 2: Click the Memory tab to see:
- Type: DDR4, DDR5, etc.
- Size: Total RAM capacity
- Channel: Single or Dual channel configuration
- NB Frequency: Memory controller frequency
- DRAM Frequency: Actual RAM speed (multiply by 2 for effective DDR speed)
- CAS Latency and timings
Step 3: Click the SPD tab (Serial Presence Detect) to see:
- Individual module specifications
- Manufacturer information
- Part numbers
- Supported speeds and XMP profiles
- Memory slot dropdown showing each installed stick
In my opinion, CPU-Z is invaluable for serious PC builders and overclockers because it shows information that Windows’ built-in tools simply don’t provide, like detailed timing specifications and XMP profile support.
How to Check RAM on Mac
Mac users have different methods for checking RAM, depending on whether they have an Intel-based Mac or Apple Silicon (M1, M2, M3, M4).
Method 1: About This Mac
Step 1: Click the Apple logo in the top-left corner of your screen.
Step 2: Select About This Mac.
Step 3: In the Overview tab, you’ll see Memory listed, showing total installed RAM (e.g., “16 GB”).
This method provides a quick overview but limited technical details.
Method 2: System Settings (macOS Ventura and later)
Step 1: Click the Apple logo and select System Settings.
Step 2: Click General in the left sidebar.
Step 3: Click About.
Step 4: Look for Memory under the chip information.
Step 5: For more detailed specifications, scroll down and click System Report.
Step 6: In System Report, select Memory under the Hardware section to see:
- Total memory installed
- Memory type (e.g., LPDDR4, LPDDR5)
- Speed
- Manufacturer
- Status of each module
Method 3: Activity Monitor (Check RAM Usage)
Step 1: Press Command + Space to open Spotlight search.
Step 2: Type Activity Monitor and press Enter.
Step 3: Click the Memory tab at the top.
Step 4: At the bottom of the window, review:
- Physical Memory: Total RAM installed
- Memory Used: Currently occupied memory
- App Memory: RAM used by applications
- Wired Memory: System memory that can’t be cached
- Compressed: Memory compressed to free up space
- Cached Files: Files cached in unused memory
- Swap Used: Amount of storage drive used as virtual memory
- Memory Pressure: Color-coded indicator (green = good, yellow = moderate, red = critical)
The Memory Pressure graph is particularly important. If it frequently shows yellow or red, your Mac needs more RAM or you need to close memory-intensive applications.
Understanding RAM Specifications
RAM Types: DDR4 vs DDR5
As of October 2025, two primary RAM types dominate the market:
| Specification | DDR4 | DDR5 |
|---|---|---|
| Release Year | 2014 | 2021 |
| Standard Speed Range | 2133-5100 MT/s | 4800-8000+ MT/s |
| Bandwidth | 17-25.6 GB/s | 38.4-51.2 GB/s |
| Operating Voltage | 1.2V | 1.1V |
| Maximum Capacity per Module | 32GB (64GB rare) | 128GB |
| Typical Latency (CAS) | CL14-CL18 | CL28-CL40 |
| Pin Count | 288 pins | 288 pins (different notch position) |
| Power Management | Motherboard-controlled | On-module PMIC |
| Market Position (2025) | Mature, cost-effective | Future-proof, higher performance |
DDR5 offers significantly higher speeds and bandwidth, making it ideal for demanding applications like 4K/8K video editing, 3D rendering, and high-end gaming. However, DDR5 comes with higher latency and higher costs compared to DDR4.
DDR4 remains an excellent choice for most users in 2025. It offers lower latencies, proven stability, and significantly better pricing. For gaming at 1080p or 1440p, general productivity, and moderate content creation, DDR4 provides outstanding value.
RAM Speed and Performance
RAM speed is measured in MHz (megahertz) or MT/s (megatransfers per second). Common speeds include:
DDR4:
- 2133 MHz (entry-level)
- 2666 MHz (common in budget systems)
- 3200 MHz (sweet spot for gaming and productivity)
- 3600 MHz (enthusiast choice)
- 4000+ MHz (high-end overclocked)
DDR5:
- 4800 MHz (entry-level/JEDEC standard)
- 5200-5600 MHz (mainstream)
- 6000-6400 MHz (performance tier)
- 7200+ MHz (enthusiast/overclocked)
While testing PCs, I discovered that for most users, faster RAM provides diminishing returns beyond certain thresholds. For DDR4, 3200-3600 MHz hits the sweet spot between performance and cost. For DDR5, 5200-6000 MHz offers excellent performance without premium pricing.
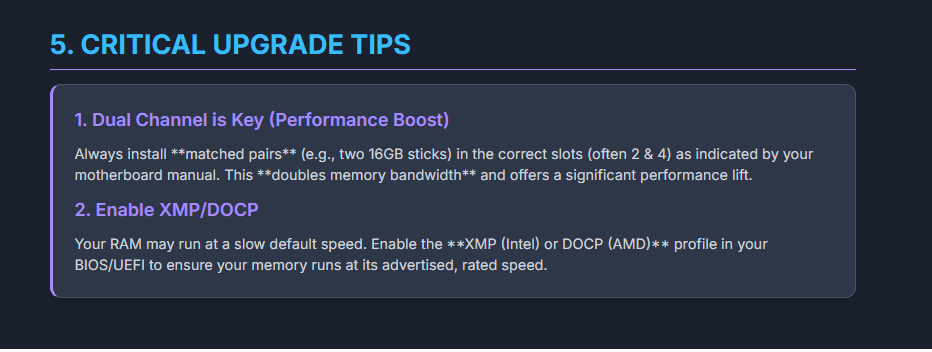
Single vs Dual Channel Configuration
RAM performs better when installed in matched pairs running in dual-channel mode:
- Single Channel: One RAM stick or mismatched sticks. Limits memory bandwidth.
- Dual Channel: Two matched sticks in correct slots. Doubles memory bandwidth, improving performance 10-20% in most applications and up to 50% in memory-intensive tasks.
Always check your motherboard manual for correct slot configuration. Typically, dual-channel requires installing RAM in slots 2 and 4 (or A2 and B2).
How Much RAM Do You Need?
The optimal amount of RAM depends on your specific use case and requirements.
| Use Case | Minimum RAM | Recommended RAM | Ideal RAM | Notes |
|---|---|---|---|---|
| Basic Web Browsing & Office | 4GB | 8GB | 16GB | 4GB struggles with modern browsers |
| General Productivity & Multitasking | 8GB | 16GB | 16-32GB | Multiple apps, Chrome tabs, Zoom calls |
| Gaming (1080p/1440p) | 8GB | 16GB | 16-32GB | 16GB is the current sweet spot |
| Gaming (4K, High Settings) | 16GB | 32GB | 32GB | Modern AAA titles benefit from 32GB |
| Photo Editing (Lightroom, Photoshop) | 8GB | 16GB | 32GB | Large RAW files need more memory |
| Video Editing (1080p) | 16GB | 16-32GB | 32GB | Depends on project complexity |
| Video Editing (4K) | 32GB | 32GB | 64GB | Multiple layers, effects, color grading |
| Video Editing (6K/8K/RAW) | 64GB | 64-128GB | 128GB+ | Professional production work |
| 3D Rendering & CAD | 32GB | 64GB | 128GB+ | Large models, simulations |
| Software Development | 16GB | 32GB | 32-64GB | Multiple VMs, containers, IDEs |
| Music Production (DAW) | 16GB | 32GB | 64GB | Large sample libraries |
| Streaming While Gaming | 16GB | 32GB | 32GB | Separate encoding process |
In my experience, 16GB has become the baseline for comfortable computing in 2025. While 8GB can still work for light tasks, it feels constraining with modern software and workflows. For gaming and content creation, 32GB provides excellent headroom and futureproofing.
Checking RAM Usage and Performance
Windows Task Manager RAM Usage
Understanding how your RAM is being used helps identify memory leaks and performance issues.
Step 1: Open Task Manager (Ctrl + Shift + Esc).
Step 2: Go to Performance > Memory.
Step 3: Review the memory composition graph showing:
- In use: Actively used by applications
- Modified: Recently used data waiting to be written to disk
- Standby: Cached data that can be cleared if needed
- Free: Completely unused memory
Step 4: Click the Processes tab to see which applications consume the most RAM. Click the Memory column header to sort by usage.
If your RAM usage consistently exceeds 70-80% during normal use, you likely need more memory. However, occasional high usage during intensive tasks is normal and expected.
Mac Activity Monitor Memory Pressure
Step 1: Open Activity Monitor (Command + Space, type “Activity Monitor”).
Step 2: Click the Memory tab.
Step 3: Observe the Memory Pressure graph at the bottom:
- Green: Sufficient memory available, system running smoothly
- Yellow: Memory pressure increasing, system managing but may benefit from more RAM
- Red: Critical memory pressure, system swapping heavily, performance degraded
Step 4: Check Swap Used. High swap usage (several GB) combined with yellow/red memory pressure indicates insufficient RAM for your workload.
Methods Comparison Table
| Method | Platform | Information Provided | Ease of Use | Best For |
|---|---|---|---|---|
| Settings/About | Windows 10/11, Mac | Total RAM capacity | Very Easy | Quick checks |
| Task Manager | Windows 10/11 | Capacity, speed, slots, usage | Easy | Real-time monitoring |
| System Information | Windows 10/11 | Total capacity, system specs | Easy | General system info |
| Command Prompt | Windows 10/11 | Detailed per-module specs | Moderate | Technical users |
| PowerShell | Windows 10/11 | Detailed per-module specs | Moderate | Scripting, automation |
| CPU-Z | Windows (third-party) | Extremely detailed specs, timings, XMP | Easy | Enthusiasts, overclockers |
| About This Mac | Mac | Total capacity, basic info | Very Easy | Quick checks |
| Activity Monitor | Mac | Capacity, usage, memory pressure | Easy | Performance monitoring |
| System Report | Mac | Detailed technical specs | Easy | Mac technical details |
RAM Upgrade Considerations
Compatibility Checks
Before purchasing additional RAM, verify compatibility:
- RAM Type: Ensure you buy the correct generation (DDR4 vs DDR5). These are NOT interchangeable.
- Speed: Match or exceed your existing RAM speed. Mixing speeds causes all modules to run at the slowest speed.
- Capacity Limits: Check your motherboard’s maximum supported RAM capacity.
- Number of Slots: Determine available slots using methods described earlier.
- Laptop vs Desktop: Laptops use SO-DIMM modules; desktops use full-size DIMM modules.
- Brand Matching: While not strictly necessary, using the same brand and model as existing RAM minimizes compatibility issues.
Many modern laptops, especially ultrabooks and MacBooks, have RAM soldered directly to the motherboard, making upgrades impossible. Always verify upgradeability before purchasing.
Installation Best Practices
For Dual Channel Configuration:
- Install matched pairs in slots 2 and 4 (or A2 and B2)
- Consult your motherboard manual for exact configuration
- Use identical capacity, speed, and brand for best results
For Maximum Capacity:
- Fill all available slots with largest supported modules
- Ensure all modules are identical for stability
Frequently Asked Questions
How do I know if I need more RAM?
If your computer frequently freezes, becomes sluggish when multitasking, shows “low memory” warnings, or has consistently high RAM usage (above 80%) in Task Manager or Activity Monitor, you likely need more RAM. High swap usage on Mac or frequent hard drive activity on Windows also indicate insufficient memory.
What’s the difference between DDR4 and DDR5 RAM?
DDR5 offers higher speeds (starting at 4800 MT/s vs DDR4’s 2133 MT/s), greater bandwidth, higher capacity per module (up to 128GB vs 32GB), and better power efficiency (1.1V vs 1.2V). However, DDR5 has higher latency and costs more. DDR4 remains excellent for most users in 2025, while DDR5 is better for cutting-edge performance and futureproofing.
Can I mix different RAM brands or speeds?
While technically possible, mixing RAM brands or speeds can cause instability, compatibility issues, or prevent dual-channel mode. If you mix speeds, all modules will run at the slowest speed. For best results, use identical RAM modules (same brand, model, speed, capacity, and timings).
How do I check RAM speed on my computer?
On Windows, open Task Manager (Ctrl + Shift + Esc), go to Performance > Memory, and look for “Speed” showing MHz. On Mac, open Activity Monitor, click Memory tab, or use System Report under Hardware > Memory. For detailed specifications, use CPU-Z on Windows.
Why does my RAM show half its rated speed?
DDR stands for “Double Data Rate,” meaning the effective speed is double the reported frequency. If your 3200 MHz RAM shows as 1600 MHz in some tools, this is normal—it’s showing the base clock rate, not the effective DDR rate. The actual transfer rate is 3200 MT/s.
Can I upgrade RAM on my laptop?
Many laptops allow RAM upgrades, especially gaming laptops and older models. However, ultrabooks, MacBooks (2016 and later), and many modern thin-and-light laptops have RAM soldered to the motherboard, making upgrades impossible. Check your laptop’s manual or manufacturer specifications before purchasing RAM.
What is XMP and should I enable it?
XMP (Extreme Memory Profile) is an Intel technology (AMD equivalent is DOCP/EXPO) that allows RAM to run at its advertised speed rather than default JEDEC specifications. Without enabling XMP in BIOS, your 3200 MHz RAM might run at only 2133 MHz. Yes, you should enable it for optimal performance.
How much RAM does Windows 11 require?
Windows 11 officially requires a minimum of 4GB RAM, but this provides only basic functionality. For comfortable use, 8GB is the practical minimum, and 16GB is recommended for multitasking, gaming, and productivity work.
Is 32GB RAM overkill for gaming?
For pure gaming at 1080p or 1440p in 2025, 16GB remains sufficient for most titles. However, 32GB provides benefits if you stream while gaming, run background applications, play demanding AAA titles at maximum settings, or want futureproofing. For 4K gaming and content creation, 32GB is increasingly becoming the standard.
How do I check how many RAM slots my motherboard has?
Use Command Prompt with the command wmic Memphysical get MemoryDevices to see total slots, or check Task Manager’s Performance > Memory section showing “Slots used” (e.g., “2 of 4”). CPU-Z’s SPD tab also shows all memory slots with a dropdown menu.
Tips for Optimal RAM Performance
Based on my professional experience testing and reviewing PCs, here are key tips for maximizing RAM performance:
Enable XMP/DOCP Profiles: Always enable XMP (Intel) or DOCP/EXPO (AMD) in your BIOS to ensure RAM runs at its rated speed rather than default JEDEC specifications.
Use Dual-Channel Configuration: Install RAM in matched pairs for significant performance improvements. Consult your motherboard manual for correct slot configuration.
Keep RAM Cool: While RAM doesn’t generate much heat, adequate airflow prevents throttling and extends lifespan, especially with high-speed modules.
Update BIOS: RAM compatibility and performance improve with BIOS updates. Check your motherboard manufacturer’s website for updates, especially when installing new RAM.
Close Unnecessary Background Apps: Modern applications often run in the background consuming RAM. Disable startup programs you don’t need in Task Manager > Startup tab.
Monitor Memory Leaks: If certain applications gradually consume more RAM over time without releasing it, they may have memory leaks. Restart the application periodically or contact the developer.
Consider RAM Disk for Ultra-Fast Storage: If you have excess RAM (48GB+), consider creating a RAM disk for temporary files, browser cache, or render files for dramatically faster access speeds than even NVMe SSDs.
Conclusion
Understanding how to check your RAM—whether you’re using Windows 10, Windows 11, or Mac—is a fundamental skill that empowers you to troubleshoot performance issues, plan upgrades, and optimize your system. From quick checks using Settings or About This Mac to detailed technical specifications via Task Manager, Command Prompt, or CPU-Z, you now have multiple methods to examine every aspect of your computer’s memory.
As we’ve covered, RAM requirements continue to grow in 2025, with 16GB becoming the comfortable baseline for most users and 32GB increasingly recommended for gaming, content creation, and multitasking. Whether you’re running mature DDR4 or cutting-edge DDR5, knowing your RAM specifications helps you make informed decisions about upgrades and system optimization.
Remember that more RAM isn’t always the solution to performance problems—ensure your CPU, GPU, and storage are also adequate for your workload. However, insufficient RAM creates obvious bottlenecks that more memory can immediately resolve. Use the monitoring tools discussed in this guide to determine whether your RAM usage patterns indicate a need for more capacity or if other components require attention.
With the knowledge from this guide, you’re equipped to check your RAM specifications, understand what those numbers mean, monitor memory usage patterns, and make intelligent upgrade decisions that match your computing needs and budget.