Skip to content
 Yes, you can upgrade most mini PCs, but your options are limited compared to traditional desktop towers—typically you can upgrade RAM and storage, while the CPU and GPU remain permanently soldered to the motherboard. The good news is that RAM and storage upgrades alone can dramatically transform your mini PC’s performance and extend its useful life by several years. However, understanding exactly what’s upgradable before you buy is crucial, because not all mini PCs offer the same flexibility, and some budget models solder everything in place with zero upgrade potential.
What Components Can You Actually Upgrade in a Mini PC?
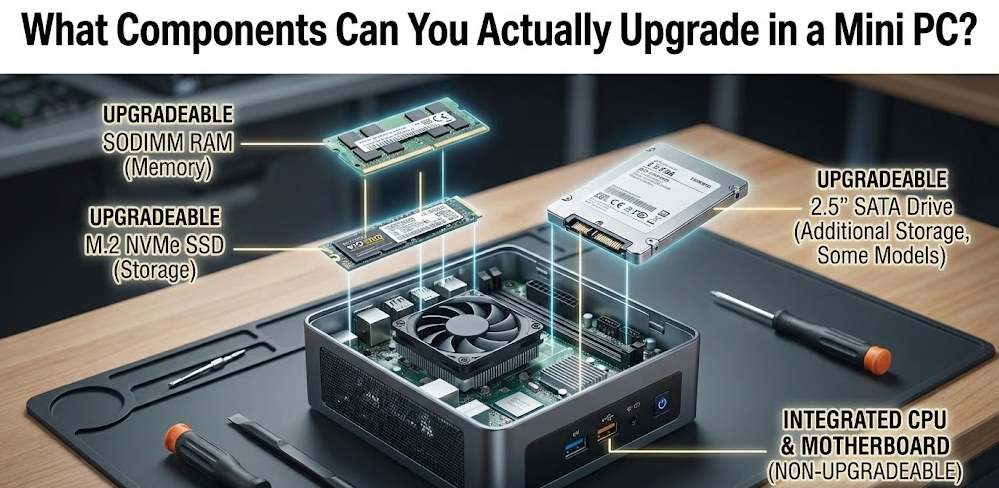
The upgradeability of mini PCs varies significantly by manufacturer and model, but certain patterns have emerged across the industry in 2025. Understanding these patterns helps you make informed purchasing decisions and set realistic expectations.
RAM (Memory) – Usually Upgradable
Most mid-range and high-end mini PCs feature two SO-DIMM (Small Outline Dual In-line Memory Module) slots—the same laptop-style RAM used in notebooks. These slots typically support DDR4 or DDR5 memory depending on the processor generation, with maximum capacities ranging from 32GB to 96GB on modern systems.
The upgrade process is straightforward—remove the bottom panel, locate the RAM slots, release the retention clips, remove old modules, and install new ones. Based on my professional experience reviewing PCs, RAM upgrades deliver the most noticeable performance improvement for everyday computing, especially when moving from 8GB to 16GB or 32GB.
However, budget mini PCs under $300 increasingly use soldered RAM to reduce costs and save internal space. Models like some entry-level Beelink and GMKtec units solder 8GB or 16GB directly to the motherboard with no upgrade path. Always verify RAM upgradeability before purchasing if future expansion matters to you.
Storage – Almost Always Upgradable
Storage represents the most universally upgradable component in mini PCs. Nearly every 2025 model includes at least one M.2 slot supporting NVMe SSDs, with many offering two or even three M.2 slots for expansion. High-end models like the Minisforum MS-01 include up to six M.2 slots, creating massive storage potential in compact form factors.
Typical configurations include one M.2 2280 NVMe slot (the most common size), sometimes a second M.2 2242 or 2280 slot for additional storage, and occasionally a 2.5-inch SATA bay for traditional SSDs or HDDs. Modern PCIe Gen 4 NVMe drives deliver read speeds of 5,000-7,400 MB/s, dramatically outperforming older SATA SSDs at 550 MB/s.
Storage upgrades serve multiple purposes including increased capacity for files and applications, improved speed by moving from SATA to NVMe or upgrading to faster Gen 4 drives, and dedicated drives for specific purposes like OS, applications, and data separation.
Wi-Fi and Bluetooth – Sometimes Upgradable
Many mini PCs use replaceable M.2 or mini-PCIe Wi-Fi cards, allowing upgrades from Wi-Fi 5 to Wi-Fi 6/6E/7 or adding Bluetooth 5.3/5.4 support. This upgrade appeals to users wanting faster wireless speeds, better range and reliability, or the latest Bluetooth standards for modern peripherals.
The upgrade requires opening the chassis, locating the Wi-Fi card (usually under the bottom panel), disconnecting antenna cables, removing the old card, and installing the new one. Intel AX210/AX211 cards (Wi-Fi 6E) and AX411 (Wi-Fi 7) represent popular upgrade options in 2025, offering substantial improvements over older wireless standards.
However, some manufacturers use proprietary Wi-Fi modules or solder wireless components directly to motherboards, eliminating upgrade potential. Check your specific model’s specifications and teardown reviews before purchasing replacement Wi-Fi cards.
CPU and GPU – Not Upgradable
The processor and integrated graphics in mini PCs are permanently soldered to the motherboard. Unlike traditional desktop towers with socketed CPUs that you can swap out, mini PC processors use BGA (Ball Grid Array) mounting that requires specialized industrial equipment to replace.
This fundamental limitation means your mini PC’s CPU and integrated graphics performance is locked at purchase. You cannot upgrade from an Intel i5 to an i7, or from Ryzen 5 to Ryzen 7. Choose your processor carefully when buying, as this decision is permanent.
The only GPU upgrade path involves external GPUs (eGPUs) connected via Thunderbolt, which we’ll discuss in detail later. Internal discrete graphics cards found in desktop towers simply don’t fit in mini PC chassis, and the power supplies couldn’t support them anyway.
Detailed Upgrade Options: What’s Possible in 2025

RAM Upgrades: The Most Impactful Change
Upgrading RAM delivers immediate, noticeable performance improvements across virtually all computing tasks. Applications launch faster, multitasking becomes smoother, browser tabs don’t reload constantly, and memory-intensive applications like photo editors and virtual machines run without choking.
RAM Capacity Guidelines for 2025:
- 8GB: Bare minimum for basic web browsing and office work—not recommended for new purchases
- 16GB: Sweet spot for general productivity, media consumption, light content creation, and casual gaming
- 32GB: Excellent for serious multitasking, content creation, development work, and running virtual machines
- 64GB+: Professional workloads, heavy virtualization, extensive home lab environments, and future-proofing
When upgrading RAM, ensure you match the memory type supported by your mini PC. DDR4 and DDR5 are physically different and not interchangeable. Check your motherboard specifications for maximum supported speed (measured in MHz) and whether the system benefits from dual-channel configuration using matched pairs.
In my testing, I’ve discovered that moving from single-channel 8GB to dual-channel 16GB (2×8GB) can improve performance by 15-25% in CPU-bound tasks and integrated graphics workloads. The dual-channel configuration allows the memory controller to access both modules simultaneously, effectively doubling memory bandwidth.
Storage Upgrades: Speed and Capacity
Storage upgrades impact both system responsiveness and available space for files and applications. The performance difference between storage technologies is substantial and immediately noticeable in daily use.
Storage Performance Comparison:
- SATA SSD: 500-550 MB/s read/write speeds
- NVMe PCIe Gen 3: 1,500-3,500 MB/s read/write speeds
- NVMe PCIe Gen 4: 5,000-7,400 MB/s read/write speeds
- NVMe PCIe Gen 5: 10,000-14,000 MB/s read/write speeds (available in latest 2025 models)
Upgrading from a 256GB or 512GB drive to 1TB or 2TB eliminates constant storage management headaches. Modern 2TB NVMe drives cost $100-200 in 2025, making capacity upgrades affordable. Some enthusiasts install 4TB or even 8TB NVMe drives in mini PCs, creating impressive storage in tiny form factors.
Multiple M.2 slots enable creative configurations including fast NVMe for OS and applications, second NVMe for games or creative projects, and 2.5-inch SATA SSD for bulk storage or backups. This tiered approach balances performance, capacity, and cost effectively.
Pro Tip: When upgrading storage, clone your existing drive to the new one using software like Macrium Reflect or Clonezilla before physically swapping drives. This preserves your Windows installation, applications, and settings, avoiding the need to reinstall everything from scratch.
External GPU (eGPU) Solutions
External GPUs represent the most ambitious mini PC upgrade, connecting desktop-class graphics cards to mini PCs via Thunderbolt 3/4 or USB4 connections. This setup enables gaming, 3D rendering, video editing, and other GPU-accelerated tasks that integrated graphics cannot handle.
eGPU Requirements:
- Mini PC with Thunderbolt 3/4 or USB4 port (not all USB-C ports support this)
- eGPU enclosure ($200-400) with built-in power supply
- Desktop graphics card (RTX 4060 through RTX 4090, or AMD equivalents)
- Thunderbolt cable (usually included with enclosure)
Thunderbolt 3/4 provides 40 Gbps bandwidth, sufficient for most gaming scenarios though with some performance penalty compared to internal desktop GPU installations. Expect 10-20% reduced performance due to bandwidth limitations and overhead, but you’ll still achieve dramatically better graphics than integrated solutions.
Popular eGPU enclosures in 2025 include the Razer Core X ($300-350), Sonnet eGFX Breakaway Box ($250-350), Mantiz MZ-02 ($280-320), and ASUS ROG XG Mobile (for specific ASUS mini PCs). These enclosures accommodate full-sized graphics cards and provide adequate cooling and power delivery.
However, eGPUs introduce complexity and additional cost. The total investment—enclosure plus graphics card—easily reaches $600-1,200, approaching or exceeding the cost of the mini PC itself. For users primarily interested in gaming or GPU-intensive work, traditional desktop towers with internal graphics cards often make more economic sense.
Based on my testing experience, eGPUs work best for users who already own mini PCs and want occasional graphics boost, or users who value portability and can disconnect the eGPU when traveling with the mini PC.
External Storage Expansion
While not technically an “upgrade,” external storage dramatically expands mini PC capacity without opening the chassis. Modern USB 3.2 Gen 2 (10 Gbps) and Thunderbolt connections provide sufficient bandwidth for fast external drives.
Options include external NVMe enclosures connected via Thunderbolt or USB-C, offering speeds approaching internal drives, USB 3.2 external SSDs providing 500-1,000 MB/s speeds, traditional external HDDs for cost-effective bulk storage, and NAS (Network Attached Storage) for shared storage accessible by multiple devices.
Thunderbolt 4 docks expand connectivity further, adding multiple USB ports, display outputs, Ethernet, audio, and SD card readers through a single cable to the mini PC. This creates desktop-like connectivity for mini PCs while maintaining the ability to quickly disconnect and relocate the unit.
Mini PC Upgrade Comparison Table
| Component | Typical Upgradeability | Performance Impact | Difficulty Level | Cost Range (2025) |
|---|---|---|---|---|
| RAM | High (if not soldered) | High for multitasking and memory-intensive apps | Easy | $30-$200 |
| NVMe SSD | Very High (most models) | High for system speed and storage capacity | Easy | $50-$400 |
| 2.5″ SATA Drive | Moderate (model-dependent) | Moderate for storage capacity | Easy | $40-$200 |
| Wi-Fi Card | Moderate (model-dependent) | Moderate for wireless speed | Moderate | $15-$50 |
| CPU | None (soldered) | N/A—cannot upgrade | Impossible | N/A |
| Integrated GPU | None (part of CPU) | N/A—cannot upgrade | Impossible | N/A |
| External GPU | Requires Thunderbolt | Very High for graphics tasks | Moderate-Hard | $400-$1,200+ |
| External Storage | Universal (USB/Thunderbolt) | Moderate to High for capacity | Very Easy | $50-$500+ |
Step-by-Step Guide: Upgrading RAM in Your Mini PC
Upgrading RAM is the most common and impactful mini PC upgrade. Here’s the complete process:
Step 1: Verify Compatibility
- Check your mini PC model specifications for maximum RAM capacity and type (DDR4 vs DDR5)
- Confirm your model uses SO-DIMM slots rather than soldered RAM
- Note the maximum speed supported (e.g., DDR4-3200, DDR5-5600)
- Determine whether you have one or two RAM slots available
Step 2: Purchase Compatible RAM
- Buy RAM matching your system’s specifications (DDR4 or DDR5, correct speed)
- For best performance, purchase matched pairs (2×8GB or 2×16GB) for dual-channel operation
- Reputable brands include Crucial, Kingston, Corsair, G.Skill, and Samsung
- Verify the return policy in case of compatibility issues
Step 3: Prepare Your Workspace
- Power down your mini PC completely and unplug all cables
- Wait 5-10 minutes for any residual charge to dissipate
- Work on a clean, static-free surface (avoid carpets)
- Ground yourself by touching a metal surface before handling components
- Gather a small Phillips-head screwdriver
Step 4: Access the RAM Slots
- Remove the bottom panel screws (typically 4-6 screws)
- Carefully lift the bottom panel—some models have clips or ribbon cables to watch for
- Locate the SO-DIMM slots (usually clearly visible, often with existing RAM installed)
- Take a photo of the interior for reference during reassembly
Step 5: Remove Existing RAM (if replacing)
- Gently push the metal retention clips outward on both sides of the RAM module
- The module will pop up at a 30-45 degree angle
- Carefully pull the module straight out from the slot
- Repeat for the second module if replacing both
- Set removed modules aside on a static-free surface
Step 6: Install New RAM
- Hold the new RAM module by its edges, avoiding the gold contacts and chips
- Align the notch in the module with the key in the slot (it only fits one way)
- Insert the module at a 30-45 degree angle into the slot
- Gently but firmly press down until the retention clips snap into place with an audible click
- Repeat for the second module if installing dual-channel configuration
Step 7: Reassemble and Test
- Replace the bottom panel and secure all screws
- Reconnect all cables (power, display, peripherals)
- Power on the mini PC and immediately enter BIOS (usually F2, F10, or Del key during startup)
- Verify the system recognizes the new RAM capacity and speed
- Allow Windows to boot and check System Information to confirm total RAM
Step 8: Verify Performance
- Open Task Manager (Ctrl+Shift+Esc) and check the Performance tab under Memory
- Confirm the correct amount of RAM appears and dual-channel mode is active
- Run a memory test using Windows Memory Diagnostic or MemTest86 (optional but recommended)
- Monitor system performance during typical usage to ensure stability
Important Warning: Opening your mini PC may void the manufacturer warranty. Check your warranty terms before proceeding, or wait until the warranty period expires before upgrading. Some manufacturers explicitly allow user upgrades without voiding warranties—check documentation carefully.
Step-by-Step Guide: Upgrading Storage in Your Mini PC
Storage upgrades are slightly more involved than RAM but still manageable for most users.
Step 1: Choose Your Storage
- Identify your mini PC’s M.2 slot type (usually 2280, meaning 22mm wide × 80mm long)
- Confirm PCIe generation supported (Gen 3 or Gen 4—Gen 4 drives work in Gen 3 slots but at reduced speed)
- Select capacity based on needs (512GB, 1TB, 2TB, or 4TB most common in 2025)
- Popular reliable brands include Samsung (980 Pro, 990 Pro), Western Digital (SN850X), Crucial (P5 Plus), and SK hynix (Platinum P41)
Step 2: Back Up Your Data
- Create a complete backup of your current drive to external storage
- Consider cloning your existing drive to the new drive before installation (easier than reinstalling Windows)
- Use cloning software like Macrium Reflect Free, Acronis True Image, or Samsung Data Migration
- Connect the new drive via USB M.2 enclosure for cloning before internal installation
TechRadar best mini PCs roundup
Step 3: Prepare for Installation
- Power down and unplug the mini PC
- Remove the bottom panel following the same process as RAM upgrade
- Locate the M.2 slots (usually marked M.2_1, M.2_2, etc.)
- Identify which slot is currently occupied (if any)
Step 4: Remove Existing Drive (if replacing)
- Remove the small screw securing the drive at the far end (opposite the connector)
- Carefully pull the drive straight out of the M.2 slot at a slight angle
- Store the removed drive safely or in an external enclosure for continued use
Step 5: Install New Drive
- Hold the new drive by its edges, avoiding the components and gold connector
- Align the notches on the drive with the keys in the M.2 slot
- Insert the drive at a 30-degree angle into the slot, sliding it fully into the connector
- Gently press the far end down flat against the motherboard
- Secure the drive with the retaining screw (don’t overtighten—finger-tight plus a quarter turn is sufficient)
Step 6: Boot and Initialize
- Replace the bottom panel and reconnect cables
- Power on the mini PC
- If you cloned the drive, it should boot normally into Windows
- If installing a blank drive alongside existing storage, boot into Windows and use Disk Management to initialize and format the new drive
- For fresh Windows installation, boot from Windows installation media and follow the setup wizard
Step 7: Verify Performance
- Use CrystalDiskMark or similar software to test read/write speeds
- Confirm speeds match the drive’s specifications (accounting for PCIe generation limitations)
- Check that Windows recognizes the full capacity of the drive
- Monitor temperatures during use—most NVMe drives include temperature sensors
Which Mini PC Models Offer the Best Upgradeability?
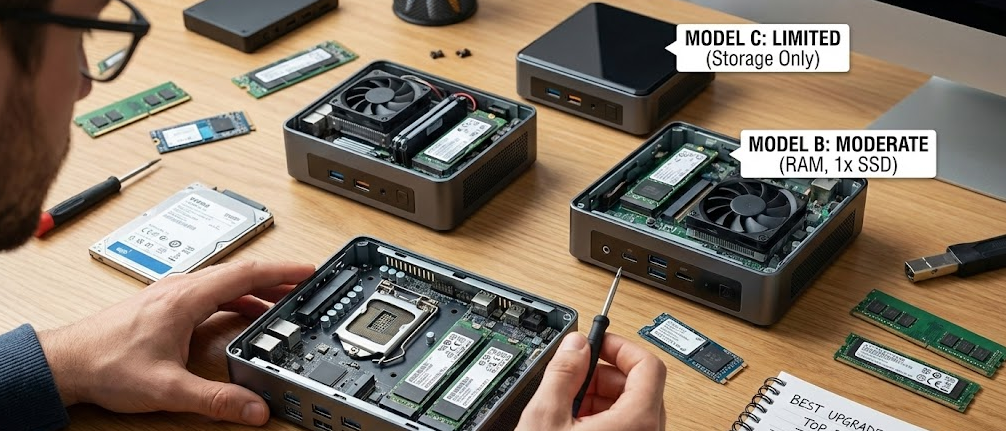
Not all mini PCs are created equal when it comes to upgrade potential. Some models prioritize user accessibility while others sacrifice upgradeability for compact size or cost savings.
Highly Upgradable Models (2025):
- Minisforum MS-01: Six M.2 slots, dual SO-DIMM (up to 96GB), dual 2.5GbE, excellent for home servers
- ASUS NUC 14 Pro: Dual SO-DIMM (up to 96GB DDR5), two M.2 slots, replaceable Wi-Fi, Thunderbolt 4
- Beelink GTi14 Ultra: Dual SO-DIMM (up to 96GB), multiple M.2 slots, good internal access
- Geekom GT13 Pro: Dual SO-DIMM (up to 64GB), two M.2 slots, user-friendly interior layout
- HP EliteDesk 800 G9 Mini: Enterprise-grade with excellent upgrade access, dual SO-DIMM, multiple storage options
Moderately Upgradable Models:
- Minisforum UM790 Pro: Dual SO-DIMM (up to 64GB), dual M.2 slots, decent access
- Beelink SER7/SER8: Dual SO-DIMM, two M.2 slots, standard upgradeability
- GMKtec NucBox series: Dual SO-DIMM, one or two M.2 slots depending on model
- Lenovo ThinkCentre M90q: Dual SO-DIMM, one M.2 + one 2.5″ bay
Limited Upgradeability Models:
- Budget Intel N100 units under $200: Often soldered RAM, single M.2 slot, minimal expansion
- Ultra-compact models prioritizing size: Reduced internal space limits upgrade options
- Apple Mac Mini: Soldered RAM (non-upgradable), soldered storage (non-upgradable), closed ecosystem
When shopping for mini PCs, upgradeability should factor into your decision if you plan to keep the system for 4+ years or anticipate changing needs. Paying slightly more upfront for a model with better upgrade potential often proves more economical than replacing the entire unit when requirements change.
Common Mini PC Upgrade Mistakes to Avoid
Buying Incompatible RAM
DDR4 and DDR5 are physically different and not interchangeable. Installing the wrong type is impossible (the notch positions differ), but purchasing the wrong type wastes money. Additionally, exceeding your motherboard’s maximum supported speed provides no benefit—a DDR5-6400 module will simply run at DDR5-5600 if that’s your system’s limit.
Ignoring Dual-Channel Configuration
Installing a single RAM module or mismatched modules sacrifices performance. Always install RAM in matched pairs (same capacity, speed, and preferably brand) to enable dual-channel operation, which effectively doubles memory bandwidth and significantly improves integrated graphics performance.
Choosing Wrong M.2 Form Factor
M.2 drives come in multiple lengths—2230 (30mm), 2242 (42mm), 2260 (60mm), and 2280 (80mm). Most mini PCs support 2280, but some compact models only accept 2242 or 2230. Buying a drive that’s too long means it won’t physically fit.
Overlooking PCIe Generation
PCIe Gen 4 drives cost more than Gen 3 but provide limited benefit in Gen 3 slots (they’ll work but at Gen 3 speeds). Conversely, Gen 3 drives in Gen 4 slots leave performance on the table. Match your drive to your system’s capabilities for optimal price-performance.
Forgetting to Back Up Before Storage Upgrades
Unexpected issues during storage upgrades can result in data loss. Always maintain current backups before opening your mini PC and working with storage. The 10 minutes spent backing up can save hours of recovery effort or permanent data loss.
Voiding Warranty Unnecessarily
Some manufacturers explicitly allow user upgrades without warranty implications, while others void warranties the moment you remove the bottom panel. Check warranty terms before proceeding, and consider waiting until the warranty period expires if the terms are unclear or restrictive.
External GPU Setup: Detailed 2025 Guide
eGPUs represent the most complex and expensive upgrade path but deliver transformative graphics performance for supported mini PCs.
Compatibility Requirements:
- Thunderbolt 3, Thunderbolt 4, or USB4 port on your mini PC (standard USB-C ports don’t provide sufficient bandwidth)
- Windows 10/11 or macOS (Linux support exists but requires more configuration)
- Sufficient power delivery from your mini PC to the Thunderbolt port
- Updated Thunderbolt firmware and drivers
Choosing an eGPU Enclosure:
Consider enclosure size (ensure your chosen GPU fits), power supply wattage (minimum 400W for mid-range GPUs, 500-650W for high-end), cooling quality (better cooling equals better sustained performance), and connectivity options (additional USB ports, Ethernet, etc.).
Leading options in 2025 include Razer Core X ($300-350) supporting up to RTX 4090, 650W PSU, excellent build quality; Sonnet eGFX Breakaway Box 750 ($350-400) with 750W PSU for power-hungry GPUs; and Mantiz MZ-02 ($280-320) offering good value with 550W PSU and extra ports.
Installation Process:
- Purchase compatible eGPU enclosure and desktop graphics card
- Install graphics card into enclosure following manufacturer instructions
- Connect enclosure to mini PC via Thunderbolt cable
- Power on enclosure, then power on mini PC
- Install GPU drivers from NVIDIA or AMD website
- Configure Windows to use eGPU for specific applications or as primary graphics
Performance Expectations:
- 10-20% performance reduction compared to internal desktop installation due to Thunderbolt bandwidth limitations
- Some games and applications may require specific settings to utilize eGPU
- Laptop/mini PC display may see larger performance penalty than external monitors connected directly to eGPU
- Not all applications automatically detect and use eGPU—may require manual configuration
Embed YouTube Video Here: “Yes, you can upgrade a mini PC. These are the parts to look at” from PCWorld – This video provides visual demonstrations of actual mini PC upgrades including RAM, storage, and eGPU setup that complement the written instructions.
When Upgrading Doesn’t Make Sense
Despite upgrade possibilities, sometimes replacement makes more financial sense than upgrading an aging mini PC.
Consider replacement instead of upgrading when your CPU is 5+ years old and bottlenecking performance even with maximum RAM and fast storage, you’re hitting fundamental limitations like lack of Thunderbolt for eGPU, insufficient M.2 slots, or soldered RAM, the cost of desired upgrades approaches 50-75% of a new mini PC with better specifications, or your current mini PC lacks modern connectivity like USB 3.2, Wi-Fi 6, or 2.5GbE that newer models include standard.
For example, upgrading a 5-year-old Intel i5-8250U mini PC with 8GB soldered RAM and single M.2 slot offers limited value. Even adding maximum storage doesn’t address the CPU limitation, soldered RAM bottleneck, or outdated connectivity. A new $500-600 mini PC with modern Ryzen 7 or Intel i7, 32GB upgradable RAM, dual M.2 slots, Wi-Fi 6E, and 2.5GbE networking delivers dramatically better experience and future upgrade potential.
From My Experience: I recently evaluated whether to upgrade my 4-year-old Intel N5105 mini PC or replace it. Upgrading to 16GB RAM and 1TB NVMe would cost $120, but the CPU still struggled with video editing and VM workloads. A new Ryzen 7 7840HS mini PC at $650 provided 400% better CPU performance, better graphics, modern connectivity, and room for future upgrades—making replacement the smarter investment despite the higher upfront cost.