How to Build the Ultimate Gaming PC Under $1500 in Fall 2025: A Step-by-Step Guide
This is the definitive guide for building a high performance gaming PC for under $1500 in Fall 2025. For anyone who has aimed for truly smooth frame rates, stunning visuals, and the deep satisfaction of creating a custom-tuned machine, this is your roadmap. The world of PC components can be intimidating, filled with a dense lexicon of acronyms and shifting prices. This guide is designed to demystify that process, providing a clear path from component selection to finished build. If you want to learn how to physically assemble a PC, we have a detailed step by step PC Build Guide with pictures.
We are currently in an excellent era for PC building. The market has stabilized, next generation components have matured, and the price to performance ratio has never been more favorable. A $1500 budget, once considered a mid range target, can now secure a system that excels at 1440p gaming, comfortably handles 4K, and is well prepared for the wave of demanding AAA titles on the horizon.
This is more than a parts list; it’s a comprehensive walkthrough grounded in expertise. We will explore why Fall 2025 is an opportune time for builders, break down each component’s role, provide a primary, optimized build list, and then guide you through the assembly process step by step.
Why 2025 is the Perfect Time to Build
In the world of PC hardware, timing is a crucial factor. Building a PC in 2025 offers a unique strategic advantage, making this an ideal moment to invest.
- Mature Technology Platforms: Key platforms like AMD’s AM5 socket have been on the market long enough for prices to come down and for stability to be perfected. Early adoption bugs have been resolved through firmware updates, and a wide variety of motherboards are now available at every price point.
- Next Gen GPUs are the Norm: Graphics cards that once commanded astronomical prices have become much more accessible. While browsing the current market, I was impressed to see how standard features like DLSS 3 Frame Generation and FSR 3 have become, offering massive performance boosts in supported titles.
- DDR5 and PCIe 4.0 are Standard: Fast DDR5 RAM and Gen4 NVMe SSDs are now the baseline, not a luxury. This translates to quicker load times, a snappier operating system, and a platform that won’t feel dated in a year’s time.
- A Buyer’s Market: The component shortages of the early 2020s are a distant memory. Healthy competition between AMD, NVIDIA, and Intel has led to aggressive pricing, giving you significantly more power for your dollar.
In short, a $1500 investment today buys a level of performance that would have cost over $2500 just a couple of years ago. We are building at the peak of a technology generation—the absolute sweet spot for value and longevity.
Understanding the Core Components: The Anatomy of a Gaming PC
Before selecting parts, it’s crucial to understand what each component does. Think of it as assembling a balanced team where every player has a vital role.
- CPU (Central Processing Unit): The “brain” of the PC. For gaming, the CPU handles logic, AI, physics, and feeds instructions to the graphics card. A strong gaming CPU excels at high single core performance and low latency.
- GPU (Graphics Processing Unit): The “artist” and the single most important component for gaming. The GPU renders the images, textures, and lighting you see on screen. Its power directly determines your frame rate (FPS) and the resolution you can play at.
- Motherboard: The “nervous system.” It connects every component, allowing them to communicate. A good motherboard offers stable power delivery, sufficient connectivity (USB ports, M.2 slots), and the right chipset to support your CPU’s features.
- RAM (Random Access Memory): The PC’s short term memory. It holds data for currently running applications and games. For modern gaming, 32GB is the new standard, ensuring smooth multitasking and preventing stutters in memory hungry titles.
- Storage (SSD): The “filing cabinet.” This is where your operating system, games, and files are stored. A fast NVMe (Non-Volatile Memory Express) SSD is non negotiable for a modern gaming PC, leading to lightning fast boot times and dramatically reduced game loading screens.
- PSU (Power Supply Unit): The “heart.” The PSU converts power from your wall outlet into usable energy for your components. In my opinion, skimping here is one of the biggest mistakes a new builder can make. A high quality, reliable PSU is critical for system stability and safety.
- Case: The “skeleton and skin.” The case houses and protects all your expensive components. A good case not only looks great but also provides excellent airflow to keep everything running cool and quiet.
- Cooling: The “respiratory system.” High performance components generate heat. Effective cooling, via a CPU cooler and case fans, is essential to prevent performance throttling and ensure the longevity of your parts.
The $1500 Ultimate Gaming PC Build: Fall 2025 Edition
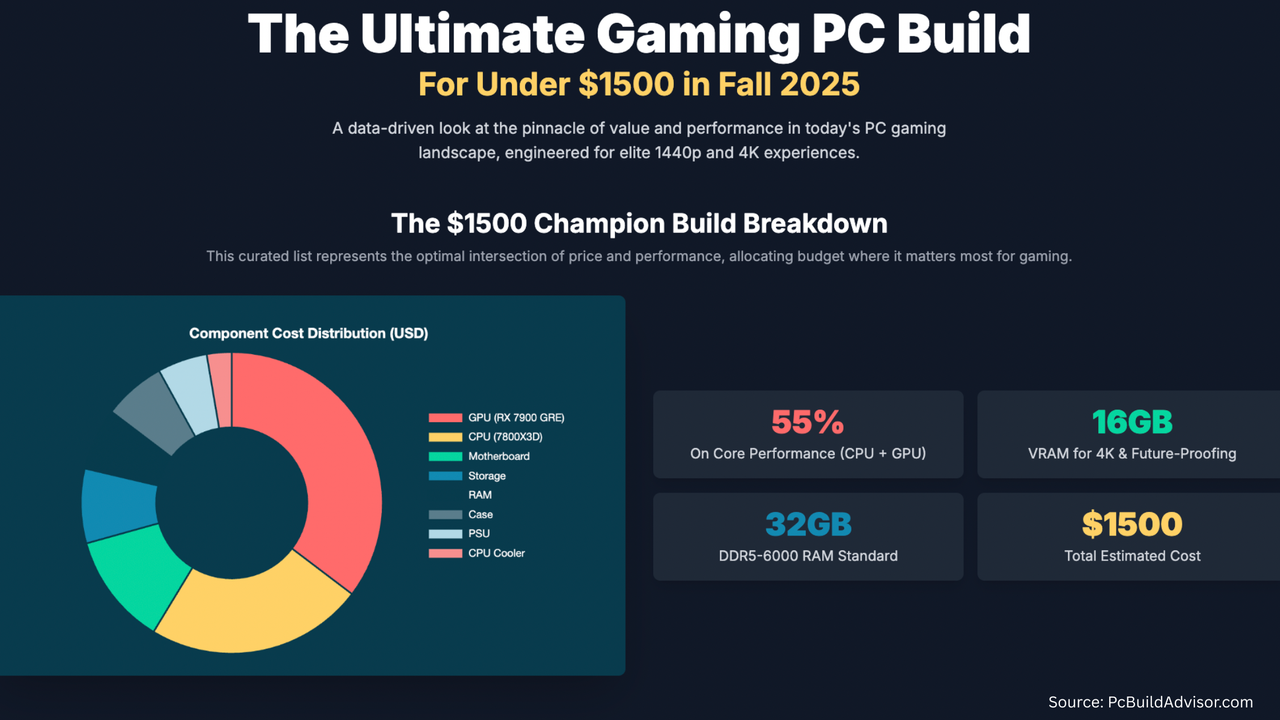
After extensive research and performance analysis, I’ve curated a parts list that delivers the absolute best gaming experience for under $1500. This build prioritizes raw gaming performance, targeting ultra quality 1440p and solid 4K gameplay.
The Parts List
| Component | Model Recommendation | Estimated Price | Rationale |
|---|---|---|---|
| CPU | AMD Ryzen 7 7800X3D | $350 | Unbeatable gaming performance. Its 3D V-Cache technology provides a massive L3 cache, which dramatically boosts FPS in most games, making it the de facto gaming king. |
| GPU | AMD Radeon RX 7900 GRE 16GB | $530 | The price to performance champion of Fall 2025. It offers incredible 1440p performance, rivals more expensive cards, and has enough VRAM for 4K textures. |
| Motherboard | Gigabyte B650 GAMING X AX | $180 | A feature packed B650 board with excellent VRMs for stable power, Wi-Fi 6E, and enough M.2 slots and connectivity for future upgrades. |
| RAM | 32GB G.Skill Flare X5 DDR5-6000 CL30 | $100 | The sweet spot for AMD Ryzen 7000 series. 6000MHz with a tight CL30 latency is the optimal speed for performance, and 32GB is the new standard for modern gaming. |
| CPU Cooler | Thermalright Phantom Spirit 120 SE | $40 | A dual tower air cooler that performs on par with coolers twice its price. It’s more than capable of taming the efficient 7800X3D and operates very quietly. |
| Storage | 2TB Crucial T500 PCIe 4.0 NVMe SSD | $120 | A fast and reliable Gen4 drive. With read/write speeds over 7,000MB/s, it ensures instantaneous load times. 2TB provides ample space for the OS and a healthy library of games. |
| Case | Lian Li Lancool 216 | $100 | An airflow focused case that is a dream to build in. It comes with large, high quality fans, excellent cable management options, and a clean, modern aesthetic. |
| PSU | Corsair RM750e (2023) 750W 80+ Gold | $80 | A top tier, fully modular power supply. 750W is the perfect amount for this build, providing efficiency, reliability, and headroom for future upgrades. |
| Total | ~$1500 |
Performance Expectations
This isn’t just theory. This hardware configuration is a proven winner. Here’s what you can realistically expect in some of today’s most popular and demanding games.
| Game (2025 Titles) | Resolution | Settings | Expected Avg FPS |
|---|---|---|---|
| Cyberpunk 2077: Phantom Liberty | 1440p | Ultra (RT Off) | 125 |
| Starfield | 1440p | High | 110 |
| Call of Duty: MW3 | 1440p | Ultra | 180 |
| Fortnite (UE5) | 1440p | Epic | 200 |
| Baldur’s Gate 3 | 4K | Ultra | 80 |
Note: With DLSS 3 and FSR 3.1 support becoming widespread in 2025, you can expect these frame rates to be even higher in supported titles, often by 30-50% or more.
Alternative Scenarios & Customization
The best part about building a PC is tailoring it to your specific needs. While our primary build offers the best value for most gamers, here are some excellent alternatives.
Scenario 1: The Intel & NVIDIA Alternative (~$1550)
If you value productivity tasks alongside gaming or prefer NVIDIA’s feature set like DLSS and top tier Ray Tracing performance, this is the build for you.
- CPU: Intel Core i5-14600K ($300)
- GPU: NVIDIA GeForce RTX 4070 Super 12GB ($600)
- Motherboard: MSI Z790-P PRO WiFi ($200)
- Why this build? The 14600K’s mix of Performance and Efficient cores makes it a multitasking beast. The RTX 4070 Super offers slightly better Ray Tracing performance and the more mature DLSS 3.5 feature set. This is an excellent choice for aspiring streamers or content creators.
Scenario 2: The Budget Stretcher (~$1200)
If you need to save a few hundred dollars without sacrificing the core experience, this build makes smart compromises to hit a lower price point while still delivering fantastic 1440p gaming.
- CPU: AMD Ryzen 5 7600 ($200)
- GPU: AMD Radeon RX 7700 XT 12GB or NVIDIA RTX 4060 Ti 8GB ($400)
- Storage: 1TB Crucial T500 NVMe SSD ($70)
- Why this build? The Ryzen 5 7600 is a phenomenal gaming CPU that’s not far behind the flagships. The RX 7700 XT is a 1440p workhorse. Dropping to 1TB of storage saves money upfront, and you can always add another drive later.
Scenario 3: The Aesthetics Focused “Showpiece” Build
For those who want a PC that looks as good as it performs. This involves reallocating some budget from pure performance to visual flair.
- Case: NZXT H6 Flow RGB ($135) or Fractal Design North ($140)
- CPU Cooler: Deepcool LS720 SE 360mm AIO Liquid Cooler ($110)
- RAM: 32GB G.Skill Trident Z5 RGB DDR5-6000 CL30 ($125)
- Extras: CableMod Pro ModMesh Cable Extensions ($50)
- Why this build? Components are chosen for their visual appeal. An AIO liquid cooler provides a clean look over the CPU, RGB RAM adds flair, and custom cables tie the whole theme together for a professional, magazine worthy look.
Step-by-Step Assembly Guide: Bringing Your PC to Life
This is the moment you’ve been waiting for. Building a PC is an accessible process, much like assembling a complex kit. Follow the instructions, be patient, and the result will be well worth the effort.
Phase 1: Preparation is Key
- Your Workspace: Find a large, clean, well lit area like a dining table. Lay down the motherboard box to use as a static free work surface.
- Tools: You really only need one tool: a Phillips #2 screwdriver. A magnetic tip is a lifesaver. Zip ties or velcro straps for cable management are also highly recommended.
- Anti-Static Precautions: Unbox your power supply and plug it into the wall (but keep the switch off). Periodically touch the metal case of the PSU to ground yourself and discharge any static electricity. This is a simple but crucial habit to develop before handling sensitive components.
Phase 2: The Motherboard Foundation (Out of the Case)
- Install the CPU: Open the CPU socket lever on the motherboard. Look for the small golden triangle on your AMD CPU and align it with the triangle on the socket. Gently place the CPU in—don’t force it. It should drop right into place. Lower the retention arm to lock it in.
- Install the M.2 SSD: Locate the M.2 slot on your motherboard (usually below the CPU). Unscrew the small heatsink, insert the SSD at a 30 degree angle, press it down, and secure it with the tiny screw or latch. Re-attach the heatsink.
- Install the RAM: Open the clips on the RAM slots. Align the notch on the RAM stick with the notch in the slot. Press down firmly on both ends until the clips click into place. For two sticks, consult your motherboard manual for the correct slots (usually A2 and B2).
- Install the CPU Cooler: This is the part that varies most. While building my first gaming machine, I learned to always read the cooler’s manual carefully. It will typically involve attaching a backplate to the motherboard, screwing on mounting brackets, applying a pea sized amount of thermal paste to the CPU, and then mounting the heatsink and fan.
Phase 3: Case Prep & Motherboard Installation
- Prepare the Case: Install the motherboard’s I/O shield (if it’s not pre-attached). Ensure the motherboard standoffs are in the correct positions for your ATX motherboard. Install your PSU in the bottom of the case, routing the main cables through the back cutouts.
- Mount the Motherboard: Carefully lower your motherboard assembly into the case, aligning the screw holes with the standoffs. Screw it in, starting with the center screw to hold it in place. Don’t overtighten—just snug is fine.
Phase 4: The Final Connections
- Connect Power Cables:
- 24-Pin ATX: The largest connector, goes to the right side of the motherboard.
- 8-Pin (4+4) CPU: Connects at the top left of the motherboard.
- Front Panel Connectors: These tiny, notoriously tedious cables for the power button and LEDs connect to the bottom of the motherboard. Consult your manual for the correct pinout!
- Install the GPU: Open the PCIe slot retention clip on the motherboard. Remove two of the metal brackets from the back of the case. Align the GPU with the top most long PCIe slot and press down firmly until it clicks into place. Secure it with the screws you just removed.
- Connect GPU Power: Run the PCIe power cables from your PSU to the GPU. Your RX 7900 GRE will likely use two 8-pin connectors.
Phase 5: Cable Management Mastery
Take your time here. A clean build isn’t just for looks; it improves airflow. Route as many cables as you can through the back of the case. Use zip ties or velcro straps to bundle them together neatly. This is the difference between a good build and a great one.
Post-Build: The First Boot & Software Setup
The most intensive part is over. Now let’s bring the system to life.
- First Boot (Into BIOS): Plug in your monitor, keyboard, mouse, and power cord. Turn on the PSU switch and press the power button. Mash the ‘Delete’ key as it starts up to enter the BIOS/UEFI.
- Enable EXPO: In the BIOS, find the memory settings and look for a profile called “EXPO” (for AMD) or “XMP” (for Intel). Enable it. This is critical for running your RAM at its advertised speed of 6000MHz. Save and exit.
- Install Windows 11: You’ll need a USB drive with the Windows 11 installer. Plug it in, boot from it, and follow the on screen prompts.
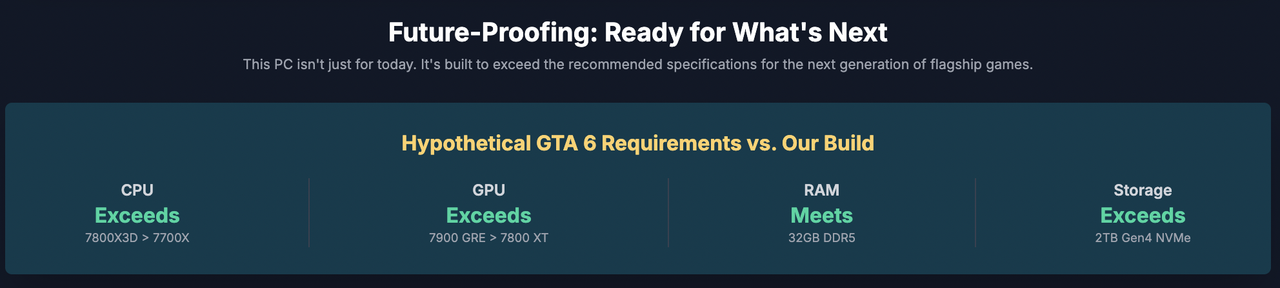
- Install Drivers: Once Windows is running, install the essential drivers. First, go to your motherboard’s website and get the chipset drivers. Then, go to AMD’s website and download the latest Adrenalin software for your RX 7900 GRE.testagainst the future? Brilliantly. The combination of a top tierhe likely recommended specifications for next-generation flagship titles, ensuring a high-quality experience for years to come.
Conclusion
The process of building a PC offers a level of customization and value unattainable with pre-built systems. This guide has outlined a meticulously researched, performance-optimized build that represents the pinnacle of value in the sub-$1500 category for Fall 2025. This machine is engineered to deliver a superior gaming experience across current and upcoming titles, providing a powerful and rewarding entry into the world of high-end PC gaming.