Skip to content
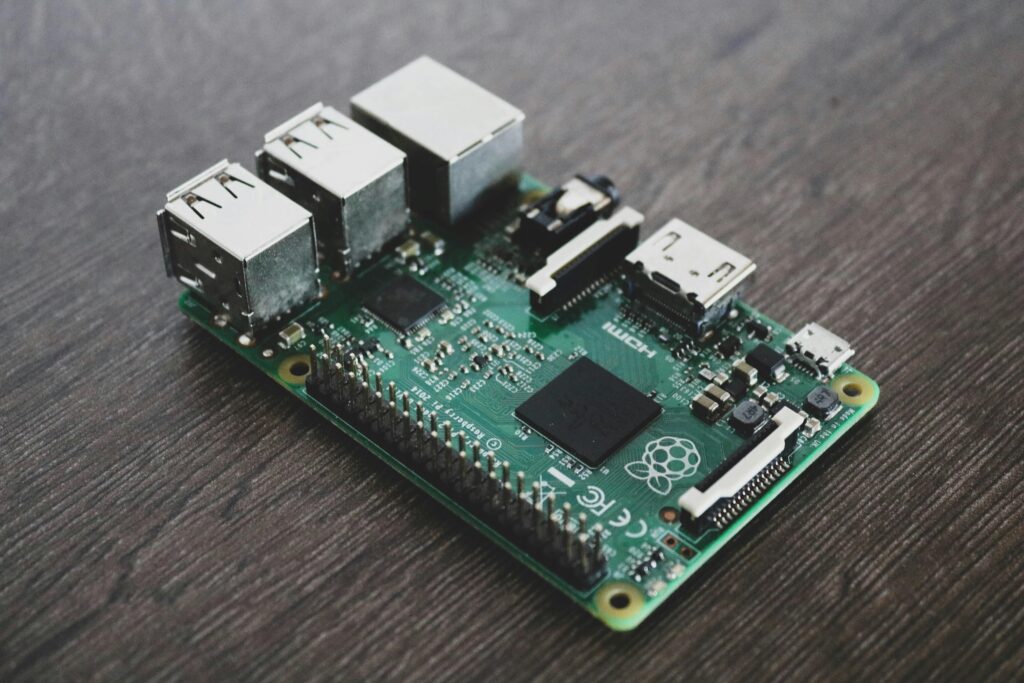
 Converting an old laptop screen into an external monitor for your mini PC requires purchasing an LCD controller board (also called an LVDS-to-HDMI converter board) that matches your laptop panel’s specifications—typically costing $25-50 in 2026. First, identify your laptop screen’s exact model number by removing the screen and checking the label on the back, which includes crucial details like resolution, size, and connector type (LVDS or eDP). Most laptop screens from 2010-2020 use 30-pin or 40-pin LVDS connections, while newer panels (2018+) increasingly use eDP (Embedded DisplayPort) connectors that offer better efficiency and higher resolution support. After obtaining the correct controller board kit—which includes the main board, power adapter, button controls, and necessary cables—you’ll connect the LVDS/eDP cable to your laptop panel, wire the backlight inverter, connect HDMI from your mini PC to the controller, and power everything with the included 12V adapter. The entire conversion process takes 1-2 hours for beginners and transforms your salvaged laptop screen into a fully functional secondary monitor. However, before investing time and money, consider that new portable USB-C monitors in 2026 start at $80-120 with plug-and-play convenience, often making the DIY approach more suitable for electronics enthusiasts, budget builds using screens you already own, or specialized projects requiring custom display solutions. The DIY conversion excels for learning electronics, creating ultra-thin mounted displays, or repurposing high-quality laptop panels (like 4K or OLED screens from premium laptops), but lacks the portability, warranty protection, and ease-of-use that commercial portable monitors provide.
Understanding Laptop Screen Technology (2026 Update)
How laptop screens differ from standalone monitors
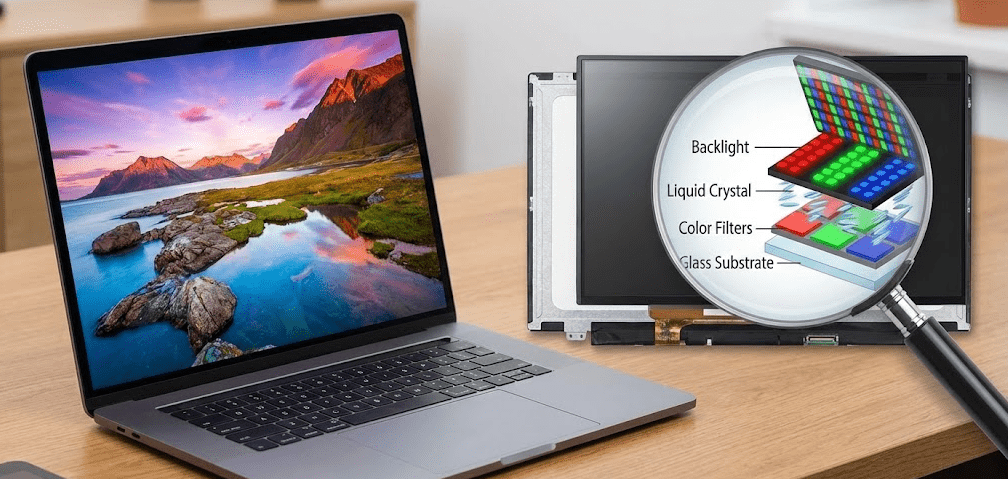
Laptop LCD panels are designed as integrated components rather than standalone displays. They lack the power supply, video input processing, and control electronics found in regular monitors. A laptop screen receives raw video signals through proprietary connectors (LVDS or eDP) directly from the laptop’s motherboard, along with separate power for the backlight system. Converting these panels requires adding external electronics that translate standard video signals (HDMI, DisplayPort, VGA) into the panel’s native format.
LVDS vs eDP: Understanding connector types
The connector type determines which controller board you need:
LVDS (Low-Voltage Differential Signaling): Common in laptops manufactured between 2008-2018. LVDS uses differential signaling with limited bandwidth, making it suitable for resolutions up to 1920×1080 at 60Hz. LVDS connectors typically have 30 or 40 pins arranged in dual rows with a simple latch mechanism. They transmit only video and clock signals, requiring separate backlight power connections.
eDP (Embedded DisplayPort): Standard in modern laptops from 2018 onward, especially those with QHD (2560×1440) or 4K (3840×2160) displays. eDP provides higher bandwidth, lower power consumption, and can carry audio signals alongside video. eDP connectors use 30, 40, or 50 pins with a flip-lock mechanism and support Panel Self-Refresh (PSR) technology that reduces power consumption. eDP-based controller boards cost $10-20 more than LVDS equivalents but enable higher refresh rates and resolutions.
Touch screen considerations: If your laptop had a touchscreen, the digitizer layer adds complexity. Touch functionality requires separate USB controllers and drivers. Most LCD controller boards don’t support touch input—you’d need specialized touch controller boards that cost $60-100 additional and require significant technical knowledge to implement.
Screen condition requirements: Before starting conversion, inspect your laptop screen for:
- Dead pixels: A few scattered dead pixels are acceptable, but clusters or lines indicate panel damage
- Backlight bleeding: Uneven brightness at edges (common in older panels, usually acceptable)
- Physical cracks: Any crack, even hairline, will spread and worsen—these panels are unusable
- Burn-in or image retention: Common in older OLED laptop screens but rare in LCDs
Pro Tip: “Before disassembling your laptop to extract the screen, test it one final time by booting the laptop. Take a photo of the BIOS screen or a pure white image—this confirms the panel works and provides reference for color/brightness after conversion. Many people discover panel issues only after completing the hardware conversion, wasting time and money on controller boards for defective screens.”
Method 1: Identify Your Laptop Screen Model
Accurate identification is critical because controller boards are panel-specific.
Step 1: Power down and disassemble
Completely shut down your laptop and disconnect the power adapter. Remove the battery if it’s removable. Most laptop screens are held by 4-8 small Phillips screws hidden under rubber bezels. Use a plastic spudger or guitar pick to carefully pry off the plastic bezel around the screen—start from a bottom corner and work around the perimeter. Don’t force it; bezels clip in place and require gentle, patient prying.
Step 2: Remove the screen
Once the bezel is off, you’ll see screws on the left and right sides of the metal screen frame (usually 4 total). Remove these screws and gently tilt the screen forward. You’ll see a cable connected at the bottom or back—this is the LVDS or eDP video cable. Disconnect it by lifting the locking tab (don’t pull the cable itself). There may be an additional cable for the backlight—disconnect this too.
Step 3: Locate the model number label
Flip the LCD panel over to examine the back. You’ll find one or more labels with various codes. Look for the manufacturer’s part number, which typically includes:
- Manufacturer code: Single letter indicating the maker (N = Chi Mei/Innolux, B = AUO, LP = LG, LTN = Samsung)
- Screen size: Usually 3 digits (156 = 15.6″, 140 = 14.0″, 173 = 17.3″)
- Model/revision codes: Additional letters and numbers
Common examples:
- N156B6-L0B = Chi Mei 15.6″ panel, model B6, revision L0B
- LP140WH2-TLE1 = LG 14.0″ WXGA HD panel, model WH2, revision TLE1
- B173RW01 V.3 = AUO 17.3″ panel, model RW01, version 3
Write down the complete part number exactly as printed.
Step 4: Identify connector type and pin count
Examine the connector on the back of the panel where the cable plugged in. Count the pins carefully—common configurations include 30-pin, 40-pin, or 50-pin. Note whether it’s a single-row or dual-row connector. Take clear photos of both the connector and the labels for reference when ordering the controller board.
Step 5: Verify specifications online
Search your panel model number on sites like PanelLook.com or the manufacturer’s database. Verify:
- Native resolution (1366×768, 1920×1080, 2560×1440, 3840×2160)
- Brightness (measured in nits/cd/m²)
- Contrast ratio
- Backlight type (WLED is standard; older panels may use CCFL)
- Connector type (LVDS or eDP) and pin configuration
This information is essential for ordering the correct controller board.
Method 2: Purchase the Right LCD Controller Board
Controller boards bridge the gap between standard video inputs and your laptop panel’s proprietary connector.
Understanding controller board types
Basic VGA boards ($15-25): Support only VGA input at resolutions up to 1920×1080. Suitable for older mini PCs or budget builds where HDMI isn’t required. These usually include basic OSD (On-Screen Display) controls for brightness and contrast.
HDMI + VGA boards ($25-40): The most popular option in 2026. Support HDMI 1.4 (up to 1080p@60Hz or 4K@30Hz) plus VGA fallback. Include audio pass-through for HDMI audio to external speakers. Feature OSD controls via included button panel.
HDMI + DisplayPort boards ($40-60): For higher-end panels with 4K resolution. Support HDMI 2.0 (4K@60Hz) and DisplayPort 1.2. Essential for panels with resolutions above 1920×1080. Some include USB-C input for direct connection to modern mini PCs.
Universal vs panel-specific boards: Universal boards claim to work with “any” LVDS panel by manually selecting resolution and timing via DIP switches or OSD menus. These are unreliable and often produce artifacts, incorrect colors, or unstable images. Always buy a board specifically designed for your exact panel model or at minimum one that lists your panel as compatible.
Where to buy in 2026
- eBay: Search “LCD controller board [your panel model]”. Expect 2-4 week shipping from Asian suppliers, but prices are lowest ($20-35 shipped).
- AliExpress: Similar selection to eBay with buyer protection. Verify seller ratings above 95%.
- Amazon: More expensive ($40-70) but faster shipping (3-7 days) and easier returns. Search “LCD controller kit [screen size] [resolution]”.
- Specialized retailers: Sites like LCDControllerBoard.com or Showtimearcademods.com offer curated selections with verified compatibility lists.
What’s included in the kit:
- LCD controller board (main PCB with video inputs and panel connectors)
- Power adapter (usually 12V 2A-3A with barrel connector)
- Button control panel (for OSD menu, power, input selection)
- LVDS or eDP cable (connects controller to panel)
- Inverter cable (for backlight power, if needed)
- Mounting screws and cable ties
What’s NOT included (buy separately):
- HDMI cable (to connect mini PC to controller)
- Speakers (if you want audio; most boards have 3.5mm or speaker pin connectors)
- Enclosure or stand (DIY required or purchase separately)
Verifying compatibility before purchase
Contact the seller with your panel model number and request confirmation of compatibility. Reputable sellers maintain compatibility databases and can verify before you order. If ordering a “universal” board, ensure it specifically lists your panel’s resolution and connector type as supported.
Method 3: Assemble the Hardware
Once you have the controller board and panel, assembly takes 30-60 minutes.
Step 1: Prepare your workspace
Work on a clean, flat surface covered with a soft cloth or towel to prevent scratching the LCD panel. Ground yourself by touching a metal object to discharge static electricity. Gather tools: small Phillips screwdriver, wire strippers/cutters if modifying cables, and masking tape for organizing cables.
Step 2: Connect the LVDS/eDP cable
The controller board kit includes a cable that connects the controller to your LCD panel. One end plugs into the controller board (usually labeled “LCD” or “PANEL”), and the other connects to the panel’s connector. Ensure the locking tab is in the open position, insert the cable with the contacts facing the correct direction (usually down), and press the locking tab closed. The cable should be fully seated with no exposed contacts visible.
Step 3: Connect backlight power
Most LCD panels have separate cables for the backlight. The backlight cable from the panel (usually 4-6 wires with a small white connector) connects to the inverter circuit. Modern controller boards have integrated inverters, so you’ll connect the panel’s backlight cable directly to the board’s inverter connector (often labeled “LAMP” or “BACKLIGHT”). Older panels with CCFL backlights may require external inverters, but WLED panels (standard since 2010) use the board’s built-in inverter.
Step 4: Connect the control buttons
The button control panel (power button, menu navigation, input selection) connects to the controller board via a ribbon cable or wire harness. These buttons will be your interface for adjusting brightness, contrast, selecting inputs, and powering the display on/off. Position the button panel where you can access it easily—it can be temporarily taped to the back of the LCD frame for testing.
Step 5: Connect power and video
Plug the 12V power adapter into the controller board’s DC jack. Connect an HDMI cable from your mini PC’s HDMI output to the controller board’s HDMI input. Don’t power anything on yet—verify all connections first.
Step 6: Initial power-on test
With everything connected, plug in the power adapter and press the power button on the control panel. You should see the backlight illuminate and the panel display the controller’s OSD menu or a “no signal” message. If the backlight comes on but there’s no image, double-check the LVDS/eDP cable connection. If nothing happens, verify power adapter voltage and polarity. If you see an image with wrong colors or scrambled video, the LVDS cable may be inserted backward or you have the wrong controller board for your panel.
Step 7: Connect to mini PC and test
Boot your mini PC and the panel should display the boot screen and desktop. The display may initially appear in the wrong resolution—this is normal. Access your mini PC’s display settings and select the native resolution of your panel (e.g., 1920×1080). Test the OSD buttons to adjust brightness, contrast, and other settings.
Method 4: Build an Enclosure or Stand
Your converted screen needs support and protection.
Option A: DIY cardboard or wood frame
Cut a backing board from cardboard, MDF, or thin plywood matching your panel’s dimensions. Attach the LCD panel to this backing using the original mounting holes and screws from the laptop. Mount the controller board to the back of this frame using double-sided tape or screws. Create a stand using an adjustable picture frame stand or a simple angled bracket. This approach costs $5-15 in materials and provides adequate protection for desk use.
Option B: 3D printed enclosure
If you have access to a 3D printer, search Thingiverse or Printables for “[your screen size] LCD enclosure” designs. Many users have shared STL files for popular panel sizes. These designs often include integrated stands, cable management, and mounting points for the controller board. Printing costs $10-20 in filament and produces a professional-looking result.
Option C: Commercial monitor enclosure
Purchase a universal LCD enclosure or “bare LCD frame” from Amazon or eBay ($30-60). These are designed for bare LCD panels and include front bezels, back covers, stands, and mounting hardware. Measure your panel dimensions carefully before ordering—enclosures are size-specific.
Option D: Acrylic or glass sandwich
Cut two pieces of acrylic or glass slightly larger than your panel. Sandwich the LCD between them with the front piece protecting the display surface. Use corner brackets or standoffs to hold the layers together. This creates an ultra-thin, frameless appearance popular for wall-mounting. Costs $20-40 depending on material quality.
Cable management considerations
Use cable ties or adhesive cable clips to secure the LVDS cable, power cables, and button panel wires to the back of your enclosure. This prevents stress on connectors and keeps everything tidy. Position the power adapter and controller board where they have adequate ventilation—these components generate heat during operation.
Method 5: Alternative—Use Laptop Wireless Display Feature
For certain scenarios, you don’t need hardware conversion at all.
When this method works
If you still have a functional laptop with an intact screen, you can use it as a wireless display for your mini PC without any hardware modifications. This approach works when:
- Your mini PC runs Windows 10/11 (source device)
- The laptop runs Windows 10/11 (display device)
- Both devices support Miracast (most 2015+ Windows devices do)
- Both are connected to the same Wi-Fi network
- You want a temporary display solution without opening hardware
Limitations of wireless display
- Noticeable latency (100-300ms) makes it unsuitable for gaming or video editing
- Lower video quality than wired connections due to compression
- Requires both devices to remain powered on (can’t salvage just the screen)
- Relies on stable Wi-Fi connection; interference causes stuttering
- Drains battery if the laptop isn’t plugged in
Setup process (Windows 11)
On the laptop you want to use as a display:
- Open Settings → System → Projecting to this PC
- Change the first dropdown to “Available everywhere” or “Available everywhere on secure networks”
- Under “Ask to project to this PC,” select “Every time a connection is required” or “First time only”
- Enable “Require PIN for pairing” for security (optional)
- Leave this settings page open—the laptop is now ready to receive
On your mini PC:
- Open Settings → System → Display
- Scroll to “Multiple displays” section
- Click “Connect to a wireless display”
- A sidebar appears searching for available devices
- Select your laptop’s name from the list
- On the laptop, approve the connection request
- The laptop screen now mirrors or extends your mini PC’s display
Adjusting display modes
Once connected, press Windows Key + P on your mini PC to choose display modes:
- PC screen only: Laptop screen stays blank (not useful here)
- Duplicate: Shows same content on both screens
- Extend: Laptop becomes second monitor, expanding desktop
- Second screen only: Only laptop displays output
For maximum screen space, choose “Extend” mode.
Disconnecting
Press Windows Key + K, select the laptop from the list, and click “Disconnect.” Or disconnect from the wireless display sidebar where you originally connected.
Comparing Conversion vs Buying New Portable Monitors (2026)
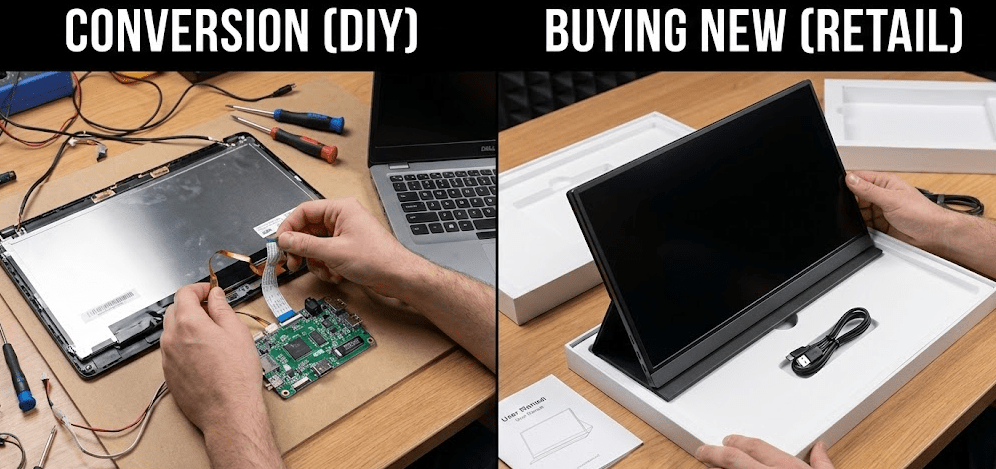
Cost comparison
DIY conversion total cost: $40-80
- LCD controller board: $25-50
- Enclosure materials: $10-25
- Cables (if not included): $5-10
- Assumes you already own the laptop screen
Commercial portable monitor: $80-250
- Budget 1080p USB-C portable monitor: $80-120
- Mid-range 1080p with stand and case: $120-180
- Premium 4K portable monitor: $200-350
- Top-rated portable monitors in 2026 like ASUS ZenScreen or LG Gram View offer USB-C connectivity, integrated batteries, protective cases, and 2-year warranties
Feature comparison
| Feature | DIY Converted Laptop Screen | Commercial Portable Monitor |
|---|---|---|
| Setup complexity | Moderate (1-2 hours, technical skills needed) | Plug-and-play (1 minute) |
| Portability | Poor (needs power adapter, bulky enclosure) | Excellent (thin, lightweight, travel case) |
| Video input | HDMI, VGA, sometimes DisplayPort | USB-C (video+power), HDMI, DisplayPort |
| Power requirements | AC power adapter required (12V 2A-3A) | USB-C bus-powered or integrated battery |
| Build quality | DIY dependent (varies greatly) | Professional with quality control |
| Warranty | None (DIY project risk) | 1-3 years manufacturer warranty |
| Touch support | No (requires expensive additional hardware) | Often included (especially premium models) |
| Stand/mount | DIY required | Integrated smart cover or adjustable stand |
| Aesthetics | DIY dependent (can look makeshift) | Professional design and finish |
| Resale value | Low ($10-30) | Moderate ($40-150 depending on model) |
| Learning value | High (understand display technology) | None (consumer product) |
When DIY conversion makes sense:
- You already have a high-quality laptop panel (4K, OLED, high color gamut)
- You’re building a custom desk setup with mounted displays
- Budget is extremely limited and you have time/skills
- You want to learn about display technology hands-on
- Your laptop screen is a rare size or aspect ratio not available commercially
- You’re creating a specialized project (arcade cabinet, car display, IoT device)
When buying new is better:
- You need portability for travel or flexible workspace arrangement
- Time is valuable and you want immediate plug-and-play functionality
- You lack technical skills or confidence working with electronics
- You want warranty protection and customer support
- Your laptop screen is common resolution (1366×768, 1920×1080) widely available new
- You need USB-C single-cable connectivity (video + power + data)
Troubleshooting Common Conversion Issues
Problem: Backlight works but no image displayed
Cause: LVDS/eDP cable connection issue, wrong controller board, or incorrect resolution setting.
Solution: Power off and reseat the LVDS cable on both ends—ensure locking tabs are fully engaged. Verify you ordered a controller board specifically compatible with your exact panel model. Access the controller’s OSD menu (using the button panel) and manually select your panel’s native resolution if it has resolution options.
Problem: Image appears with wrong colors (purple/green tint)
Cause: LVDS cable inserted backward or misaligned pins.
Solution: LVDS connectors are keyed but can sometimes be forced in backward. Power off, remove the cable, inspect for bent pins, and reconnect ensuring proper orientation. The cable typically has a marking or color stripe indicating pin 1.
Problem: Display flickers or shows horizontal lines
Cause: Insufficient power supply, loose backlight connection, or incompatible controller timing.
Solution: Verify your power adapter matches the controller’s requirements (usually 12V 2A minimum). Some panels, especially high-resolution ones, require 3A or higher. Check that the backlight cable is firmly connected. If using a “universal” controller board, this indicates timing incompatibility—you need a panel-specific board.
Problem: Only part of screen displays (black bars on sides/top/bottom)
Cause: Resolution mismatch between controller and panel.
Solution: Access the controller’s OSD menu and select the panel’s native resolution. If you’re using a 1366×768 panel, ensure the controller is set to exactly that resolution, not 1280×720 or 1920×1080. Some controllers require manual input via DIP switches or button combinations—consult the controller’s manual.
Problem: No power at all, backlight doesn’t illuminate
Cause: Power adapter failure, blown fuse on controller board, or faulty power jack connection.
Solution: Verify the power adapter works using a multimeter (should read 12V DC). Check that the DC jack is firmly connected to the controller board. Inspect the controller board for visible damage or blown components. Some boards have replaceable fuses—check the manual. If the board is defective, contact the seller for replacement.
Problem: Display works but no audio from HDMI
Cause: LCD panels don’t have built-in speakers; HDMI audio must be extracted separately.
Solution: Most controller boards have a 3.5mm audio output jack or speaker pin connectors. Connect external speakers to the audio jack. For speaker pins, you can salvage speakers from the original laptop or buy small 4-8Ω speakers (under $5 from electronics suppliers). Some boards require enabling audio in the OSD menu.
Problem: Display shows artifacts, checkerboard patterns, or unstable image
Cause: Using incompatible “universal” controller board without proper panel calibration.
Solution: This is difficult to fix without panel-specific controller firmware. Try adjusting clock and phase settings in the OSD menu if available. Ultimately, you may need to purchase a controller specifically designed for your panel model rather than a universal board.
FAQ: Converting Laptop Screens to Monitors
Can any laptop screen be converted to a standalone monitor?
Technically yes, but practical considerations apply. LCD panels with physical damage (cracks, dead pixel clusters) aren’t worth converting. Very old CCFL-backlit panels (pre-2010) require external inverters and are inefficient. Touch screens need additional touch controllers ($60-100) beyond standard conversion. Panels with uncommon resolutions or connector types may lack compatible controller boards. Most 2010-2024 laptop screens convert successfully with appropriate controller boards.
Will converted laptop screens work with any mini PC?
Yes, as long as your mini PC has HDMI, DisplayPort, or VGA output (HDMI is standard on all 2026 mini PCs). The LCD controller board handles signal conversion, making the panel compatible with any video source. Your mini PC doesn’t need special drivers—it sees the converted screen as a standard external monitor.
How much power does a converted laptop screen consume?
Typical power consumption: 10-25W depending on screen size and brightness settings. A 15.6″ 1080p panel at medium brightness draws approximately 15W. This is comparable to commercial portable monitors but requires AC power via the 12V adapter—there’s no integrated battery option without significant additional circuitry.
Can I use multiple converted laptop screens with one mini PC?
Yes, if your mini PC has multiple video outputs. Most 2026 mini PCs have 2-3 HDMI ports or a mix of HDMI/DisplayPort. Connect each converted screen to a separate output. Your mini PC will detect them as individual displays, allowing extended desktop or mirrored configurations.
What happens to touch functionality from touchscreen laptops?
Touch functionality requires separate touch controller hardware beyond the basic LCD conversion. The digitizer layer needs USB touch controllers and calibration software. Dedicated touch controller boards cost $60-100 and require significant technical knowledge to implement. Most DIY conversions skip touch functionality due to complexity and cost—you end up with a non-touch display even if the original laptop had a touchscreen.
Are OLED laptop screens worth converting?
Potentially yes, if you value exceptional contrast and color. High-end laptops like Dell XPS, ThinkPad X1, and MacBook Pro use OLED panels worth $300-500 new. Converting these creates premium displays for $50-70 in controller costs. However, OLED panels risk burn-in with static content (desktop icons, taskbars), making them better suited for video/photo editing than general computing. Ensure the panel has no existing burn-in before converting.
How long do converted laptop screens last?
LCD panels typically last 30,000-50,000 hours of use (10-15 years at 8 hours/day). The controller board electronics last indefinitely with proper ventilation. Backlight LEDs gradually dim over time—expect 80% of original brightness after 20,000-30,000 hours. This lifespan matches commercial monitors, so a properly converted screen lasts as long as you’ll realistically use it.
Can I add a battery for portability?
Possible but impractical. Controller boards require 12V input, typically drawing 1-2A (12-24W). You’d need a large 12V battery pack or a DC-DC converter from a standard USB power bank. Most portable monitors in 2026 use integrated 5V-12V boost circuits optimized for battery operation—retrofitting this to a DIY conversion requires advanced electronics knowledge and often costs more than buying a commercial portable monitor with built-in battery.
The Bottom Line: DIY vs Buy Decision for 2026
Converting an old laptop screen into a monitor for your mini PC remains technically feasible in 2026, but The landscape has shifted significantly toward commercial portable monitors offering superior convenience. The DIY conversion makes financial sense only when you already own a high-quality laptop panel (4K, OLED, or premium IPS) that would cost $150+ to replace, and you have the technical skills to execute the conversion confidently.
The process requires correctly identifying your panel model, purchasing a compatible LCD controller board ($25-50), assembling the hardware with proper attention to connector types and cable routing, and fabricating some form of enclosure or stand. Total time investment spans 2-4 hours for first-time converters, with moderate technical skills needed to troubleshoot connection issues or resolution mismatches. The result is a functional but non-portable display that requires AC power and lacks the refinement of commercial products.
In contrast, 2026’s portable monitor market offers exceptional value with entry-level 1080p USB-C models starting at $80-120. These provide plug-and-play USB-C connectivity that delivers video and power through a single cable, integrated stands or smart covers, manufacturer warranties covering defects, and professional industrial design that looks appropriate in any workspace. For users prioritizing convenience, portability, or lack of technical confidence, buying new overwhelmingly makes more sense.
The DIY conversion path shines for specific scenarios: repurposing premium laptop panels (MacBook Pro Retina, ThinkPad OLED, Dell XPS 4K), creating custom mounted displays for permanent desk setups, learning about display technology through hands-on projects, or building specialized embedded systems requiring bare LCD panels. These use cases justify the time investment and accept the limitations of AC power and DIY enclosures.
Before committing to conversion, honestly assess your laptop panel’s quality, your available time, and your technical comfort level. A common 1366×768 or 1920×1080 panel from a budget laptop converts into a mediocre display that costs nearly as much in parts and time as buying a superior new portable monitor. Reserve the DIY approach for quality panels and enthusiast projects rather than desperate attempts to salvage any old laptop screen.