Resetting the BIOS on a mini PC can be accomplished through three main methods in 2026: accessing the BIOS menu directly (press F2, Delete, or F10 during startup and select “Load Setup Defaults”), removing the CMOS battery connector for 10-15 minutes to clear stored settings, or using the CMOS jumper if your model has one accessible. Most modern mini PCs from brands like Beelink, GEEKOM, Minisforum, and ASUS NUC use soldered CMOS batteries with 2-pin connectors rather than removable coin cells, making the connector disconnect method the most practical hardware approach. The software method through the BIOS menu is always the safest first option, as it doesn’t require opening the case and preserves your hardware warranty. If you’re locked out due to a forgotten BIOS password or corrupted settings that prevent booting, disconnecting the CMOS battery connector is your best option—though this requires opening the mini PC case and locating the small red-and-black cable connected to the motherboard. ASUS NUC models (and legacy Intel NUC units) offer a unique power button recovery method where you hold the power button for 3 seconds while the system is off, then press F4 to initiate BIOS recovery from a USB drive containing the recovery file. For most users experiencing configuration issues, the in-menu reset takes 2-3 minutes and resolves 90% of BIOS problems without hardware intervention. Only resort to CMOS battery disconnection when you cannot access the BIOS menu at all, and always photograph cable positions before disconnecting anything to ensure correct reassembly.
Understanding BIOS and Why You Might Need to Reset It
What is BIOS/UEFI?
BIOS (Basic Input/Output System) or its modern replacement UEFI (Unified Extensible Firmware Interface) is the low-level software that initializes your mini PC’s hardware during startup. It controls boot order, memory timings, CPU settings, and hardware configurations before the operating system loads. Modern mini PCs in 2026 predominantly use UEFI firmware, though the term “BIOS” remains commonly used.
Common reasons to reset BIOS:
- Forgotten BIOS password: You’ve set a supervisor or user password and can’t remember it
- Boot failure after overclocking: CPU or RAM overclocking settings prevent the system from starting
- Corrupted settings: A failed BIOS update or power loss during configuration changes
- Hardware detection issues: The system doesn’t recognize new RAM, storage, or other components
- Boot order problems: The mini PC won’t boot from the correct drive after changes
- Performance troubleshooting: Reverting to known-good default settings to isolate issues
- Preparing for resale: Clearing all custom settings and passwords before selling the device
What gets reset:
- All BIOS/UEFI settings return to manufacturer defaults
- Custom boot order reverts to default priority
- Overclocking settings return to stock speeds
- Fan curves reset to automatic profiles
- BIOS passwords are cleared (both supervisor and user passwords)
- Date and time settings may reset (requiring manual reconfiguration)
- Secure Boot and TPM settings return to defaults
What doesn’t get reset:
- Operating system and all installed software remain intact
- Personal files, documents, and data are unaffected
- Installed applications continue working normally
- Network settings within the operating system persist
- User accounts and passwords within Windows/Linux are unchanged
Pro Tip: “Before resetting your BIOS, take photos of your current settings with your phone—especially boot order, RAM timings, and any performance tweaks. This makes it easy to reconfigure everything after the reset without relying on memory. Pay particular attention to settings like ‘Intel VMX/AMD-V’ for virtualization and ‘Secure Boot’ status if you dual-boot operating systems.”
Method 1: Reset BIOS Through the BIOS Menu (Software Method)
This is the safest and recommended first approach for resetting BIOS settings.
Step 1: Access the BIOS menu
Restart your mini PC and repeatedly press the BIOS access key during the initial boot screen (before the Windows logo appears). Common BIOS keys for mini PC brands include:
- Beelink: F2 or Delete
- GEEKOM: F2 or Delete
- Minisforum: F2 or Delete
- ASUS NUC: F2
- Legacy Intel NUC (pre-2024): F2
- ASUS mini PC: F2 or Delete
- MSI Cubi: Delete
- Lenovo ThinkCentre: F1
- HP ProDesk/EliteDesk: F10
If you’re unsure which key to use, watch the boot screen carefully—most mini PCs display a message like “Press F2 to enter Setup” or “Press DEL for BIOS” during the first 2-3 seconds of startup.
Step 2: Locate the reset option
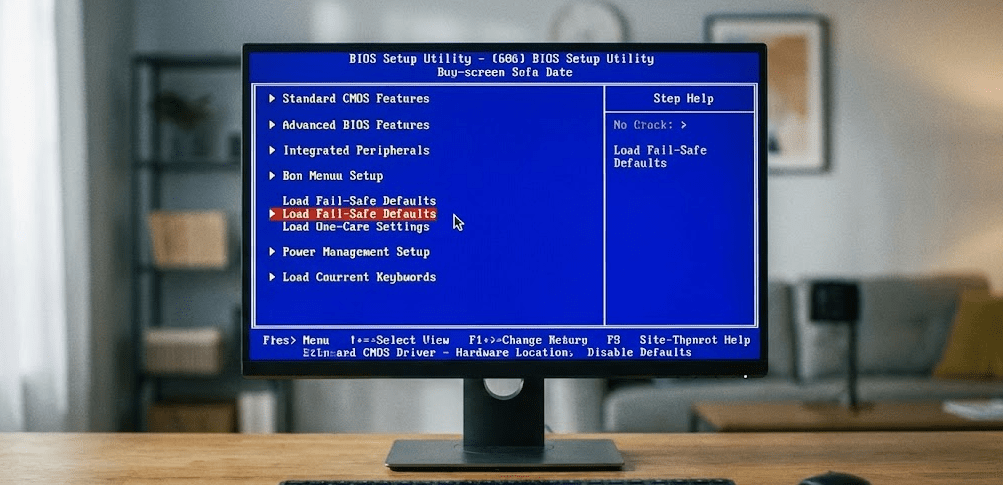
Once inside the BIOS/UEFI interface, look for one of these options (exact wording varies by manufacturer):
- “Load Setup Defaults”
- “Load Default Settings”
- “Load Optimized Defaults”
- “Restore Factory Settings”
- “Reset to Default”
- “Load Fail-Safe Defaults”
This option is typically found in one of these locations:
- Exit menu: Most common location on modern UEFI interfaces
- Main menu: Sometimes listed as the first or last option
- Advanced menu: Under a “BIOS Setup” or “Configuration” submenu
- Function keys: F9 often serves as a shortcut for “Load Defaults”
Step 3: Confirm the reset
After selecting the reset option, you’ll receive a confirmation prompt asking “Load Setup Defaults?” or similar. Select “Yes” or “OK” to proceed. The BIOS will immediately restore all settings to factory defaults.
Step 4: Save and exit
Navigate to the “Save Changes and Exit” option (often F10 as a shortcut), confirm again, and the system will reboot with default BIOS settings. The first boot after reset may take 30-60 seconds longer than usual as the system reinitializes hardware with default configurations.
When this method won’t work:
- You’ve forgotten the BIOS password and can’t access the menu
- The system won’t POST (Power-On Self-Test) due to corrupted BIOS
- The mini PC boots too quickly to catch the BIOS key press
- Overclocking settings prevent the system from displaying video output
For these scenarios, proceed to the hardware reset methods below.
Method 2: Reset BIOS by Disconnecting the CMOS Battery
This hardware method works when you cannot access the BIOS menu.
Understanding mini PC CMOS battery design
Unlike desktop motherboards with easily accessible CR2032 coin cell batteries, most 2026 mini PCs use soldered CMOS batteries with 2-pin connectors. The battery itself remains permanently attached to the motherboard, but you can disconnect the cable to clear CMOS memory.
Step 1: Power down completely
Shut down the mini PC through the operating system (don’t just force power off). Once shut down, unplug the power adapter from both the wall outlet and the mini PC. Wait 30 seconds for residual power to discharge.
Step 2: Open the case
Mini PC case opening procedures vary by brand:
- Beelink: Usually 4 Phillips screws on the bottom panel
- GEEKOM: Remove rubber feet to access screws underneath
- Minisforum: Some models use slide-off top panels; others require bottom screw removal
- ASUS NUC: Bottom panel with 4 screws (some models have tool-free latches)
- Legacy Intel NUC (pre-2024): Bottom panel with 4 screws (some models have tool-free latches)
Remove all screws and carefully lift off the bottom or top panel. Set screws aside in a small container to avoid losing them.
Step 3: Locate the CMOS battery connector
The CMOS battery location varies by model:
- Most Minisforum models: Battery taped on top of the RJ45 Ethernet jacks with a 2-pin connector running to the motherboard
- GEEKOM A5 and similar: Small connector with red and black wires near the RAM slots or storage area
- ASUS NUC / Legacy Intel NUC: Battery usually located near the M.2 SSD slot or under a protective cover
- Beelink models: Often positioned near the front USB ports or along the motherboard edge
Look for a small white or black plastic connector (approximately 5mm x 3mm) with two wires—typically one red (positive) and one black (negative/ground).
Step 4: Disconnect the CMOS battery
Gently pull the 2-pin connector straight out from its socket on the motherboard. Don’t yank or twist—use steady, even pressure. If it’s stuck, use a small flathead screwdriver or tweezers to carefully pry it loose while pulling.
Step 5: Wait for capacitors to discharge
Leave the connector disconnected for 10-15 minutes. This allows the onboard capacitors that maintain CMOS memory to fully discharge, clearing all stored BIOS settings. Some guides recommend 5 minutes, but 10-15 minutes ensures complete discharge.
Optional: While waiting, you can press and hold the power button for 10-15 seconds (with power still unplugged) to help discharge capacitors faster.
Step 6: Reconnect the battery
After the waiting period, reconnect the 2-pin connector to its socket on the motherboard. Ensure it’s fully seated and oriented correctly (the connector typically only fits one way, but verify red wire matches positive markings if visible).
Step 7: Reassemble and boot
Replace the case panel, reinstall all screws, and reconnect the power adapter. Power on the mini PC. On first boot, you may see a message like “CMOS checksum error” or “Default settings loaded”—this is normal and indicates the reset succeeded.
You’ll need to reconfigure basic settings like date/time and boot order before the system fully boots to your operating system.
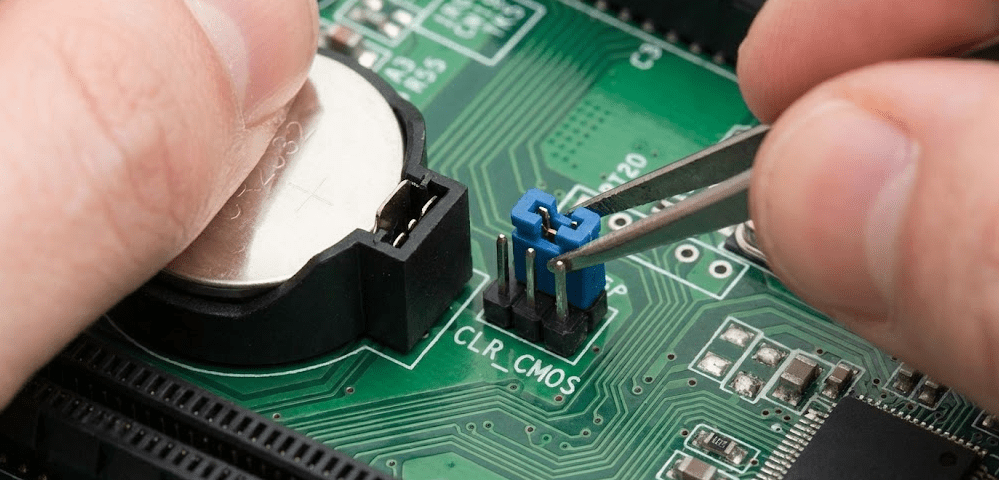
Method 3: Reset BIOS Using CMOS Jumper (If Available)
Some mini PCs include a CMOS clear jumper for easier resets, though this is less common in compact designs.
Step 1: Locate the CMOS jumper
After opening the case (following Method 2 steps), look for a 3-pin jumper near the CMOS battery or along the motherboard edge. It’s usually labeled “CLRTC,” “CLR_CMOS,” “CLEAR CMOS,” or “JBAT1.” The jumper is a small plastic cap covering two of the three pins.
Note: Many modern mini PCs (especially ultra-compact models) don’t include CMOS jumpers due to space constraints. If you don’t find one, use Method 2 instead.
Step 2: Move the jumper
The jumper typically covers pins 1-2 by default. Move it to cover pins 2-3 (the “clear” position). For example, if the jumper covers the first and second pins, move it to cover the second and third pins. Pull the jumper straight up to remove it—don’t bend the pins.
Step 3: Discharge the system
With the jumper in the clear position, press and hold the power button for 10-15 seconds (with the power adapter still unplugged). This discharges remaining power and clears CMOS memory.
Step 4: Return the jumper
Move the jumper back to its original position (usually pins 1-2). If you lose track of the original position, check the motherboard silkscreen for markings or consult your mini PC’s manual.
Step 5: Reassemble and boot
Close the case, reconnect power, and start the system. BIOS settings will be at factory defaults.
Method 4: NUC Power Button Recovery Method (ASUS NUC & Legacy Intel NUC)
NUC models offer a unique BIOS recovery feature accessible without opening the case.
When to use this method:
This approach is specifically for ASUS NUC and legacy Intel NUC mini PCs, working when BIOS corruption prevents normal booting or when you need to downgrade/recover BIOS firmware. Note that while Intel manufactured NUCs until 2023, ASUS acquired the NUC business and continues producing NUC-branded mini PCs in 2026 with similar recovery features.
Step 1: Prepare recovery USB
Download the BIOS recovery file (*.BIO format for legacy Intel NUCs, or *.CAP format for newer ASUS NUCs) from the manufacturer’s support website for your specific NUC model. Copy the file to a FAT32-formatted USB flash drive (no folders—place it in the root directory).
Step 2: Connect USB and power off
Plug the USB drive into any USB port on the NUC. Ensure the system is completely powered off and the power adapter is connected.
Step 3: Initiate recovery mode
Press and hold the power button for exactly 3 seconds, then release. The Power Button menu should appear.
Step 4: Start BIOS recovery
Press F4 to begin the BIOS recovery process. The system will automatically detect the recovery file on the USB drive and start flashing the BIOS. This takes 2-5 minutes.
Warning: Do not interrupt power or remove the USB drive during recovery. The system may reboot multiple times—this is normal.
Step 5: Recovery completion
When recovery finishes, the system will shut down or display a completion message. Remove the USB drive and power on normally. BIOS settings will be at defaults.
Method 5: Reset BIOS from Windows (No Restart Required)
Modern Windows systems offer BIOS access without timing key presses during boot.
Option A: Through Windows Settings
- Open Windows Settings (Win + I)
- Navigate to System → Recovery
- Under “Advanced startup,” click “Restart now”
- Select Troubleshoot → Advanced options → UEFI Firmware Settings
- Click Restart
Your mini PC will reboot directly into the BIOS menu where you can load default settings using Method 1.
Option B: Using Command Prompt
- Open Command Prompt as Administrator (search “cmd,” right-click, select “Run as administrator”)
- Type:
shutdown /r /fw /t 0 - Press Enter
The system immediately restarts into BIOS/UEFI settings. The /fw flag instructs Windows to boot directly to firmware settings, and /t 0 sets the timeout to zero (immediate restart).
This method is particularly useful for mini PCs with ultra-fast boot times that make catching the BIOS key press nearly impossible.
Troubleshooting Common BIOS Reset Issues
Problem: BIOS access key not working
Cause: Keyboard not recognized early enough in boot, fast boot enabled, or wrong key.
Solution: Try these approaches in order:
- Use a wired USB keyboard instead of wireless (wireless keyboards often aren’t initialized during early boot)
- Try different USB ports—some mini PCs only recognize keyboards on specific ports during POST
- Disable Fast Boot in Windows: Settings → System → Power & sleep → Additional power settings → Choose what the power button does → Change settings that are currently unavailable → Uncheck “Turn on fast startup”
- Hold the BIOS key continuously from power-on rather than tapping it repeatedly
Problem: CMOS battery connector is stuck or difficult to remove
Cause: Adhesive on connector, tight fit, or nearby components blocking access.
Solution: Use plastic tweezers or a plastic spudger (avoid metal tools that could short circuits). Gently rock the connector side-to-side while pulling straight out. If tape secures the battery, carefully peel it back first. Never use excessive force—if it won’t budge, check for hidden clips or adhesive.
Problem: System won’t boot after CMOS battery disconnect
Cause: Date/time reset causing secure boot or drive detection failure.
Solution: Enter BIOS (should be accessible now) and manually set the correct date and time. If the system still won’t boot to your OS, check that Secure Boot status matches your OS installation (Windows 11 typically requires Secure Boot enabled; Linux often requires it disabled). Verify boot order includes your primary storage device.
Problem: Settings reset but BIOS password remains
Cause: Some manufacturers store BIOS passwords in separate EEPROM chips that don’t clear with standard CMOS resets.
Solution: On consumer mini PCs, this is rare—most clear passwords with CMOS reset. If the password persists, contact the manufacturer’s support for a master password or hardware-level reset procedure specific to your model. Some models require removing a separate security jumper or performing a specific key combination during boot.
Problem: “CMOS checksum error” appears on every boot
Cause: Dead or dying CMOS battery no longer holds charge, or loose connection.
Solution: The CMOS battery may need replacement. Most mini PC CMOS batteries last 3-5 years. If your mini PC is older, the battery may be depleted and require replacement. You can purchase replacement CR2032 batteries with 2-pin connectors online for $3-5. If you’re comfortable soldering, you can attach a new CR2032 coin cell to the existing wiring.
Problem: USB BIOS recovery not working on NUC
Cause: Incorrect file format, wrong BIOS file for model, or USB drive format issues.
Solution: Ensure USB drive is formatted as FAT32 (not exFAT or NTFS). Verify the recovery file matches your exact NUC model number (e.g., NUC11PAHi7 vs NUC11PAHi5 for legacy Intel models, or specific ASUS NUC model numbers for 2024+ units—they use different files). Place the file in the root directory, not inside folders. Try a different USB port or USB drive if recovery doesn’t start.
Post-Reset Configuration Checklist
After successfully resetting your BIOS, configure these essential settings before regular use:
Immediate priority (before OS boot):
- Date and Time: Set correct date, time, and timezone
- Boot Order: Ensure your primary OS drive is first in boot priority
- Secure Boot: Enable for Windows 11; disable if dual-booting with Linux or using older OS
- RAM Profile: Enable XMP/DOCP if you have high-speed RAM (BIOS defaults often run RAM at slower JEDEC speeds)
Performance settings:
- CPU Power Limits: Restore any PL1/PL2 adjustments if you previously tuned them
- Fan Curves: Reconfigure custom fan profiles if you had adjusted cooling
- Virtualization: Re-enable Intel VT-x or AMD-V if you use virtual machines or Docker
- Storage Mode: Verify SATA mode is set to AHCI (not IDE) for SSDs
Security settings:
- Set New BIOS Password: If you use one, reconfigure supervisor and/or user passwords
- Trusted Platform Module (TPM): Verify TPM is enabled if required for Windows 11 or BitLocker
- USB Boot Protection: Disable USB booting if you don’t need it for security
Optional optimizations:
- Fast Boot: Re-enable if you want faster startup (but harder BIOS access)
- Network Stack: Disable PXE boot if you don’t network boot
- Onboard Devices: Disable unused hardware (Wi-Fi, Bluetooth) if you don’t use them
Take 5-10 minutes to verify these settings before returning the mini PC to regular use. This prevents potential issues with OS booting, performance, or hardware recognition.
Comparison: BIOS Reset Methods for Different Scenarios
| Scenario | Best Method | Time Required | Difficulty | Hardware Access Needed |
|---|---|---|---|---|
| Configuration issues, can access BIOS | Method 1: BIOS Menu Reset | 2-3 minutes | Easy | No |
| Forgotten BIOS password | Method 2: CMOS Battery Disconnect | 15-20 minutes | Moderate | Yes |
| Corrupted BIOS, won’t boot | Method 2: CMOS Battery Disconnect | 15-20 minutes | Moderate | Yes |
| Fast boot prevents BIOS access | Method 5: Windows UEFI Access | 3-5 minutes | Easy | No |
| ASUS NUC / Intel NUC BIOS corruption | Method 4: NUC Power Button Recovery | 5-10 minutes | Moderate | No (USB only) |
| Mini PC with CMOS jumper | Method 3: CMOS Jumper Reset | 10-15 minutes | Moderate | Yes |
| Overclocking caused boot failure | Method 2: CMOS Battery Disconnect | 15-20 minutes | Moderate | Yes |
| Pre-sale preparation | Method 1: BIOS Menu Reset | 2-3 minutes | Easy | No |
FAQ: BIOS Reset on Mini PC
Will resetting BIOS delete my files?
No. BIOS reset only affects firmware settings stored in CMOS memory. Your operating system, personal files, applications, and all data on storage drives remain completely untouched. BIOS operates independently of your storage drives.
How long does a CMOS battery last in a mini PC?
Typically 3-5 years with regular use. Mini PCs that remain unplugged for extended periods may see shorter battery life. Signs of a dying CMOS battery include frequent “CMOS checksum error” messages, date/time resetting to defaults on every boot, or BIOS settings not saving between power cycles.
Can I reset BIOS without opening the case?
Yes, if you can access the BIOS menu (Method 1) or use the Windows-based access methods (Method 5). These software approaches require no hardware access. Only password-locked BIOS or corrupted settings that prevent booting require opening the case for hardware resets.
What’s the difference between BIOS reset and BIOS update?
BIOS reset restores current firmware settings to defaults without changing the BIOS version. BIOS update installs new firmware code (a different version), which may add features, fix bugs, or improve compatibility. You can reset without updating, and you should often reset after updating if problems occur.
Will BIOS reset fix boot loop issues?
Sometimes. If the boot loop results from incorrect BIOS settings (overclocking, wrong boot order, incompatible hardware settings), a reset can fix it. However, boot loops caused by hardware failure, corrupted OS files, or failing storage drives won’t be resolved by BIOS reset alone.
Do I need to reset BIOS after RAM upgrade?
Not usually necessary, but recommended. Most mini PCs auto-detect new RAM, but resetting BIOS (or at least loading optimized defaults) ensures proper RAM initialization and enables appropriate XMP/DOCP profiles for rated speeds. If the system doesn’t recognize new RAM capacity, try a BIOS reset.
Can resetting BIOS damage my mini PC?
No, when done correctly. The BIOS reset process itself cannot damage hardware. However, improper handling when opening the case (static discharge, dropping components, forcing connectors) could cause damage. Always ground yourself before touching internal components and handle CMOS battery connectors gently.
Why does my mini PC boot faster after BIOS reset?
BIOS defaults often include optimized settings for fastest stable operation. Custom configurations—especially detailed hardware checks, extra boot delays, or verbose POST screens—can slow boot times. Default settings typically skip optional checks and use aggressive timing.
The Bottom Line: Choose the Right Reset Method
Resetting BIOS on mini PCs in 2026 is straightforward when you choose the appropriate method for your situation. For accessible BIOS menus, The software reset through “Load Setup Defaults” takes under 3 minutes and risks no hardware warranty concerns. When locked out by passwords or boot failures, Disconnecting the CMOS battery connector for 10-15 minutes provides reliable hardware-level reset—though this requires case disassembly and careful handling.
Mini PC BIOS architecture has evolved significantly from desktop motherboards. The prevalence of soldered CMOS batteries with 2-pin connectors rather than removable coin cells means you’re disconnecting cables rather than pulling batteries. This actually simplifies the process once you’ve opened the case and located the connector, typically found near Ethernet jacks, USB ports, or RAM slots depending on your brand.
ASUS NUC users (and those with legacy Intel NUC units from pre-2024) benefit from manufacturer-specific recovery features like the power button menu that accesses BIOS recovery without full disassembly. Meanwhile, Windows 10 and 11 users can leverage built-in UEFI firmware access through Settings or Command Prompt, eliminating the challenge of timing F2 or Delete key presses during ultra-fast boot sequences.
The most common BIOS reset scenarios—clearing overclocking experiments, resolving boot order confusion, or troubleshooting hardware detection—rarely require hardware intervention. Start with the BIOS menu reset, escalate to Windows-based UEFI access if boot speed is an issue, and only proceed to CMOS battery disconnection for password locks or complete boot failures.
After any BIOS reset, allocate 10 minutes for post-reset configuration. Properly setting date/time, boot order, RAM profiles (XMP/DOCP), and virtualization options prevents frustrating issues like slow RAM speeds, OS boot failures, or incompatible secure boot settings. Document your preferred settings with photos or notes to streamline future reconfigurations.