Yes, you can upgrade RAM in most mini PCs, but it depends on the model, mid-range and high-end mini PCs typically feature two SO-DIMM slots that accept laptop-style DDR4 or DDR5 memory, allowing upgrades from 8GB to 32GB, 64GB, or even 96GB.
However, budget models under $300 and Apple’s Mac Mini solder RAM directly to the motherboard, making upgrades impossible. Always verify your specific model’s upgradeability before purchasing, as this single factor dramatically impacts long-term value and flexibility.
Introduction – Can I Upgrade RAM in a Mini PC?
One of the most common questions I hear from mini PC buyers is whether they can upgrade the RAM later. It’s a smart concern because RAM directly impacts how smoothly your computer handles multitasking, runs demanding applications, and manages everyday workflows. The answer isn’t universal—some mini PCs welcome RAM upgrades with open access panels and standard SO-DIMM slots, while others permanently lock memory to the motherboard with zero upgrade potential.
In my professional experience reviewing and testing mini PCs, I’ve discovered that RAM upgradeability serves as a critical dividing line between models that grow with your needs and those that become obsolete when requirements change. A mini PC with 16GB RAM might feel adequate today, but video editing, content creation, or running multiple applications simultaneously can quickly expose limitations. The ability to add another 16GB or 32GB for $50-100 extends the system’s useful life by several years.
This comprehensive guide covers everything about mini PC RAM upgrades in 2026—which models support upgrades, how to identify SO-DIMM slots versus soldered memory, step-by-step installation instructions, compatibility requirements, common mistakes to avoid, and whether DDR5 is worth the premium over DDR4. Whether you’re shopping for a new mini PC or wondering if your current model supports more memory, this article provides the answers you need.
Understanding Mini PC RAM: SO-DIMM vs Soldered Memory
Mini PCs use different RAM installation methods that fundamentally determine upgradeability. Understanding these differences helps you make informed purchasing decisions and set realistic expectations.
SO-DIMM Slots (Upgradeable)
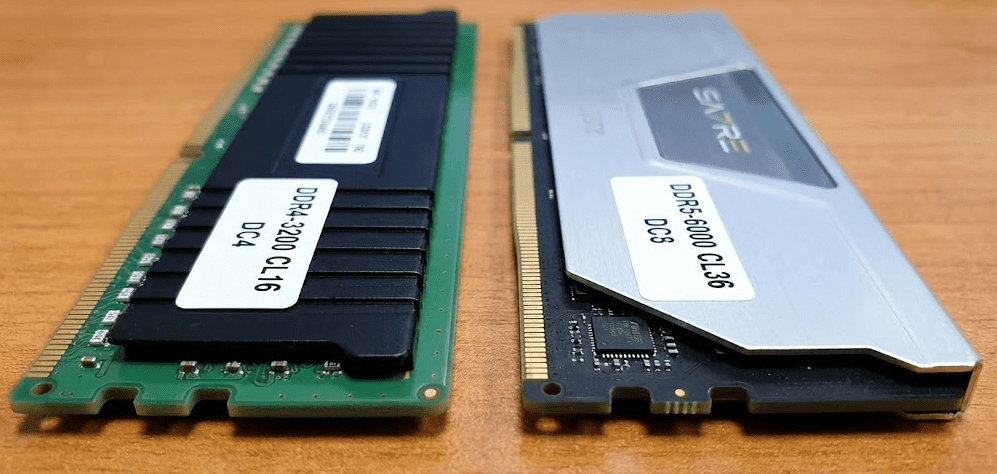
SO-DIMM stands for Small Outline Dual In-line Memory Module—the laptop-style RAM format that most upgradeable mini PCs use. These modules measure approximately 2.7 inches long (compared to desktop DIMM’s 5.25 inches) and fit into dedicated slots on the mini PC motherboard. Most modern mini PCs include two SO-DIMM slots, allowing dual-channel memory configuration that doubles bandwidth compared to single-channel setups.
The installation process is straightforward. Remove the bottom panel, locate the RAM slots, release the retention clips, and swap modules. The entire upgrade takes 10-15 minutes for first-timers and requires only a Phillips-head screwdriver. This accessibility makes RAM the most user-friendly mini PC upgrade, delivering immediate performance improvements without technical expertise.
Soldered RAM (Non-Upgradeable)
Budget mini PCs and Apple’s Mac Mini solder RAM directly to the motherboard during manufacturing. This approach saves internal space, reduces production costs, and eliminates potential connection issues—but permanently locks memory capacity. An 8GB Mac Mini cannot become 16GB. A budget mini PC with 16GB soldered memory cannot expand to 32GB, regardless of your willingness to pay for the upgrade.
Manufacturers choose soldered RAM for ultra-compact designs where every millimeter matters, entry-level models where cost reduction takes priority, and premium sealed systems like Mac Mini where Apple controls the entire upgrade path through purchase-time configurations. While this approach has technical merits, it forces buyers to predict future needs and pay premium prices upfront for maximum specifications, knowing later expansion is impossible.
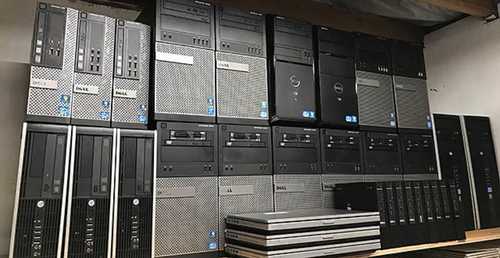
Which Mini PC Brands and Models Support RAM Upgrades?
Not all mini PCs treat upgradeability equally. Some manufacturers prioritize user accessibility while others optimize for compactness or cost savings. Here’s the 2026 landscape broken down by upgradeability tier.
Highly Upgradeable Mini PCs (Dual SO-DIMM Slots)
The Minisforum MS-01 and UM790 Pro series lead the industry with excellent upgrade access, featuring:
- Dual SO-DIMM slots supporting up to 96GB DDR5 RAM
- Multiple M.2 storage slots
- User-friendly interior layouts with clear documentation
- MS-01 specifically targets home server applications with six M.2 slots and dual 2.5GbE networking
ASUS NUC 14 Pro continues Intel’s NUC legacy under ASUS branding, offering:
- Dual SO-DIMM slots (up to 96GB DDR5)
- Thunderbolt 4 connectivity
- Replaceable Wi-Fi cards
- Excellent documentation for DIY upgrades
Geekom’s A9 Max and GT13 Pro models provide:
- Dual SO-DIMM slots (up to 128GB DDR5 on the A9 Max)
- Straightforward bottom panel access
- Clear upgrade instructions that welcome user modifications
Beelink’s GTi14 Ultra and SER series include:
- Dual SO-DIMM slots with capacities ranging from 64GB to 96GB depending on model
- Competitive pricing compared to competitors
- Reasonable internal access for upgrades
Enterprise options like HP EliteDesk 800 G9 Mini and Lenovo ThinkCentre M90q offer:
- Business-grade upgradeability with dual SO-DIMM slots
- Extensive documentation
- Designs explicitly supporting user maintenance
Moderately Upgradeable Mini PCs
Mid-range models from GMKtec, Trigkey, and similar manufacturers typically include:
- Dual SO-DIMM slots but with more cramped interiors
- Maximum capacities of 32GB-64GB
- Less polished documentation (though upgrades remain possible)
Non-Upgradeable Mini PCs (Soldered RAM)
Apple Mac Mini M4 and M4 Pro:
- Solder all RAM to the logic board with zero upgrade potential
- Force buyers to configure maximum RAM at purchase or accept permanent limitations
Budget Intel N100 mini PCs under $200:
- Often solder 8GB or 16GB RAM to reduce costs
- Eliminate future expansion options
Ultra-compact models:
- Prioritize minimal size and sometimes sacrifice upgradeability for extreme portability
Pro Tip for Buyers: Before purchasing any mini PC, search for “[model name] RAM upgrade” or “[model name] teardown” on YouTube. Visual teardowns immediately reveal whether the model uses SO-DIMM slots or soldered memory, saving you from expensive purchasing mistakes.
DDR4 vs DDR5: Which RAM Should You Choose?
The transition from DDR4 to DDR5 memory represents a significant technological shift that affects mini PC upgrade decisions in 2026. Understanding the practical differences helps you choose appropriately without overpaying for features you won’t use.
DDR5 Technical Advantages
DDR5 delivers 50% faster baseline speeds than DDR4, starting at 4800 MT/s (megatransfers per second) versus DDR4’s 3200 MT/s ceiling. High-end DDR5 modules now reach 6400 MT/s and beyond, with enthusiast kits exceeding 8000 MT/s. This translates to higher bandwidth—DDR5-6400 provides approximately 51.2 GB/s compared to DDR4-3200’s 25.6 GB/s.
Individual DDR5 SO-DIMM modules support up to 128GB capacity compared to DDR4’s 64GB maximum, enabling total system RAM of 256GB with two slots. This matters for professional workloads including virtual machines, large dataset processing, and content creation. DDR5 operates at 1.1V compared to DDR4’s 1.2V, reducing power consumption by approximately 8-10% and generating less heat. This efficiency benefit compounds in mini PCs where thermal management is constrained.
DDR4 Practical Reality
For everyday computing—web browsing, office productivity, media consumption, and light content creation—DDR4 performs identically to DDR5 in subjective user experience. The speed difference doesn’t manifest in noticeable ways for these workloads. DDR4 SO-DIMM modules cost 15-30% less than equivalent DDR5 for the same capacity, making 32GB DDR4 significantly more affordable than 32GB DDR5.
Millions of existing mini PCs support only DDR4, and these systems remain perfectly capable for their designed purposes. Upgrading RAM in a DDR4-based mini PC makes economic sense without requiring platform replacement. In gaming and CPU-intensive tasks, DDR5 provides 3-10% performance improvements depending on the specific workload, but this rarely justifies premium pricing unless you’re building new.
When DDR5 Makes Sense
Choose DDR5 when:
- Purchasing a new mini PC in 2026, as pricing has normalized and it provides better long-term value
- Your workload includes heavy multitasking, content creation, or virtual machines where bandwidth matters
- You need more than 64GB total RAM (DDR5’s higher per-module capacity enables 96GB or 128GB configurations)
- You’re future-proofing for software that increasingly leverages higher memory bandwidth
When DDR4 Remains Appropriate
Stick with DDR4 when:
- Upgrading existing DDR4-based mini PCs (you cannot mix DDR4 and DDR5)
- Your budget is constrained and DDR4 provides better value for capacity
- Your workload involves basic productivity that doesn’t stress memory bandwidth
- You’re working with older systems that physically cannot support DDR5
Step-by-Step Guide: How to Upgrade RAM in Your Mini PC
Upgrading mini PC RAM is one of the easiest hardware modifications you can perform. This detailed walkthrough covers the entire process from planning to verification.
Step 1: Verify Your Mini PC’s RAM Compatibility
Before purchasing new RAM, determine exactly what your mini PC supports. Check the manufacturer’s specification sheet for:
- Maximum RAM capacity (commonly 32GB, 64GB, or 96GB)
- Memory type (DDR4 or DDR5—these are not interchangeable)
- Maximum speed supported (e.g., DDR4-3200, DDR5-5600)
- Number of SO-DIMM slots (usually two, sometimes one)
Search for your exact model number plus “specifications” or “user manual” online. Manufacturer websites and product pages clearly list memory specifications. If documentation is unclear, search YouTube for “[your model] RAM upgrade” to see what others have successfully installed.
Step 2: Purchase Compatible RAM Modules
Buy SO-DIMM modules matching your system’s memory type and generation. For best performance, purchase matched pairs (2×8GB, 2×16GB, or 2×32GB) from the same manufacturer with identical specifications to enable dual-channel operation. Reputable brands include:
- Crucial
- Kingston
- Corsair
- G.Skill
- Samsung
- SK hynix
Consider capacity based on your needs:
- 16GB (2×8GB): General productivity, web browsing, and light multitasking
- 32GB (2×16GB): Serious multitasking, content creation, and moderate virtual machine use
- 64GB (2×32GB): Professional workflows, extensive virtualization, and home lab environments
Verify the seller’s return policy in case of compatibility issues. RAM is generally reliable, but having the option to return incompatible modules provides peace of mind.
Step 3: Prepare Your Workspace and Tools
Power down your mini PC completely using the operating system shutdown procedure. Unplug the power cable and disconnect all peripherals including display, keyboard, mouse, and external drives. Wait 5-10 minutes for any residual electrical charge to dissipate from internal components.
Prepare a clean, well-lit workspace on a non-static surface like a wooden table. Avoid carpeted areas which generate static electricity that can damage components. Gather:
- Small Phillips-head screwdriver (typically #0 or #1 size)
- Anti-static wrist strap (optional but recommended for additional protection)
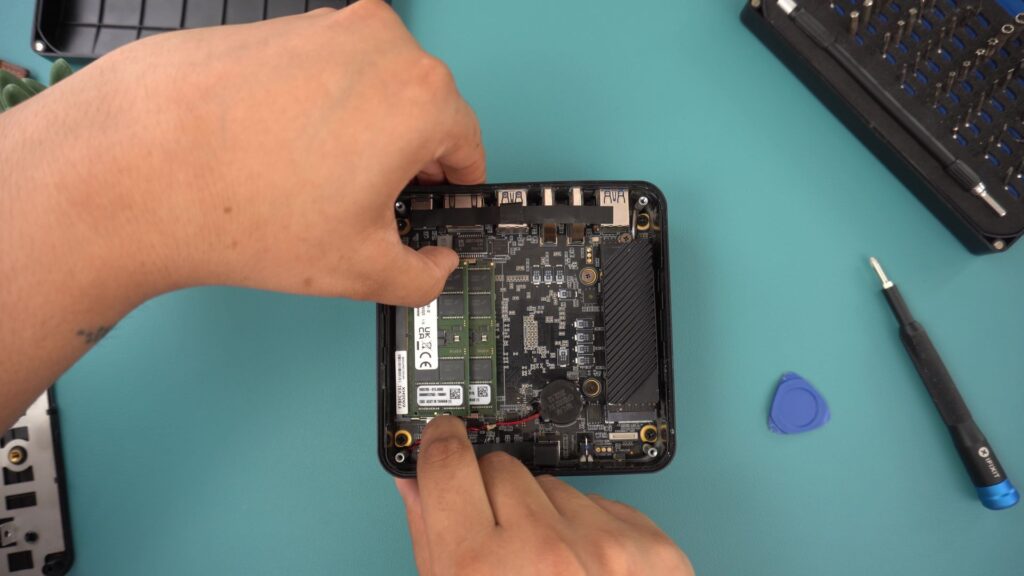
Step 4: Access the RAM Compartment
Flip your mini PC upside down to access the bottom panel. Locate all screws securing the panel—typically 4-6 screws positioned around the perimeter or under rubber feet. Some manufacturers hide screws under warranty stickers (removing these may void warranty—check terms first).
Remove all securing screws and set them aside in a small container. Gently lift the bottom panel, watching for any clips or ribbon cables that might connect it to the motherboard. Some models use sliding mechanisms requiring you to slide the panel toward the rear before lifting.
Once inside, locate the SO-DIMM slots. These are usually clearly visible, often in the center of the motherboard with existing RAM modules installed. Take a photo of the interior for reference during reassembly.
Step 5: Remove Existing RAM (If Replacing)
If you’re replacing existing RAM rather than adding to empty slots, remove the old modules first. Locate the metal retention clips on both sides of each RAM module—these clips hold the module at a 30-45 degree angle when released.
Gently push both clips outward simultaneously using your thumbs or index fingers. The RAM module will pop up at an angle when the clips fully release. Grasp the module by its edges (avoid touching gold contacts or chips) and pull it straight out at the same angle. Set removed modules on a static-free surface or in anti-static bags if you plan to reuse them.
Step 6: Install New RAM Modules
Hold your new RAM module by its edges, carefully avoiding the gold contacts along the bottom edge and the memory chips on both sides. Align the notch in the module’s contact edge with the key in the SO-DIMM slot—the module only fits one way, so incorrect orientation is impossible to force.
Insert the module into the slot at a 30-45 degree angle, ensuring the gold contacts fully enter the slot. You should feel slight resistance as the contacts engage. Gently but firmly press down on the top edge of the module until it lies flat against the motherboard. The retention clips should automatically snap into place on both sides with an audible click.
Repeat the process for the second RAM module in the second slot. For best performance and dual-channel operation, install modules in pairs of identical specification.
Step 7: Reassemble Your Mini PC
Double-check that both RAM modules are fully seated with retention clips engaged on both sides. Replace the bottom panel, aligning any clips or connectors carefully. Secure all screws in their original positions, tightening finger-tight plus a quarter turn (don’t overtighten as this can crack plastic or strip threads).
Flip the mini PC right-side up and reconnect all cables including power, display, keyboard, and mouse. Before powering on, visually inspect all connections to ensure everything is properly secured.
Step 8: Boot and Verify New RAM
Press the power button and watch for normal boot behavior. During startup, most systems briefly display memory information on screen. To verify the upgrade worked correctly, enter BIOS setup (typically by pressing F2, F10, Del, or Esc repeatedly during boot—watch for on-screen prompts).
In BIOS, navigate to system information or memory sections to confirm total RAM capacity and speed. Exit BIOS and allow Windows to boot normally. Once in Windows, right-click the Start button and select “System” to view installed RAM. Open Task Manager (Ctrl+Shift+Esc), click the Performance tab, and select Memory to verify total capacity, speed, and dual-channel operation status.
Step 9: Test Stability (Optional but Recommended)
While most RAM installations work perfectly, testing ensures stability under load. Run Windows Memory Diagnostic by:
- Searching for it in the Start menu
- Selecting “Restart now and check for problems”
- Allowing the system to reboot and test RAM for errors
Alternatively, download MemTest86, create a bootable USB drive, and run comprehensive memory testing overnight.
If errors appear during testing:
- Try reseating the RAM modules
- Test modules individually to isolate problematic units
- Verify compatibility with your motherboard’s specifications
RAM Upgrade Performance Impact: What to Expect

Understanding realistic performance expectations helps you decide whether upgrading RAM makes sense for your specific use case. The benefits vary dramatically depending on your current configuration and workload.
Upgrading from 8GB to 16GB
This upgrade delivers the most dramatic improvement for typical users. Systems with 8GB RAM constantly run out of memory during normal use, forcing Windows to use much slower disk-based virtual memory (page file). This causes severe performance degradation including:
- Slow application launches
- Browser tabs reloading when switching between them
- System freezes during multitasking
- General sluggishness that makes computing frustrating
Jumping to 16GB eliminates these bottlenecks entirely for most users. Applications remain in memory when switching between them, dozens of browser tabs stay active without reloading, and multitasking feels smooth and responsive. In my testing, users consistently describe this upgrade as “making their computer feel new again.”
Upgrading from 16GB to 32GB
This upgrade provides noticeable benefits for power users and content creators but minimal improvement for basic computing. The 16GB to 32GB jump helps with:
- Serious multitasking (running multiple browsers, office apps, and media players simultaneously)
- Content creation (photo editing, video editing, 3D modeling)
- Virtual machines (running one or more VMs while using host OS)
- Future-proofing as software becomes more memory-hungry
However, casual users who primarily browse the web, stream media, and use office applications likely won’t notice the difference. The system already has enough RAM for these tasks at 16GB, so additional memory sits unused.
Upgrading from 32GB to 64GB+
This upgrade targets professional and enthusiast workloads specifically. Very few typical users benefit from more than 32GB. The scenarios that justify 64GB+ include:
- Professional video editing with 4K/8K footage
- Extensive virtualization running multiple simultaneous VMs
- Home lab environments with Docker containers and services
- Large dataset processing and analysis
- CAD/3D rendering workflows
While testing mini PCs, I’ve found that monitoring Task Manager’s memory usage during your heaviest workload reveals whether you’d benefit from more RAM. If memory usage consistently exceeds 80-90% of capacity, upgrading helps. If you rarely exceed 60-70%, additional RAM provides minimal benefit.
Compatibility Table: Mini PC RAM Specifications
| Mini PC Model | RAM Type | Max Capacity | Number of Slots | Upgradeability |
|---|---|---|---|---|
| Minisforum MS-01 | DDR5-5600 | 96GB | 2 × SO-DIMM | Excellent |
| ASUS NUC 14 Pro | DDR5-5600 | 96GB | 2 × SO-DIMM | Excellent |
| Geekom A9 Max | DDR5-5600 | 128GB | 2 × SO-DIMM | Excellent |
| Beelink GTi14 Ultra | DDR5-5600 | 96GB | 2 × SO-DIMM | Excellent |
| Minisforum UM790 Pro | DDR5-5600 | 64GB | 2 × SO-DIMM | Very Good |
| Geekom GT13 Pro | DDR5-4800 | 64GB | 2 × SO-DIMM | Very Good |
| Beelink SER7 | DDR5-4800 | 64GB | 2 × SO-DIMM | Very Good |
| GMKtec NucBox M6 | DDR5-5600 | 64GB | 2 × SO-DIMM | Good |
| HP EliteDesk 800 G9 | DDR4-3200 | 64GB | 2 × SO-DIMM | Excellent |
| Lenovo ThinkCentre M90q | DDR4-3200 | 64GB | 2 × SO-DIMM | Very Good |
| Intel NUC 11/12 | DDR4-3200 | 64GB | 2 × SO-DIMM | Very Good |
| Budget Intel N100 Models | DDR4-3200 | 16GB | Soldered | None |
| Mac Mini M4 | Unified Memory | 64GB | Soldered | None |
| Mac Mini M4 Pro | Unified Memory | 128GB | Soldered | None |
Common RAM Upgrade Mistakes to Avoid
Learning from others’ mistakes saves time, money, and frustration. These are the most common errors I’ve encountered when helping users upgrade mini PC RAM.
Buying Incompatible Memory Type
DDR4 and DDR5 are physically different with notches in different positions, making installation of the wrong type impossible. However, purchasing DDR5 for a DDR4-only system or vice versa wastes money and time dealing with returns. Always verify your system’s memory type before ordering.
Exceeding Maximum Supported Speed
Installing DDR4-3600 RAM in a system that supports only DDR4-3200 isn’t harmful—the RAM simply runs at 3200 MT/s. But you’ve paid a premium for speed you can’t use. Match RAM speed to your system’s maximum supported specification for optimal price-performance.
Using Mismatched RAM Modules
Installing different capacity modules (8GB + 16GB) or different speed modules (DDR4-2666 + DDR4-3200) will work, but performance is affected. Modern systems use “Flex Mode” (also called Asymmetric Dual Channel), where the matching portion runs in dual-channel mode and the remainder runs in single-channel. For example, with 8GB + 16GB modules, the first 16GB (8GB from each module) runs in dual-channel, while the remaining 8GB runs in single-channel. While this is better than fully disabling dual-channel, for best performance always use matched pairs of identical specification.
Forgetting to Enable XMP/DOCP Profiles
Many high-speed RAM kits require enabling XMP (Intel) or DOCP (AMD) profiles in BIOS to run at rated speeds. Without this, RAM runs at JEDEC baseline speeds (typically DDR4-2400 or DDR5-4800), leaving performance on the table. After installation, enter BIOS and enable the appropriate profile for your RAM.
Not Testing After Installation
While most RAM installations work perfectly, occasionally modules arrive defective or incompatibility issues surface. Testing with Windows Memory Diagnostic or MemTest86 immediately after installation catches problems while you’re still within return windows.
Opening Mini PCs Under Warranty
Some manufacturers void warranties if users open the chassis, while others explicitly allow RAM and storage upgrades. Check your warranty terms before proceeding. If your mini PC is within warranty and the manufacturer prohibits user upgrades, consider waiting until the warranty expires or contacting manufacturer support.
2026 RAM Trends Affecting Mini PCs
The memory landscape continues evolving, with several trends directly impacting mini PC upgrade decisions this year.
DDR5 Becoming Standard
Most new mini PCs launched in 2026 feature DDR5 as standard, with DDR4 relegated to budget models and older stock. This transition means DDR5 upgrade modules are increasingly competitive on price with DDR4, making the newer standard more accessible for upgrades.
128GB SO-DIMM Modules Arriving
The first 128GB DDR5 SO-DIMM modules became available in late 2025, enabling 256GB total RAM in two-slot mini PCs. While expensive and targeting professional workloads, this capacity previously required full-sized workstations. For detailed coverage of mini PCs that support these extreme capacities, check out this Comprehensive guide to compatible mini PCs with 128GB RAM kits that includes tested models.
ECC Memory Support Expanding
Error-Correcting Code (ECC) memory, which detects and corrects memory errors, traditionally appeared only in enterprise systems. Some 2026 mini PCs with Ryzen PRO or Intel vPro processors now support ECC SO-DIMM modules, bringing enterprise-grade reliability to compact form factors.
Lower DDR5 Prices
DDR5 pricing dropped approximately 35-40% from 2024 to 2026 as production ramped up and adoption increased. In early 2026, quality 32GB (2×16GB) DDR5-5600 kits cost $80-120, competitive with equivalent DDR4 kits.
Mac Mini RAM: The Soldered Limitation
Apple’s Mac Mini M4 and M4 Pro deserve special attention because they represent popular mini PCs with completely non-upgradeable RAM. Understanding this limitation helps potential buyers avoid expensive mistakes.
The Mac Mini’s “unified memory” architecture integrates RAM directly into the M4 chip package during manufacturing. This approach provides exceptional bandwidth and efficiency but permanently locks capacity at purchase. The base M4 Mac Mini includes 16GB unified memory, upgradeable at purchase to 24GB or 32GB for the M4, and 24GB-128GB for the M4 Pro.
Apple charges $200 per 8GB increment for memory upgrades during purchase. Adding 16GB to reach 32GB costs $400—significantly more than aftermarket SO-DIMM modules cost for Windows mini PCs. This creates a difficult decision: overpay for maximum RAM upfront “just in case,” or accept permanent capacity limits if future needs increase.
Despite creative attempts by repair specialists, while some technically-skilled individuals have successfully swapped memory chips using specialized micro-soldering equipment, this requires industrial-grade tools, deep technical expertise, and voids warranty completely. For practical purposes, Mac Mini RAM is non-upgradeable.
Mac buyers should configure maximum RAM they might need during the 4-6 year ownership period, as later expansion is impossible. For perspective on these limitations and clever workarounds some users have attempted, this article about Upgrading M4 Mac Mini storage demonstrates the extreme difficulty of modifying Apple’s integrated components.
Pro Tip: Buy the Mini PC, Upgrade RAM Later
Don’t overpay for maximum RAM at purchase time if your mini PC supports SO-DIMM upgrades. Buy the base configuration with minimum RAM, then immediately upgrade using aftermarket modules for 40-60% cost savings. For example, a mini PC with 8GB base might cost $400, while the 32GB version costs $600. Buy the $400 model and add $80 worth of aftermarket RAM yourself, saving $120 while ending with identical specifications.
FAQ Section
Q: Can I mix different brands of RAM in my mini PC?
A: Yes, you can mix brands, but I strongly recommend using matched pairs (same capacity, speed, and ideally same brand) for optimal performance. Mixing brands or specifications may reduce dual-channel efficiency or cause stability issues, though most modern systems handle mixed RAM gracefully using Flex Mode.
Q: How do I know if my mini PC has SO-DIMM slots or soldered RAM?
A: Check the manufacturer’s specification sheet for “SO-DIMM slots” in the memory section, search YouTube for “[your model] teardown” to see internal layout, or look for reviews mentioning upgradeability. If specifications list “upgradeable RAM” or “2× SO-DIMM slots,” you can upgrade. If it says “soldered” or doesn’t mention slots, RAM is permanently fixed.
Q: Will upgrading RAM void my mini PC warranty?
A: It depends on the manufacturer. Many explicitly allow user RAM and storage upgrades without warranty implications (Minisforum, Geekom, Beelink generally permit this). Others void warranties when you open the chassis. Check your warranty terms before proceeding, and consider waiting until warranty expires if terms are unclear.
Q: Can I use desktop RAM (DIMM) in a mini PC?
A: No. Mini PCs require SO-DIMM modules (laptop RAM), which are physically smaller than desktop DIMM modules. The two formats are not interchangeable—SO-DIMM is approximately 2.7 inches long while DIMM is 5.25 inches long. Always verify you’re purchasing SO-DIMM, not DIMM.
Q: Is 16GB RAM enough for video editing on a mini PC?
A: For 1080p video editing with moderate timelines, 16GB is adequate. For 4K editing, color grading, or complex projects with many layers and effects, 32GB provides significantly better experience. Professional 8K workflows or DaVinci Resolve color work benefit from 64GB. Monitor your RAM usage during editing to determine if you’re hitting limits.
Q: Can I install one 16GB module and one 8GB module together?
A: Yes, this works using Flex Mode (Asymmetric Dual Channel). The system will run the matched 16GB (8GB from each stick) in dual-channel mode for better performance, while the remaining 8GB runs in single-channel mode. You’ll have 24GB total, which is better than just 16GB, though not as optimal as two matched 16GB modules (32GB in full dual-channel). For absolute best performance, always use matched pairs.
Q: What’s the difference between DDR4-3200 and DDR4-2666?
A: The numbers indicate speed in MT/s (megatransfers per second). DDR4-3200 transfers data at 3200 MT/s while DDR4-2666 runs at 2666 MT/s—approximately 20% slower. Faster RAM improves performance in memory-bandwidth-intensive tasks, though the difference is modest for everyday computing. Always match or exceed your system’s rated speed.
Q: Do I need to reinstall Windows after upgrading RAM?
A: No. RAM upgrades require no software changes whatsoever. Windows automatically detects the new RAM capacity at next boot and begins using it immediately. You might want to run Windows Memory Diagnostic to test the new RAM, but reinstallation isn’t necessary.
Q: Can upgrading RAM fix a slow mini PC?
A: It depends on why the system is slow. If slowness results from insufficient RAM (constant disk activity, applications closing automatically, browser tabs reloading frequently), upgrading RAM delivers dramatic improvements. If slowness results from a weak CPU, old hard drive, or malware, adding RAM won’t help. Check Task Manager’s memory usage—if consistently above 80%, RAM upgrade helps.
Q: What RAM speed should I buy for my mini PC?
A: Buy RAM matching or slightly exceeding your system’s maximum supported speed listed in specifications. For example, if your mini PC supports DDR4-3200, purchase DDR4-3200 or DDR4-3600 modules. Faster modules work but run at the system’s maximum supported speed. Don’t pay significant premiums for speeds your system can’t utilize.
Bottom Line
Yes, you can upgrade RAM in most mini PCs, but verifying upgradeability before purchase saves frustration and financial loss later. Mid-range and high-end models from manufacturers like Minisforum, Geekom, ASUS, and Beelink feature dual SO-DIMM slots that welcome user upgrades, typically supporting 32GB to 96GB depending on the model. These systems provide excellent long-term value because you can start with 16GB and add more later as needs evolve or prices drop.
Budget mini PCs under $300 and Apple’s Mac Mini permanently solder RAM to motherboards, eliminating all upgrade potential. For these systems, you must configure maximum capacity at purchase time or accept permanent limitations. This fundamentally changes the value proposition—a mini PC with 16GB soldered costs the same to use as a mini PC with upgradeable 16GB, but the latter offers flexibility while the former imposes permanent constraints.
RAM upgrades deliver substantial performance improvements, particularly when moving from 8GB to 16GB or 32GB. The upgrade process is straightforward, requiring only a screwdriver and 15 minutes of time. For mini PC owners experiencing slowdowns, constant disk activity, or application crashes, RAM upgrades often provide dramatic relief without replacing the entire system.
When shopping for mini PCs in 2026, prioritize models with dual SO-DIMM slots unless you have specific reasons to accept soldered memory. The ability to upgrade RAM extends a mini PC’s useful life from 3-4 years to 5-7 years, amortizing the initial purchase cost across more years of service. That flexibility alone justifies choosing upgradeable models even if they cost slightly more upfront.