If you think your graphics card might have damaged your motherboard, the most reliable way to check is to visually inspect the PCIe slot, test booting with and without the GPU, and cross‑test using a known‑good GPU or integrated graphics before you decide what’s actually dead. In my opinion, a calm, step‑by‑step approach beats guessing every time, especially when expensive hardware is on the line.
Motherboard damage from a GPU is not the most common PC failure, but it does happen—usually due to electrical shorts, bad power delivery, or mechanical stress from huge modern GPUs. In this ultimate guide, I’ll walk you through how to diagnose potential motherboard damage from a GPU, using a workflow very similar to what I’ve used for years reviewing and troubleshooting gaming rigs.
Can a GPU Actually Damage a Motherboard?
Yes, a GPU can damage a motherboard, but it typically happens under specific conditions like electrical faults, physical impact, or extreme weight on the PCIe slot—not from normal gaming or everyday use.
In most builds I’ve seen, either the GPU or the PSU fails first, not the motherboard. However, certain scenarios do put the motherboard at risk:
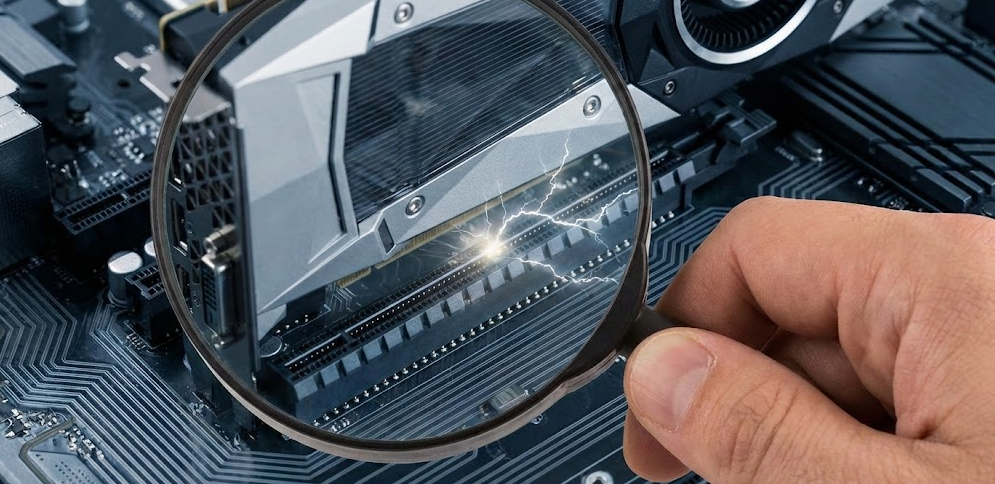
- Electrical short inside the GPU that routes power incorrectly through the PCIe slot.
- Improperly seated or forced‑in card that bends pins, traces, or the slot itself.
- Extremely heavy GPU without support slowly stressing the PCIe slot and solder joints.
- Wrong or loose PCIe power connectors causing arcing, heat, or intermittent shorts.
If you had a sudden failure immediately after installing or swapping a GPU, or you smelled burning near the PCIe area, you’re right to be suspicious of possible board damage.
Key Signs Your Motherboard Might Be Damaged (After GPU Issues)
If your GPU recently failed, crashed hard, or was installed incorrectly, these are the main clues that the motherboard—not just the GPU—may be damaged.
System won’t power on at all
If pressing the power button does nothing (no fans, no LEDs, no beeps):
- The motherboard may be shorted or dead.
- The PSU may also be blown, so you must rule that out.
When a board dies right after installing a suspect GPU, it’s a strong correlation, though not absolute proof.
System powers on but no video, even with a known‑good GPU
If:
- Fans spin and lights turn on.
- You get no video output from any GPU you try.
- You’ve already tried a different cable and monitor.
Then the PCIe slot, PCIe controller, or board’s power delivery to that slot may be damaged.
Integrated graphics works, but any GPU in that slot fails
If your CPU has integrated graphics and:
- The system boots and shows BIOS/Windows on the motherboard HDMI/DisplayPort.
- As soon as you plug any discrete GPU into the main PCIe slot, you get black screen or instant shutdown.
That points strongly toward damage to that particular PCIe slot or the surrounding circuitry.
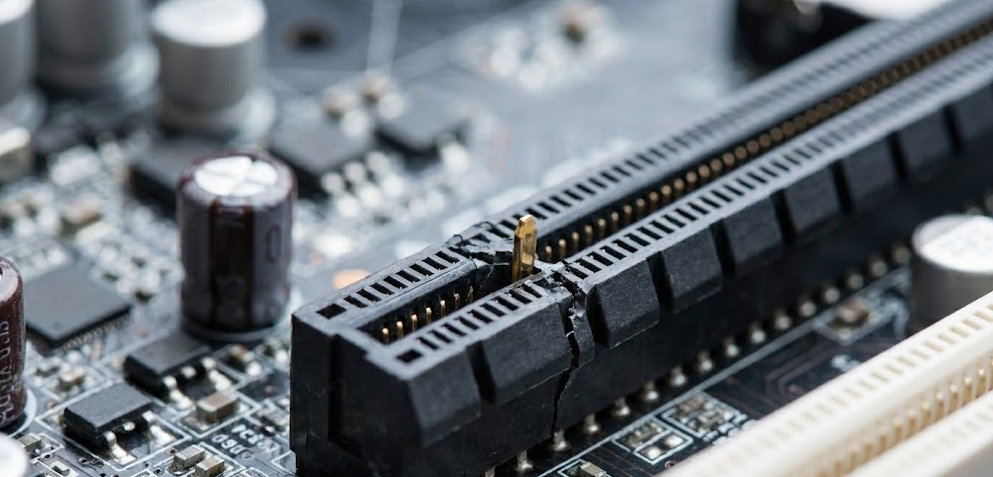
Physical damage around the PCIe slot
Use a flashlight and check for:
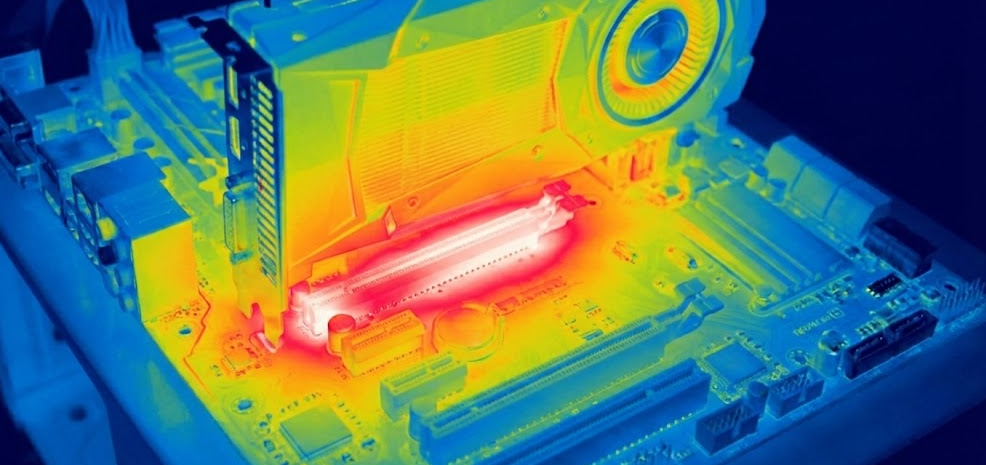
- Burn marks or dark discoloration on the PCB.
- Melted or cracked plastic in or around the PCIe slot.
- Tiny components (capacitors, resistors, chokes) that look chipped, blown, or missing.
- Warped metal reinforcement around the slot.
In my experience, if you see visible burn marks or melted plastic near the GPU slot, that board is no longer trustworthy for long‑term use with expensive GPUs.
Random crashes or reboots only under GPU load
If:
- The system idles and does light tasks fine.
- But it crashes, freezes, or reboots only during gaming or GPU benchmarks.
Then you may be dealing with:
- A failing GPU.
- A PSU that can’t deliver stable power.
- Or a motherboard whose PCIe power delivery or slot is marginally damaged.
You’ll need to swap parts to pinpoint the culprit.
Step‑By‑Step: How To Check If Your Motherboard Is Damaged by a GPU
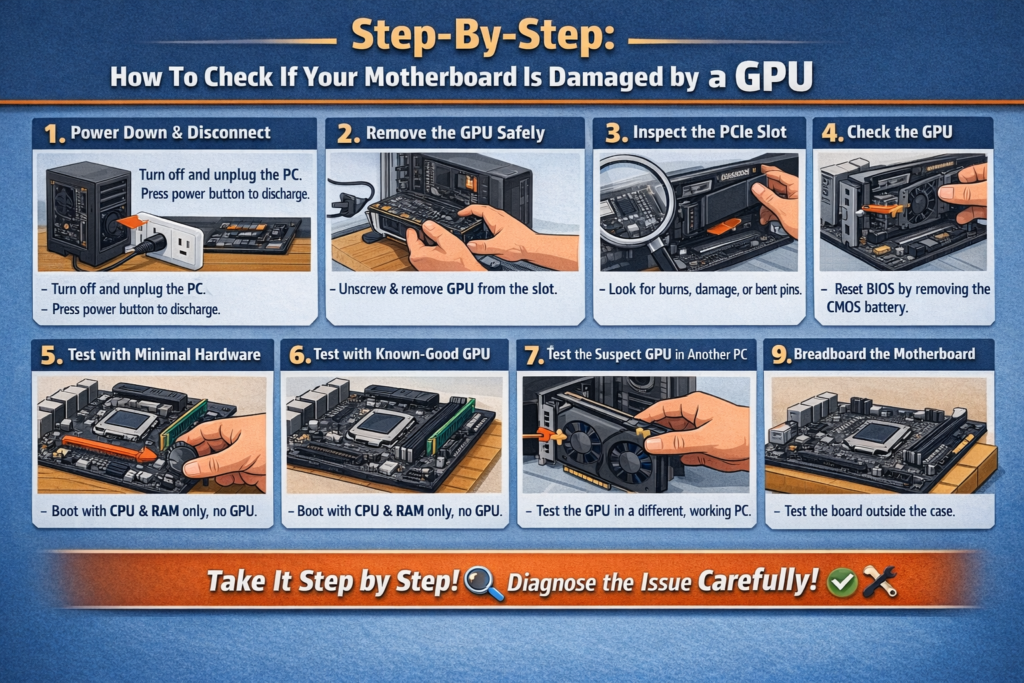
Here’s a practical, structured workflow you can follow at home. Take your time and don’t skip steps.
Step 1: Fully power down and disconnect
- Shut down the PC from the OS if possible.
- Switch the PSU off (0 position).
- Unplug the power cable from the wall or surge protector.
- Press the case power button once to discharge leftover power.
This reduces the risk of further damage or accidental shorting while you work inside the case.
Step 2: Remove the GPU safely
- Unscrew the GPU from the expansion slot brackets.
- Press the PCIe latch at the end of the slot.
- Pull the GPU straight out, supporting its weight to avoid flexing the slot.
Avoid twisting or yanking the card—if it’s stuck, double‑check the latch and screws.
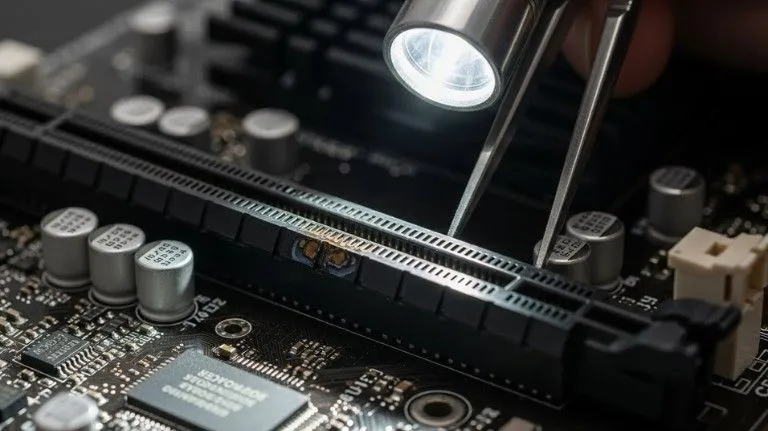
Step 3: Inspect the motherboard and PCIe slot
With the GPU out, closely inspect the area:
- Look for burnt or darkened areas around the slot.
- Check if the slot plastic is melted, bent, or cracked.
- Look for any tiny components that look scorched, lifted, or missing.
- Check for dust mixed with what looks like soot or burnt plastic.
If you find obvious burn marks or melted plastic, treat that slot (and possibly the board) as damaged.
Step 4: Inspect the GPU itself
Even though this article focuses on the motherboard, you have to know whether the GPU is also bad:
- Examine the gold PCIe fingers for charring or pitting.
- Look for cracked or blown components on the GPU PCB.
- Check around the power connectors for discoloration or melted plastic.
If the GPU shows clear physical damage, I generally consider both the card and the slot suspect until proven otherwise.
Step 5: Test with minimal hardware (no GPU)
- Leave the GPU out for now.
- Keep only CPU, one RAM stick, and the PSU connected.
- If your CPU has integrated graphics, connect the monitor to the motherboard’s HDMI/DisplayPort.
Try powering on:
- If the system posts and shows BIOS, the board is at least partially fine.
- If it still shows no signs of life, you may be dealing with deeper motherboard or PSU failure.
Step 6: Clear CMOS and test without the GPU
Clearing CMOS resets BIOS settings that might be preventing a proper boot, especially after changing GPUs or PCIe settings.
- Ensure the PSU is switched off and unplugged from the wall. If the board still has standby power, this step won’t work properly and could be unsafe.
- Remove the round CR2032 CMOS battery for about five minutes, or bridge the clear‑CMOS jumper pins on your motherboard with a screwdriver (following your board’s manual).
- Reinsert the battery, plug the PC back in, and boot the system with no GPU installed.
If your CPU has integrated graphics:
- Connect your monitor directly to the motherboard’s HDMI/DisplayPort.
- See if the system successfully posts and reaches the BIOS.
If it starts working after a CMOS reset, your problem may have been configuration‑related rather than physical damage.
Step 7: Test with a known‑good GPU in another slot (if possible)
If your board has multiple PCIe x16‑length slots:
- Install a known‑good GPU into a secondary slot.
- Connect power cables and try to boot.
Result guide:
- If it boots fine in the secondary slot, your primary slot is very likely damaged.
- If it doesn’t boot in any slot, either the “known‑good” GPU isn’t actually good, the PSU is faulty, or the motherboard has deeper issues.
For extra confidence, you can cross‑check the same GPU in another PC.
Step 8: Test the suspect GPU in another known‑good system
If you have access to another working PC:
- Test the suspicious GPU there.
- If that PC refuses to post or behaves erratically only with that GPU installed, the GPU is almost certainly bad.
- If that PC runs fine with the GPU, your original motherboard or PSU is more likely at fault.
From my professional experience, cross‑testing in another system is one of the most decisive steps in this whole process.
Step 9: Breadboard the motherboard (advanced but powerful)
If you’re still unsure and comfortable going further:
- Remove the motherboard from the case.
- Place it on a non‑conductive surface (like a cardboard box).
- Reconnect just CPU, one RAM stick, and PSU, and use integrated graphics if available.
This “breadboarding” eliminates case‑related shorts and helps confirm whether the board itself can boot consistently.
Physical Motherboard Damage vs. “Soft” Problems
Not every boot issue or GPU failure means your board is physically damaged. It helps to distinguish between the two.
Likely physical damage indicators
- Burnt smell near the PCIe area or VRM components.
- Visible burns, melted plastic, or dark spots on the PCB.
- Multiple PCIe slots or ports stop working around the same time.
- System fails to POST even with minimal hardware and a known‑good PSU.
Likely “soft” or configuration issues
- System recovers after a CMOS reset.
- Problems start right after a BIOS update or major BIOS change.
- System works on integrated graphics and just needs driver cleanup after GPU swap.
In a professional repair environment, technicians often combine visual inspection, POST code readers, and multimeter measurements to tell these apart with higher confidence.
When a Heavy GPU Can Physically Stress the Motherboard
Modern high‑end GPUs are incredibly heavy. A triple‑fan flagship card like an RTX 4090 can weigh around 2 kg (roughly 4.4 lbs), depending on the model and cooler design. Over time, that constant downward torque can:
- Slightly deform the PCIe slot itself.
- Stress the microscopic solder joints connecting the slot to the motherboard.
- Lead to intermittent contact issues that show up when the case is moved or bumped.
Most high‑end motherboards now ship with metal‑reinforced PCIe slots (ASUS brands theirs as “SafeSlot,” for example), which helps distribute the load and resist flex. Still, physics wins eventually. If you’re running a large card like a 4080 or 4090‑class GPU, I strongly recommend:
- Using the included anti‑sag bracket from the GPU box.
- Or buying a simple aftermarket GPU support stand.
- Avoiding moving the PC around with the GPU unsupported.
In my opinion, a cheap support bracket is one of the best “insurance policies” you can buy for both your GPU and motherboard.
Practical Checklist: Is My Motherboard Damaged by the GPU?
Use this quick table as a sanity check while you troubleshoot.
| Question | What It Suggests |
|---|---|
| Did the PC die or stop posting right after installing/swapping a GPU? | Suggests possible GPU, slot, or PSU damage triggered by that change. |
| Do you smell anything burnt near the PCIe area? | Strong sign of electrical damage on GPU, slot, or surrounding components. |
| Does the PC boot fine on integrated graphics but not with any GPU? | Points toward PCIe slot or GPU issues; cross‑test both to confirm. |
| Does a known‑good GPU work in another slot but not the main one? | The primary PCIe slot is likely damaged or unreliable. |
| Did multiple ports/slots fail around the same time as the GPU problem? | Indicates broader motherboard damage or power delivery issues. |
| Is your GPU visibly sagging or bending the slot? | Mechanical stress over time; use a support bracket and inspect the slot. |
Common Real‑World Scenarios (And What They Usually Mean)
Scenario 1: Borrowed GPU, sudden death
You borrow a used GPU, plug it in, and:
- The PC powers on once, then never posts again with that card.
- Integrated graphics works afterward, but the main PCIe slot never works correctly again.
Most likely, that GPU had an internal fault that damaged the slot. You might be able to use a secondary slot, but the primary slot is probably done.
Scenario 2: Heavy GPU, intermittent black screens
You’re running a big triple‑fan card. The PC is fine most of the time, but:
- You get black screens or crashes when you bump the desk or move the case.
- You notice the GPU sagging significantly.
Here, the slot or solder joints may be stressed. Reseating the card and adding a support bracket often improves stability, but if damage is already present, the slot may remain flaky.
Scenario 3: GPU artifacting, but board is fine
Your GPU starts showing artifacts, crashes under load, and eventually stops displaying anything. You drop in a different GPU and the system works perfectly. In this very common case, the GPU simply died and the motherboard is perfectly healthy.
When You Should Stop Using a Suspect Motherboard
Continuing to use a damaged motherboard can put other components at risk, especially a new GPU or CPU.
You should seriously consider retiring or replacing the board if:
- You see clear burn marks or melted components near the PCIe slot or VRM area.
- The system repeatedly behaves dangerously (hard shutdowns, sparks, smoke) with known‑good GPUs.
- POST is impossible even with minimal hardware, a different PSU, and a clean CMOS.
- Multiple PCIe slots or power‑related subsystems fail over a short time.
In those cases, trying to “nurse” the board along is usually a false economy. If you’re investing in a 300–1000‑dollar GPU, pairing it with a compromised motherboard just isn’t worth the risk.
Helpful Video and Creator Recommendations
If you’re a visual learner, watching experienced technicians diagnose GPU and motherboard faults can make everything click much faster.
Personally, I recommend starting with Greg Salazar’s Fix or Flop series, especially episodes where he isolates GPU vs. motherboard issues step by step. For example, in “Fixing a Viewer’s BROKEN Gaming PC? – Fix or Flop S7:E3” he walks through exactly the kind of “is it the GPU or the board?” troubleshooting process many home builders struggle with.
On top of that, channels like NorthridgeFix go deep into board‑level repair, showing how shorts on GPUs and motherboards are found and fixed with multimeters and microscopes. I find that pairing videos like these with a written checklist (like the one in this guide) gives you both the step‑by‑step logic and the real‑world visuals you need to troubleshoot with confidence.
External Resources Worth Bookmarking
Here are a few high‑quality resources you can read alongside this guide for deeper context:
- ASUS’s official guide on clearing CMOS – a good reference for safe CMOS reset procedures specific to their boards.
- Geeks on Site’s overview of faulty motherboard symptoms and diagnosis – helpful to see how repair shops frame the signs of a failing board.
- Gigabyte RTX 4090 Gaming OC review on Tom’s Hardware – illustrates just how large and heavy modern GPUs have become, and why anti‑sag and slot reinforcement matter.
These aren’t required reading to fix your PC, but they’re excellent to deepen your understanding of what’s going on under the hood.
FAQs: Motherboard Damage From GPU (Quick Answers)
Can a dead GPU kill a motherboard?
A GPU that simply “dies” from age usually won’t kill a motherboard, but a GPU with an electrical short can damage the PCIe slot or nearby power circuitry. If you hear a pop, see sparks, or smell burning when powering on with a suspicious GPU, assume both the card and slot might be affected.
How do I know if it’s my GPU or motherboard?
Cross‑test both: try a known‑good GPU in your system, and try the suspect GPU in a different, known‑good PC. If the suspect GPU fails everywhere, it’s the GPU. If multiple GPUs fail only in your board but work elsewhere, the motherboard or its power delivery is likely to blame.
Can a heavy GPU physically damage the motherboard?
Yes, over time a very heavy GPU can stress or crack the PCIe slot or solder joints, especially without a support bracket or on boards without metal‑reinforced slots. That’s why many manufacturers and reviewers recommend using anti‑sag brackets with flagship GPUs.
Is it safe to keep using a motherboard with a slightly damaged PCIe slot?
If damage is purely cosmetic and the slot passes stress tests without crashes, some users keep using it, but there is always a risk. If you see burned plastic, visible cracks, or intermittent contact, I wouldn’t trust that slot with an expensive GPU.
Can a failing motherboard damage my GPU?
Yes. A motherboard with bad power delivery or shorted traces can feed your GPU unstable or incorrect voltages, potentially damaging it. If you strongly suspect the board is faulty, avoid repeatedly testing new or good GPUs in it until you’re confident it’s safe—or replace the board.