To make OpenClaw work with your browser, you need to either use OpenClaw’s built-in managed browser profile (which launches an isolated Chromium instance automatically), attach it to your existing Chrome session via Chrome DevTools MCP, set up a node host relay with the browser extension, or connect a remote CDP cloud browser. The right method depends on whether you want an isolated agent browser or control over your own signed-in session.
That said, there is more to it than just picking a method. Each approach has real differences in setup complexity, browser compatibility, and what the agent can actually do. I have tested all of these setups, and in this guide I’ll walk you through every option so you can pick the one that actually fits your workflow.
What Is OpenClaw and Why Does Browser Integration Matter?
OpenClaw is an AI agent framework that lets you automate tasks, run browser-based workflows, scrape data, fill forms, and interact with web apps using natural language instructions. Think of it as giving an AI agent a real browser to work with, not just a headless HTTP client.
Browser integration is the core feature that makes OpenClaw genuinely powerful. Without it, the agent can only fetch raw HTML. With a live browser connected, it can log into accounts, navigate JavaScript-heavy apps, click buttons, handle popups, and interact with pages the same way a human would. The difference in capability is enormous.
In 2026, OpenClaw has matured significantly with its browser tooling. It now supports multiple named browser profiles, remote cloud browser connections, and a dedicated Chrome DevTools MCP path that lets agents attach directly to your personal signed-in browser session. This guide covers all of it.
Browser Compatibility: What OpenClaw Supports
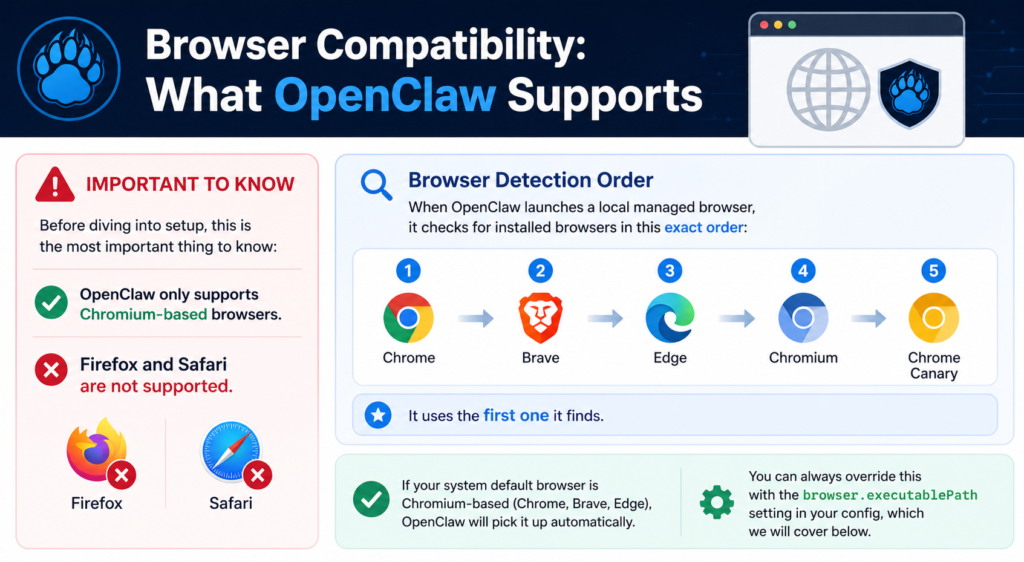
Before diving into setup, this is the most important thing to know: OpenClaw only supports Chromium-based browsers. Firefox and Safari are not supported.
When OpenClaw launches a local managed browser, it checks for installed browsers in this exact order:
-
Chrome
-
Brave
-
Edge
-
Chromium
-
Chrome Canary
It uses the first one it finds. If your system default browser is Chromium-based (Chrome, Brave, Edge), OpenClaw will pick it up automatically. You can always override this with the browser.executablePath setting in your config, which we will cover below.
The Four Main Ways to Connect OpenClaw to a Browser
There are four distinct methods for connecting OpenClaw to a browser. Each has a different use case, and choosing the wrong one is one of the most common reasons people run into frustrating setup issues.
Let’s go through each one in detail.
Method 1: The Managed OpenClaw Browser Profile (Recommended Starting Point)
This is the default and easiest method. When you install OpenClaw, it automatically creates a dedicated browser profile called openclaw. This is a completely isolated browser instance, separate from your personal browser. It has its own user data directory, its own CDP port (starting at 18800), and even a distinctive orange accent color so you can immediately tell it apart from your normal browser.
The managed profile is what I recommend for most automation tasks. It is clean, does not touch your personal cookies or login sessions, and is fully controlled by the agent. The official OpenClaw browser documentation describes it as “a safe, isolated surface for agent automation and verification.”
Step-by-Step: Setting Up the Managed Browser Profile
Step 1: Verify OpenClaw is installed
Open your terminal and run:
openclaw statusIf OpenClaw is running correctly, you will see the Gateway status. If not, install it first via npm with npm install -g openclaw.
Step 2: Check that the browser plugin is enabled
Open your config file at ~/.openclaw/config.json. Make sure you do not have a plugins.allow list that omits the browser plugin. If you do have one, add "browser" to it:
{

"plugins": {

"allow": ["telegram", "browser"]

}

}
Alternatively, having any browser config block in your root config (such as browser.enabled: true) will also activate the plugin even under a restrictive allowlist.
Step 3: Run the browser doctor check
openclaw browser --browser-profile openclaw doctorThis checks that the Gateway, plugin, profile, and browser are all healthy. For a deeper check that also probes a live tab, use:
openclaw browser --browser-profile openclaw doctor --deepStep 4: Start the browser
openclaw browser --browser-profile openclaw startOpenClaw will launch a Chromium-based browser in a dedicated profile. You should see a browser window open with the orange accent tint.
Step 5: Test it
openclaw browser --browser-profile openclaw open https://example.com

openclaw browser --browser-profile openclaw snapshot
If you get a snapshot back with page content, the managed browser is working correctly.
Pro Tip: On Linux servers without a display (like a DigitalOcean droplet), OpenClaw automatically falls back to headless mode when no
DISPLAYorWAYLAND_DISPLAYenvironment variable is detected. You can also force headless withopenclaw browser start --headlesswithout changing your config permanently. This is perfect for VPS deployments where you never want a visible browser window.
Method 2: Attaching to Your Existing Chrome Session (User Profile)
The user profile is a built-in profile that connects OpenClaw directly to your real, signed-in Chrome session using the Chrome DevTools MCP (Model Context Protocol). This means the agent can access your Gmail, your logged-in accounts, and your current tabs, all without you needing to log into anything again.
This method is higher privilege than the managed profile. Use it when your automation genuinely needs your existing session state, and make sure you are at your computer to approve the attach prompt that Chrome will show you.
Requirements for this method:
-
Google Chrome version 144 or newer
-
Chrome must be launched with the remote debugging port flag enabled
-
You must be physically at the computer to approve the connection prompt
Step-by-Step: Attaching to Your Existing Chrome Session
Step 1: Relaunch Chrome with remote debugging enabled
Completely close out of your existing Chrome session first. Open your terminal or command prompt and relaunch the browser using the remote debugging flag:
Linux:
google-chrome --remote-debugging-port=9222Windows:
chrome.exe --remote-debugging-port=9222macOS:
/Applications/Google\ Chrome.app/Contents/MacOS/Google\ Chrome --remote-debugging-port=9222This opens the WebSocket connection that Chrome MCP needs to attach to your session. You cannot enable this from inside Chrome’s UI after launch, it must be set at startup as a launch flag.
Step 2: Start the user profile from OpenClaw
openclaw browser --browser-profile user startChrome will show an attach consent prompt. Click “Allow.”
Step 3: Verify the connection
openclaw browser --browser-profile user status

openclaw browser --browser-profile user tabs
A successful connection looks like this in the status output:
-
driver: existing-session -
transport: chrome-mcp -
running: true
The tabs command will list your currently open browser tabs. At this point, the agent has live control of your Chrome session.
Step 4: Take a snapshot of the active tab
openclaw browser --browser-profile user snapshot --format aiThis returns a structured AI-readable view of whatever tab is currently focused in your browser.
Important limitations of the user profile: Compared to the managed openclaw profile, the existing-session path has some constraints worth knowing. Batch actions, PDF export, download interception, and response body capture still require the managed browser path. The type command does not support slowly=true, and select only accepts a single value at a time. For most everyday automation tasks these limits do not matter, but for complex scraping or form workflows, the managed profile is more capable.
Method 3: Node Host and Browser Extension (Remote VPS Setup)
This method is for situations where OpenClaw is running on a remote server or VPS, but the browser you want to control is on your local machine. This is a common scenario if you are running OpenClaw as a background service on a cloud server but want it to automate tasks in a browser on your local desktop.
Hostinger’s detailed guide on using the OpenClaw browser extension explains this setup well: it involves three components working together. OpenClaw runs on the VPS, a node host program runs on your local machine as a relay, and the Chrome extension is installed in your local browser to execute the instructions.
The three components:
-
VPS Gateway: OpenClaw running on your server
-
Node Host: A relay program installed on your local computer
-
Chrome Extension: Installed in your local Chromium browser, connects to the node host
Step-by-Step: Setting Up the Node Host Relay
Step 1: Install OpenClaw on your local machine
Even though the Gateway runs on the VPS, you also need OpenClaw installed locally to get the node host and the browser extension files:
npm install -g openclawStep 2: Start the node host on your local machine
The node host exposes your local browser to the remote VPS Gateway via a proxy command. Once running, the Gateway can auto-route browser tool calls to it without any additional browser config.
Step 3: Install the browser extension
The OpenClaw browser extension is not published in the Chrome Web Store. It ships as local files inside the OpenClaw npm package. Install it manually from the terminal:
openclaw browser extension installThen in Chrome, go to chrome://extensions, enable Developer Mode, click “Load Unpacked,” and point it to the extension path from the previous command.
Step 4: Connect and test
Open the Chrome tab you want to control, click the OpenClaw extension icon in the toolbar, and confirm the badge shows “ON.” Back on your VPS, run:
openclaw browser --browser-profile chrome tabsYou should see your local Chrome tabs listed from the remote server.
Note on Brave: Multiple community members have reported that if Chrome does not cooperate with the extension relay, switching to Brave often solves it. Brave tends to have fewer conflicts with the extension’s connection mechanism.
Method 4: Remote CDP and Cloud Browsers
For power users, developers building production automation pipelines, or anyone who needs scale, remote CDP connections let OpenClaw drive a cloud-hosted browser. This is becoming increasingly popular in 2026 as cloud browser services have matured significantly.
Browser Use’s integration guide for OpenClaw shows one clean approach: you configure a remote CDP profile using a WebSocket URL from a cloud provider. No extra SDK or dependencies are needed. OpenClaw connects to the remote browser over WebSocket CDP just like it would to a local one.
Supported cloud browser providers:
Browserless:
{

"browser": {

"enabled": true,

"defaultProfile": "browserless",

"profiles": {

"browserless": {

"cdpUrl": "wss://production-sfo.browserless.io?token=YOUR_API_KEY",

"color": "#00AA00"

}

}

}

}
Browserbase (includes built-in CAPTCHA solving and stealth mode):
{

"browser": {

"enabled": true,

"defaultProfile": "browserbase",

"remoteCdpTimeoutMs": 3000,

"remoteCdpHandshakeTimeoutMs": 5000,

"profiles": {

"browserbase": {

"cdpUrl": "wss://connect.browserbase.com?apiKey=YOUR_API_KEY",

"color": "#F97316"

}

}

}

}
Browser Use Cloud (via CDP URL):
Add your Browser Use API key to the CDP URL as a query parameter. You can also pass timeout (session duration in minutes, max 240), profileId (to load a saved browser profile with persistent cookies), and proxyCountryCode (to route through a specific country like us, de, or jp).
Remote CDP is also useful if you self-host Browserless in Docker on the same machine as OpenClaw. In that case, treat it as an externally managed CDP service by setting attachOnly: true so OpenClaw does not try to launch its own browser on that port.
Configuring the config.json File
All browser settings live in ~/.openclaw/config.json. Here is a full example configuration that covers the most important options:
{

"browser": {

"enabled": true,

"defaultProfile": "openclaw",

"headless": false,

"actionTimeoutMs": 60000,

"tabCleanup": {

"enabled": true,

"idleMinutes": 120,

"maxTabsPerSession": 8,

"sweepMinutes": 5

},

"profiles": {

"openclaw": { "cdpPort": 18800, "color": "#FF4500" },

"work": {

"cdpPort": 18801,

"color": "#0066CC",

"headless": true,

"executablePath": "/Applications/Google Chrome.app/Contents/MacOS/Google Chrome"

},

"user": {

"driver": "existing-session",

"attachOnly": true,

"color": "#00AA00"

}

}

}

}
Key settings explained:
Any change to browser config requires a Gateway restart to take effect.
Setting a Custom Browser (Brave, Edge, or Specific Chrome)
If you want OpenClaw to use a specific browser rather than whichever it auto-detects, use the executablePath setting. You can set it globally or per profile.
Via CLI:
openclaw config set browser.executablePath "/usr/bin/google-chrome"Per platform in config.json:
macOS (Brave):
{

"browser": {

"executablePath": "/Applications/Brave Browser.app/Contents/MacOS/Brave Browser"

}

}
Linux (Chrome):
{

"browser": {

"executablePath": "/usr/bin/google-chrome"

}

}
Windows (Edge):
{

"browser": {

"executablePath": "C:\\Program Files (x86)\\Microsoft\\Edge\\Application\\msedge.exe"

}

}
Based on my experience testing different setups, Brave is often a solid choice if you are running OpenClaw on a desktop machine. It tends to be stable with OpenClaw’s CDP connection and also has a built-in ad blocker that keeps automation sessions cleaner when scraping content-heavy pages.
If you want to see this whole process visually, This walkthrough on connecting OpenClaw with Chrome MCP covers the live attach flow and profile status verification in real time, which is genuinely helpful if you are setting it up for the first time.
Working With Multiple Browser Profiles
One of the more underrated features in OpenClaw is multi-profile support. You can run separate named profiles for different tasks simultaneously. For example, you might have:
-
openclaw: the default isolated profile for general automation -
work: a headless Chrome profile for background scraping jobs -
user: your real signed-in Chrome session for account-specific tasks -
remote: pointing at a cloud CDP URL for scalable workflows
Managing profiles from the CLI:
# List all profiles

openclaw browser profilesopenclaw browser create-profile –name work –color “#FF5A36”
openclaw browser create-profile –name chrome-live –driver existing-session
openclaw browser create-profile –name remote –cdp-url https://browser-host.example.com
openclaw browser delete-profile –name work
Use --browser-profile <name> on any CLI command to target a specific profile. All control endpoints also accept ?profile=<name> as a query parameter.
Troubleshooting OpenClaw Browser Issues

“Browser disabled” or “openclaw browser is unknown command”
This almost always means the browser plugin is not in your plugins.allow list. Open ~/.openclaw/config.json and add it:
{

"plugins": {

"allow": ["browser"]

}

}
Or add any browser config block to your root config. Either approach activates the plugin.
“Chrome CDP websocket for profile openclaw is not reachable after start”
This is a CDP startup failure. Run the minimal diagnostic sequence:
openclaw browser --browser-profile openclaw start

openclaw browser --browser-profile openclaw tabs

openclaw browser --browser-profile openclaw open https://example.com
If start fails, troubleshoot CDP readiness first. If start succeeds but tabs fails, the control plane is still unhealthy. If start and tabs succeed but open fails, the browser is up and the problem is likely an SSRF navigation policy block.
On slow hardware like a Raspberry Pi or a low-end VPS, Chrome can take longer than the default timeouts to start. Increase these values in your config.json:
{

"browser": {

"localLaunchTimeoutMs": 30000,

"localCdpReadyTimeoutMs": 15000

}

}
“Port is in use but not by OpenClaw”
If you are using Browserless in Docker on the same machine, you must set attachOnly: true on that profile. Without it, OpenClaw treats the loopback port as its own managed profile and throws a port conflict error.
If you have tools.profile: "coding" set, it includes web_search and web_fetch but does NOT include the full browser tool. You need to explicitly allow it:
{

"tools": {

"profile": "coding",

"alsoAllow": ["browser"]

}

}
Agent attaches but existing-session does not work
Make sure Chrome is version 144 or newer. The browser must have been launched with the --remote-debugging-port=9222 flag at startup. If you launched Chrome normally without the flag, close it completely and relaunch it from the terminal with the flag as described in Method 2. The openclaw doctor command will check that Chrome is installed locally but cannot open a debugging port on a browser that was not launched with it.
Comparison: All OpenClaw Browser Methods at a Glance
2026 Trends: What Is Changing in OpenClaw Browser Automation
The OpenClaw ecosystem in 2026 has moved meaningfully toward cloud-first browser automation. Browserbase in particular has become a popular pairing because of its built-in CAPTCHA solving, stealth fingerprinting, and residential proxy support, all of which are increasingly necessary for reliable scraping in an era where bot detection has gotten far more sophisticated.
Chrome DevTools MCP as an official Google-backed protocol has made the existing-session attach path significantly more reliable than earlier extension-based approaches, which had compatibility and reliability problems. If you previously used the browser extension method to control your own Chrome, it is worth revisiting the user profile approach now.
Multi-agent and sub-agent workflows have also become a more prominent use case. OpenClaw’s sub-agent policy requires explicit tools.alsoAllow: ["browser"] at the profile stage because sub-agent policy is applied after profile filtering. This is a common gotcha when building agentic pipelines.
Frequently Asked Questions
Does OpenClaw work with Firefox?
No. OpenClaw only supports Chromium-based browsers: Chrome, Brave, Edge, Chromium, and Chrome Canary. Firefox and Safari are not supported because they do not implement the Chrome DevTools Protocol (CDP) that OpenClaw relies on.
Do I need to install a browser separately, or does OpenClaw come with one?
OpenClaw does not bundle a browser. It auto-detects and uses any Chromium-based browser already installed on your system. If none is found, you will need to install one manually. Chrome and Brave are the most commonly used.
Can OpenClaw control my existing browser tabs?
Yes, using the user profile (existing-session via Chrome MCP). This gives the agent control over your currently open Chrome tabs and your logged-in sessions. You need Chrome 144+, and Chrome must be launched with the --remote-debugging-port=9222 flag.
What is the difference between the openclaw profile and the user profile?
The openclaw profile is a fully isolated managed browser with its own user data, no connection to your personal browser. The user profile attaches to your real signed-in Chrome session. Use openclaw for clean automation, use user when you need your existing logins and session state.
Can I use OpenClaw on a server without a GUI?
Yes. On Linux servers without a display environment, OpenClaw automatically falls back to headless mode. You can also force headless mode with openclaw browser start --headless or by setting browser.headless: true in your config.json.
Why is the browser tool missing from my agent?
Two common causes: either the browser plugin is missing from your plugins.allow list in config.json, or you are using a tools profile like coding that does not include the browser tool by default. Fix both by adding "browser" to plugins.allow and adding "browser" to tools.alsoAllow in your agent config.
What happens to tabs after automation finishes?
OpenClaw has a built-in tab cleanup system. By default, idle tabs are closed after 120 minutes, and no more than 8 tabs per session are kept open. These values are configurable in the tabCleanup section of your config.json.
Can I connect OpenClaw to a Brave browser specifically?
Yes. If Brave is your system default browser, OpenClaw picks it up automatically. You can also set it explicitly with browser.executablePath pointing to the Brave binary. For existing-session attach, set driver: "existing-session" and point userDataDir at your Brave profile directory.
Is the OpenClaw browser extension on the Chrome Web Store?
No. The browser extension ships as local files inside the OpenClaw npm package and must be installed manually using openclaw browser extension install followed by loading it as an unpacked extension in Chrome’s extensions page.
How do I use a cloud browser with OpenClaw?
Set a remote CDP profile in your ~/.openclaw/config.json using the cdpUrl field pointing to your cloud provider’s WebSocket endpoint. Browserless, Browserbase, and Browser Use all support this. No extra SDKs are required.
Bottom Line
Getting OpenClaw to work with your browser comes down to one decision: do you need a clean isolated agent browser, or do you need access to your existing logged-in sessions? For most automation and scraping tasks, the managed openclaw profile is the simplest and most capable path. For anything that requires your personal accounts, the user profile via Chrome MCP is the right tool, just remember to relaunch Chrome with the --remote-debugging-port=9222 flag before connecting. And for VPS users controlling a remote local browser, the node host relay method bridges the gap.
The config file at ~/.openclaw/config.json is where all of this comes together, and the openclaw browser doctor command is your best friend when something does not work. Start there, check the plugin allowlist, and verify CDP readiness before diving deeper into troubleshooting.