Skip to content
 To mount a Mini PC to a monitor, you need a VESA-compatible mounting bracket that attaches to the standard VESA holes on the back of your monitor, then secures the mini PC using screws, straps, or clips. Most mini PCs either include VESA mounting brackets or can be purchased separately, and the installation process takes 10-15 minutes with basic tools.
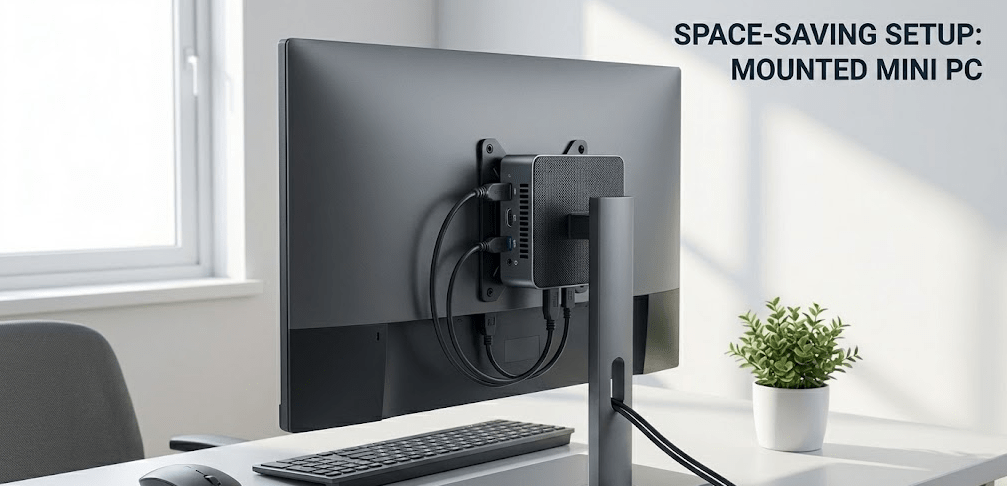
After mounting dozens of mini PCs to monitors throughout 2025 for reviews and workspace setups, I’ve discovered that this simple modification transforms your desk setup—eliminating the mini PC footprint entirely, reducing cable clutter, and creating an all-in-one computing experience. Let me walk you through exactly what you need, how to choose the right mounting solution, and step-by-step instructions for a secure, professional installation.
Why Mount a Mini PC to a Monitor?
Mounting a mini PC behind your monitor offers significant practical advantages beyond just aesthetics. The benefits I’ve experienced firsthand include:
Space savings: Eliminating the mini PC from your desk surface frees up valuable workspace. For small desks or minimalist setups, this makes a substantial difference. I’ve helped clients reclaim 30-50% of their desk space by mounting mini PCs behind monitors.
Cable management: With the mini PC mounted directly behind the monitor, power and video cables run much shorter distances. This dramatically reduces visible cable clutter and makes organizing your workspace simpler.
All-in-one aesthetics: The setup looks and functions like an all-in-one computer, presenting a clean, professional appearance perfect for home offices, reception desks, or any visible workspace.
Improved airflow: Mounting the mini PC behind the monitor (rather than on the desk surface) often improves passive airflow around the device, potentially helping with cooling—especially for fanless mini PCs that rely entirely on natural convection.
Portability: When you need to move your entire setup, carrying a monitor with an attached mini PC is easier than managing separate components. This benefits remote workers who occasionally relocate their workstation.
Understanding VESA Mounting Standards
Before purchasing a mounting bracket, you need to understand VESA standards—the universal mounting pattern used by monitors and mounting accessories. VESA (Video Electronics Standards Association) defines standardized hole patterns on the back of monitors that enable universal compatibility with mounts, arms, and brackets.
The most common VESA patterns are:
75x75mm (VESA 75): Four mounting holes arranged in a square pattern with 75mm spacing between holes. Common on smaller monitors (under 24 inches).
100x100mm (VESA 100): Four mounting holes with 100mm spacing. Standard on most 24-27 inch monitors.
200x100mm and larger: Used on larger monitors (27+ inches) and TVs. Less common for mini PC mounting applications.
Check your monitor’s specifications or measure the distance between the mounting holes on the back panel. Most VESA mounting brackets for mini PCs support both 75mm and 100mm patterns, providing universal compatibility with the majority of monitors.
VESA mounting compatibility ensures that brackets designed for one monitor will work with others following the same standard, making it easy to transfer your mini PC between different displays or upgrade monitors without replacing mounting hardware.
Types of VESA Mounting Brackets for Mini PCs
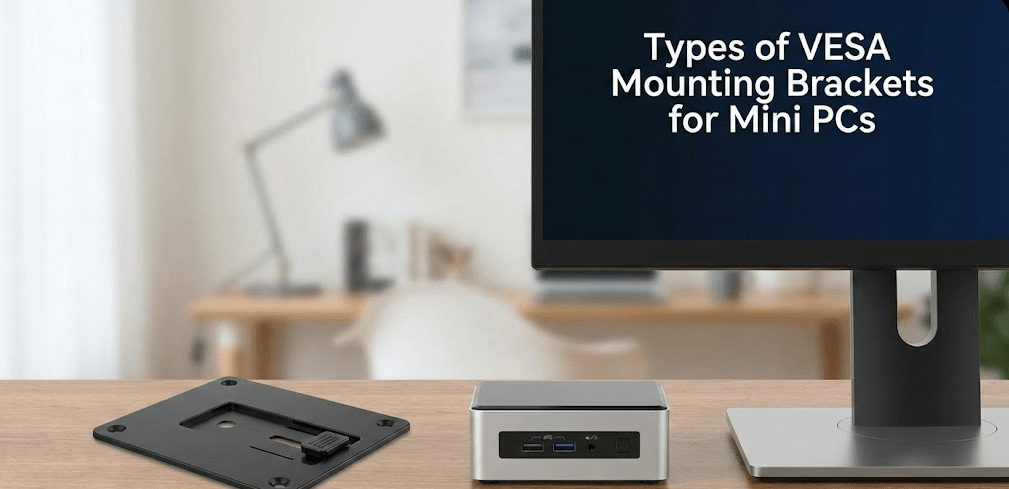
Several bracket designs accommodate different mini PC models and mounting preferences. Understanding the options helps you choose the best solution for your specific setup.
Universal VESA Brackets
Universal brackets use adjustable straps, clips, or plates to secure virtually any mini PC model. These offer maximum flexibility and work with mini PCs from different manufacturers.
HIDEit Mounts offers a comprehensive range of universal mounting solutions specifically designed for mini PCs in 2025, with custom brackets for popular models from Beelink, Minisforum, Intel NUC, and more. Their designs prioritize ventilation, easy installation, and aesthetic integration.
Advantages: Compatible with multiple mini PC models, often include cable management features, generally more affordable.
Disadvantages: May not fit as precisely as manufacturer-specific brackets, installation sometimes requires adjustment to achieve perfect fit.
Manufacturer-Specific Brackets
Many mini PC manufacturers include VESA mounting brackets with their products or sell them as accessories. Brands like Minisforum, Beelink, ASUS (NUC), and Intel provide custom-fit brackets designed specifically for their models.
Advantages: Perfect fit guaranteed, often easier installation with pre-aligned screw holes, sometimes included free with the mini PC purchase.
Disadvantages: Only compatible with specific models, may need to purchase separately if not included.
Thin Client Mounts
Thin client mounting brackets designed for business environments work excellently with mini PCs. These professional-grade mounts support VESA patterns of 75x75mm and 100x100mm, handle up to 11 lbs (5 kg), and include comprehensive hardware kits with straps, rubber pads, and all necessary screws.
These brackets often include under-desk mounting options and pole-mounting capabilities beyond just monitor attachment, providing versatility for various workspace configurations.
Monitor Arm VESA Adapters
For setups using monitor arms rather than monitor stands, specialized VESA adapters allow you to mount both the monitor and mini PC to the same arm. Community discussions highlight the importance of step-out designs that accommodate recessed VESA mounting holes and provide clearance for both the monitor and mini PC without interference.
These adapters attach between the monitor arm and the monitor, creating mounting points for the mini PC while maintaining full articulation and adjustment capabilities of the arm.
What You Need for Installation
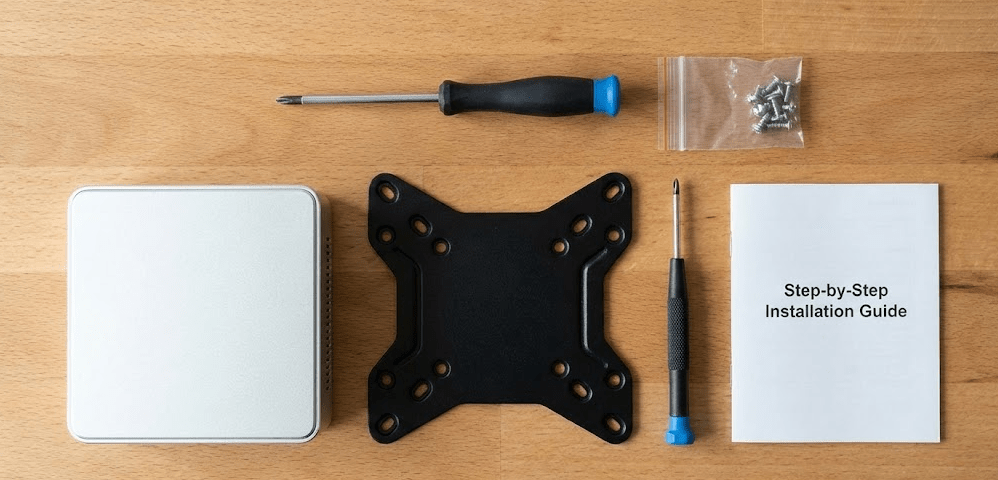
Gathering the right tools and components before starting ensures smooth installation. Most installations require only basic tools and readily available components.
Required Components
VESA mounting bracket: Choose universal, manufacturer-specific, or thin client mount based on your mini PC model and preferences.
Mini PC: Obviously, the computer you’re mounting. Verify its weight doesn’t exceed your bracket’s capacity (most brackets support 5-11 lbs; mini PCs typically weigh 1-4 lbs).
Monitor with VESA mount: Confirm your monitor has VESA mounting holes (most monitors from the past decade do). Check the pattern (75mm or 100mm) to ensure bracket compatibility.
Screws: Most brackets include screws for both attaching the bracket to the monitor and securing the mini PC to the bracket. Verify you have the correct screw types and lengths for your specific monitor and mini PC.
Tools Needed
Phillips head screwdriver: The most commonly needed tool for standard VESA screws and mini PC attachment.
Adjustable wrench or socket set: Some brackets use nuts and bolts rather than screws alone.
Cable ties or Velcro straps: For cable management after mounting.
Measuring tape (optional): Helpful for verifying VESA hole spacing if uncertain.
Level (optional): Ensures the monitor and mounted mini PC sit perfectly horizontal if mounting to a wall mount rather than a desk stand.
Step-by-Step Installation Guide
Follow this systematic approach for secure, professional mounting results. The entire process typically takes 10-20 minutes for first-time installations.
Step 1: Preparation
Power off and disconnect both the monitor and mini PC completely. Unplug all cables including power, video, USB, and network connections. This prevents accidental damage during installation and makes handling easier.
Clear a workspace with adequate room to lay the monitor face-down on a soft surface (a towel or foam pad works well to protect the screen). Gather all tools and components within easy reach.
Step 2: Locate VESA Mounting Holes
Turn the monitor face-down on your protected surface. Locate the VESA mounting holes on the back panel—typically four threaded holes arranged in a square pattern. Some monitors have a plastic cover over the VESA holes; remove this cover to expose the mounting points.
Measure the spacing between holes if you’re uncertain about the VESA pattern. This confirms you have the correct bracket configuration.
Step 3: Attach Bracket to Monitor
Position the VESA mounting bracket over the monitor’s VESA holes, aligning the bracket holes with the threaded holes on the monitor. The bracket orientation may vary by design—some mount horizontally, others vertically. Check bracket instructions for the correct orientation for your specific model.
Insert screws through the bracket holes into the monitor’s VESA threads. Hand-tighten first to ensure all screws engage properly, then tighten securely with a screwdriver. Don’t overtighten—snug is sufficient; excessive force can strip threads.
For a visual demonstration of the complete mounting process from start to finish, This installation tutorial shows exactly how to install a mini PC to the back of a monitor using a VESA bracket, including proper screw placement and secure attachment techniques that work across different mini PC models.
Step 4: Attach Mini PC to Bracket
The attachment method varies by bracket type:
Strap-based brackets: Position the mini PC on the bracket platform, then secure it using the adjustable strap. Thread the strap through the bracket slots, wrap it around the mini PC, and tighten until snug. The mini PC should not shift when you gently push it.
Screw-based brackets: Align screw holes on the mini PC’s bottom panel with the bracket mounting points. Insert screws and tighten securely. Some mini PCs have dedicated mounting screw holes; others require screws into existing screw bosses.
Clip-based brackets: Position the mini PC and engage the clips to secure it in place. Test that the clips fully engaged by gently attempting to lift the mini PC.
Add rubber pads (usually included with brackets) between the mini PC and bracket to prevent scratching and reduce vibration transmission.
Step 5: Cable Management
Before setting the monitor upright, connect necessary cables:
Power cable to the mini PC.
Video cable (HDMI, DisplayPort, or USB-C) from the mini PC to the monitor. Since they’re mounted together, this cable can be very short—6-12 inches typically works.
USB, Ethernet, and other peripherals as needed.
Use cable ties or Velcro straps to bundle cables together and secure them to the monitor stand or bracket. Good cable management prevents cables from dangling and maintains the clean aesthetic that motivated mounting in the first place.
Some brackets include integrated cable management channels or clips—use these to route cables neatly along the bracket and monitor structure.
Step 6: Final Installation
Carefully lift the monitor upright and position it on your desk or mount it to your monitor arm/wall mount. The added weight of the mini PC (typically 1-4 lbs) shouldn’t affect most monitor stands, but verify the monitor stand remains stable.
Connect the monitor’s power cable and any remaining connections. Power on both the monitor and mini PC, then verify everything functions correctly.
Weight Considerations and Load Limits
Monitor stands and VESA brackets have maximum weight capacities you must respect for safe, stable mounting. Exceeding these limits risks damage to your equipment and potential injury.
Mini PC Weights
Typical mini PC weights range from:
- Ultra-compact models (Intel NUC, similar): 0.5-1.5 lbs (0.2-0.7 kg)
- Standard mini PCs (Beelink, Minisforum): 1.5-3 lbs (0.7-1.4 kg)
- Performance mini PCs with discrete GPUs: 3-4 lbs (1.4-1.8 kg)
Check your specific mini PC’s weight in its specifications before selecting a mounting bracket.
Bracket Capacities
Most VESA mounting brackets for mini PCs support 5-11 lbs (2.3-5 kg), providing substantial safety margin over typical mini PC weights. Professional mounting solutions from Ergotron and similar manufacturers specify exact load capacities and include safety certifications for commercial use.
Verify your bracket’s capacity before purchasing, especially if mounting heavier mini PCs or planning to attach additional accessories.
Monitor Stand Stability
Adding a mini PC behind your monitor increases the total weight the monitor stand must support. A 5-lb monitor plus a 2-lb mini PC creates a 7-lb load on the stand.
Most monitor stands easily handle this additional weight, but lightweight portable monitors or slim desk stands may not. If you notice the monitor stand becoming unstable or tipping backward, the stand cannot safely support the combined weight. In such cases, consider using a heavier-duty monitor stand or a wall-mounted monitor arm instead.
Monitor Arm Compatibility
Monitor arms provide an excellent platform for mounting mini PCs, often offering better cable management and greater flexibility than standard monitor stands. However, compatibility requires attention to specific details.
Mounting Configuration
When using a monitor arm, you have two mounting options:
In-line mounting: The mini PC mounts between the monitor arm and the monitor. The VESA bracket attaches to the arm’s VESA plate, then the monitor attaches to the bracket. This requires a specialized bracket designed for this configuration.
Side mounting: The mini PC mounts separately on the monitor arm’s pole or base. This approach leaves the monitor’s VESA connection unobstructed and provides more flexibility in positioning.
Clearance Issues
Monitor arms with recessed VESA mounts or thick mounting plates may require step-out brackets that provide clearance for the mini PC without interfering with the monitor’s position. Users frequently discuss the challenges of finding brackets that provide adequate clearance while maintaining stability, particularly with specific monitor arm models that have limited space between the arm and the monitor back panel.
Measure the distance between your monitor arm’s VESA plate and the back of your monitor when mounted. Ensure any bracket you choose fits within this space without forcing the monitor forward excessively.
Weight Capacity
Monitor arms have maximum load capacities (typically 15-25 lbs for consumer models). Verify the combined weight of your monitor plus mini PC falls within your arm’s capacity. Exceeding capacity causes the arm to sag or fail to maintain position.
Ventilation Considerations
Proper airflow around your mounted mini PC ensures it stays cool and operates reliably. Poor ventilation can lead to thermal throttling, reduced performance, and shortened component lifespan.
Spacing Requirements
Mount the mini PC with at least 0.5-1 inch of clearance on all sides. Avoid mounting it flush against the monitor’s back panel—use spacers or brackets designed with built-in standoffs that create air gaps.
Fanless mini PCs particularly depend on natural convection for cooling. Mounting them in configurations that restrict airflow around the chassis sides and top significantly reduces cooling efficiency.
Orientation Matters
Most mini PCs cool best when oriented horizontally (the way they sit on a desk). When mounting behind a monitor, try to maintain this orientation if possible. Vertical mounting can work but may impact cooling performance for some models.
Ensure ventilation grilles on the mini PC don’t face directly against the monitor or mounting bracket. Position the mini PC so that intake and exhaust areas have clear airflow paths.
Monitor Heat
Monitors generate heat, particularly LED-backlit displays at higher brightness levels. This heat rises upward, so avoid positioning your mini PC directly in the path of the monitor’s heat exhaust if possible.
In practice, this rarely causes problems—the modest heat from monitors doesn’t significantly affect mini PC cooling. But for intensive workloads or hot environments, keeping mini PCs slightly offset from the monitor’s center (where heat concentrates) can help.
Mounting Options Beyond Standard VESA Brackets
While VESA brackets are most common, alternative mounting solutions exist for specific scenarios.
Adhesive Mounts
Double-sided adhesive mounting pads or Velcro strips can attach very lightweight mini PCs (under 1 lb) directly to monitor backs without screws. These work for ultra-compact models like Intel Compute Sticks or similar minimal systems.
I don’t recommend adhesive mounts for standard mini PCs due to weight and heat concerns. Adhesives can fail over time, especially when exposed to the heat generated by mini PCs during operation.
Shelf-Style Brackets
Some brackets create a shelf behind the monitor rather than securing the mini PC rigidly. These allow easier removal of the mini PC for service or transport while maintaining the clean aesthetic of monitor mounting.
Shelf brackets work well if you need to frequently access the mini PC’s ports or swap drives. The trade-off is slightly less secure mounting compared to strapped or screwed configurations.
Under-Desk Mounting
If monitor mounting doesn’t suit your situation, under-desk mounting brackets attach the mini PC to the underside of your desk. This still frees desk surface space and reduces visible clutter while providing even better access to ports and cables.
Under-desk mounting works particularly well for standing desks or shared workstations where multiple people use the same monitor but different mini PCs.
Common Installation Challenges and Solutions

Even straightforward installations sometimes present unexpected issues. Knowing common problems and their solutions saves time and frustration.
Problem: Screw Length Mismatch
VESA screws that are too long can damage monitor electronics if they penetrate too deeply. Screws that are too short won’t engage enough threads for secure mounting.
Solution: Measure the depth of your monitor’s VESA threaded holes before installation. Screw length should be approximately: bracket thickness + 5-6mm thread engagement. Most monitors accept M4 screws (4mm diameter), but verify this before purchasing aftermarket screws.
Problem: Blocked Ports
Mounting a mini PC behind a monitor can block access to frequently-used ports depending on orientation and positioning.
Solution: Orient the mini PC so that commonly-accessed ports (USB, audio) face outward where you can reach them. For less frequently accessed ports, you can still access them by tilting the monitor forward. Alternatively, use port replicators or USB hubs connected via extension cables to bring ports to more accessible locations.
Problem: Cable Reach
Standard cables may not reach when the mini PC is mounted behind the monitor, particularly for devices positioned away from the monitor.
Solution: Use right-angle adapters for HDMI/DisplayPort connections to reduce the space needed for cable connections. Purchase short cables specifically for monitor-mounted setups—6-12 inch HDMI and power cables often work perfectly. For peripherals, use longer cables or USB hubs positioned conveniently on your desk.
Problem: Monitor Stand Instability
Adding a mini PC behind the monitor shifts the center of gravity backward, potentially causing lighter monitor stands to tip.
Solution: Add weight to the monitor stand’s base (some stands have weighted bases you can add), switch to a heavier-duty stand, or use a monitor arm with more robust stability. As a last resort, attach the monitor stand to the desk using screws or adhesive to prevent tipping.
Recommended Mounting Brackets for 2025
Based on extensive testing and community feedback, several mounting solutions stand out in 2025.
For Universal Compatibility
HIDEit Uni-M VESA Mount ($25-$40): Adjustable design fits most mini PCs 5-10 inches in size. Includes cable management channels and ventilation gaps. Supports VESA 75 and 100 patterns.
HumanCentric Thin Client Mount ($30-$45): Professional-grade construction supporting up to 11 lbs. Includes comprehensive hardware kit with multiple mounting options (VESA, under-desk, pole mount). Rubber pads prevent scratches and dampen vibration.
For Manufacturer-Specific Models
Minisforum VESA Bracket ($15-$25): Included with most Minisforum mini PCs or available separately. Custom-fit design for specific models ensures perfect alignment and maximum stability.
ASUS NUC VESA Bracket ($20-$30): Precision-fit bracket for ASUS NUC models with integrated cable routing channels.
For Monitor Arms
Ergotron Mini PC Mount ($60-$80): Professional-grade mount specifically designed for use with Ergotron monitor arms. Provides clearance for recessed VESA mounts and maintains full arm articulation.
Budget Option
Generic VESA Brackets ($10-$20): Available from Various sellers on Newegg and Amazon. Basic strap-based designs that work adequately for lightweight mini PCs. Less refined than premium options but functional for budget-conscious setups.
FAQ: Common Questions Answered
Can all mini PCs be mounted to monitors?
Most modern mini PCs can be mounted using universal VESA brackets, even if they don’t include dedicated mounting hardware. Verify the mini PC’s weight falls within the bracket’s capacity (typically 5-11 lbs) and that its dimensions fit the bracket.
Will mounting a mini PC damage my monitor?
No, when properly installed using appropriate brackets and screws of correct length, mounting causes no damage. VESA mounting is a standard feature monitors are designed to support.
Can I mount a mini PC to a curved monitor?
Yes, but standard flat brackets may not sit flush against the curved back panel. Some universal brackets with flexible straps accommodate curved monitors better than rigid plates. Alternatively, mount the mini PC to the monitor arm or stand rather than directly to the curved monitor back.
How do I access ports on a monitor-mounted mini PC?
Orient the mini PC so frequently-accessed ports face outward. For ports facing the monitor, tilt the monitor forward to access them (this is why most monitor stands have tilt adjustment). USB hubs and extension cables can also bring ports to more convenient locations.
Will the added weight affect my monitor stand’s adjustment?
Minimally. Most monitor stands easily accommodate the 1-4 lbs added by a mini PC. You may need to slightly tighten the stand’s adjustment mechanism to account for the additional weight, but normal adjustment functionality should remain unaffected.
Can I mount a gaming mini PC with a discrete GPU to a monitor?
Yes, as long as the combined weight falls within your bracket and monitor stand’s capacities. Gaming mini PCs with discrete GPUs typically weigh 3-4 lbs, still well within most brackets’ 5-11 lb capacity. Ensure adequate ventilation around the mounted mini PC since gaming generates more heat.
What if my monitor doesn’t have VESA holes?
Some budget monitors lack VESA mounting. Aftermarket VESA adapter plates attach to monitors using clamps or adhesive, creating VESA mounting points. These adapters work but add complexity and may not be as secure as integrated VESA threads.
The 2025 Monitor-Mounting Reality
Mounting mini PCs to monitors has become increasingly popular and refined in 2025. Manufacturers recognize this use case and design many mini PCs with VESA mounting in mind—including brackets, optimizing port placement, and ensuring designs accommodate back-of-monitor installation.
Based on my extensive experience mounting mini PCs throughout 2025, I recommend this approach for anyone prioritizing desk space, cable management, or aesthetics. The 15-minute investment in installation pays ongoing dividends through improved workspace organization and functionality.
Choose your bracket based on your specific mini PC model (manufacturer-specific for best fit, universal for flexibility), verify VESA compatibility with your monitor, and follow the step-by-step installation process for secure mounting. The result is a clean, integrated computing setup that maximizes space efficiency while maintaining full functionality and accessibility.