Skip to content
Getting smooth, comfortable VR on a gaming laptop comes down to three pillars: eliminating thermal throttling, configuring your GPU and VR software correctly, and clearing every unnecessary system bottleneck. A laptop that struggles in flat-screen gaming can often deliver solid VR performance once properly tuned — and a laptop that already performs well can become genuinely excellent with the right settings.
This guide walks you through every step, from checking readiness to advanced software tweaks.
Is Your Gaming Laptop Actually VR-Ready?
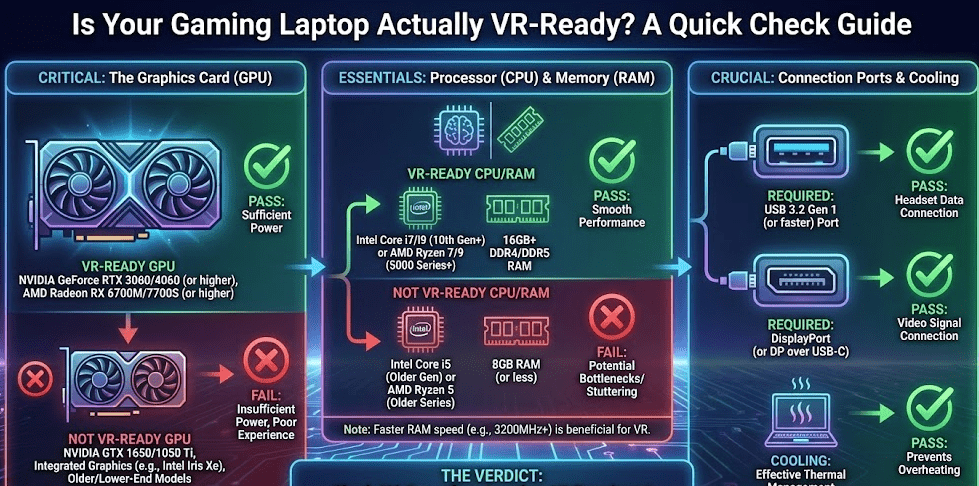
Before tuning anything, verify that your hardware meets the baseline requirements. VR is uniquely demanding because it renders two displays simultaneously — one per eye — at high refresh rates, which multiplies GPU load significantly compared to standard gaming.
Minimum hardware requirements for PC VR in 2026
| Component | Minimum | Recommended |
|---|---|---|
| GPU | NVIDIA RTX 2060 / AMD RX 5700 | RTX 4070 / RX 7700 XT or better |
| CPU | Intel Core i5/i7 8th gen+ or Ryzen 5/7 | Intel Core Ultra 7 / Ryzen AI 7 9000-series |
| RAM | 16GB | 32GB |
| Storage | SSD (any) | NVMe SSD |
| Ports | USB 3.0, HDMI or DisplayPort | USB-C (for Oculus Link), DisplayPort 1.4 |
| OS | Windows 10 64-bit | Windows 11 64-bit |
If your laptop has an RTX 3060 or better, you’re in a solid position for most major VR titles. Anything below an RTX 2060 will struggle with smooth performance regardless of software tweaks.
To check VR readiness, the best approach in 2026 is to look up the minimum and recommended system requirements for the specific VR titles you want to play on their Steam or store pages. For a standardized synthetic benchmark, VRMark by Futuremark is the most reliable modern tool — it tests your system across multiple VR performance scenarios and gives a clear pass/fail result against current headset standards. Note that the old SteamVR Performance Test has been removed from Steam and should not be used — it was built for 2016 hardware and is no longer accurate.
Step 1: Set Power Mode to Maximum Performance
This is the single most impactful change you can make. By default, Windows power plans and laptop manufacturer profiles throttle CPU and GPU performance to manage heat and battery life. For VR, you need every cycle you can get.
Windows power settings
- Go to Settings > System > Power & Sleep > Additional Power Settings
- Select High Performance or, if available, Ultimate Performance
- Always keep your laptop plugged in during VR — battery mode activates aggressive throttling that will cause frame drops and judder
NVIDIA Control Panel settings
- Open NVIDIA Control Panel > Manage 3D Settings > Global Settings
- Set Power Management Mode to Prefer Maximum Performance
- Set Low Latency Mode to Ultra
- Set Texture Filtering Quality to Performance
AMD Adrenalin settings (for AMD GPU laptops)
- Open AMD Software: Adrenalin Edition
- Under Graphics > Gaming, set GPU Workload to Gaming
- Enable Radeon Anti-Lag for reduced input latency
Step 2: Update Every Driver and Firmware
Outdated drivers are one of the most common causes of VR stuttering, crashes, and tracking issues — and also one of the easiest to fix.
Priority update list:
- GPU drivers: Download the latest Game Ready Driver (NVIDIA GeForce Experience) or Adrenalin driver (AMD Software). Don’t skip this — VR-specific optimizations are frequently included in driver updates.
- VR headset firmware: Open your headset’s companion app (Meta Quest app, SteamVR, Vive Console, or Windows Mixed Reality) and update firmware before every session.
- Windows Update: Go to Settings > Windows Update and install all pending updates. Unstable OS builds cause more VR issues than most people realize.
- Laptop BIOS/UEFI: Visit your laptop manufacturer’s support page (ASUS, MSI, Razer, Lenovo, etc.) and check for BIOS updates — newer versions often improve thermal management and USB power delivery, both critical for VR.
Step 3: Eliminate Thermal Throttling
Thermal throttling is the silent killer of laptop VR performance. When your CPU or GPU hits temperature limits — typically 90–100°C — the processor automatically reduces clock speeds to protect itself, causing sudden frame rate drops and judder mid-session.
Cooling strategies that work:
- Use a quality cooling pad: A laptop cooling pad with dual or triple fans can reduce GPU temperatures by 5–15°C under sustained VR load. Look for models with adjustable height to improve airflow to the laptop’s intake vents.
- Elevate the rear of the laptop: Even 2–3 cm of elevation improves passive airflow enough to meaningfully reduce temperatures.
- Clean your vents: Dust buildup in intake and exhaust vents is one of the most overlooked performance issues on gaming laptops. Compressed air through the vents every 3–6 months keeps thermal headroom in check.
- Repaste your CPU and GPU (advanced): On laptops older than 2–3 years, dried-out thermal paste on the CPU and GPU die is a common cause of excessive heat. Repasting with quality thermal compound (Thermal Grizzly Kryonaut or similar) can drop temperatures 10–20°C.
- Monitor temperatures during VR: Use HWiNFO64 or MSI Afterburner to log CPU and GPU temps in real time. If either component consistently hits 90°C+, thermal throttling is occurring and cooling improvements are needed before anything else.
As HP’s VR gaming optimization guide for OMEN laptops notes, updating GPU drivers is the single most important software step — but thermal management is what separates a laptop that sustains VR performance from one that throttles five minutes into a session.
Step 4: Optimize Windows for VR Performance
Clearing background processes and system bloat gives your CPU and RAM more headroom for VR’s demanding real-time workloads.
Essential Windows optimizations:
- Disable startup apps: Open Task Manager (Ctrl + Shift + Esc) > Startup tab > Disable everything non-essential (Discord, Spotify, OneDrive, browser update agents).
- Enable Game Mode: Settings > Gaming > Game Mode > On. This tells Windows to prioritize CPU and GPU resources for your active game.
- Hardware-Accelerated GPU Scheduling (HAGS) — disable if stuttering: HAGS (Settings > Display > Graphics > Change Default Graphics Settings) is known to cause micro-stutters, frame drops, and encoding lag in VR — particularly with wireless connections like Air Link or Virtual Desktop. If you are experiencing stuttering in VR, disabling HAGS is one of the first fixes to try. Leave it off by default unless a specific title’s documentation recommends it.
- Disable Xbox Game Bar: Settings > Gaming > Xbox Game Bar > Off. It runs in the background and consumes resources you’d rather give to VR.
- Kill background apps before VR sessions: Close Chrome, browsers, Discord, Spotify, and any other RAM-heavy applications. VR benefits enormously from having 16GB+ RAM available — don’t waste it on background tabs.
- Disable Windows notifications during VR: Settings > System > Notifications > Off. Pop-up notifications can break immersion and cause micro-stutters.
Step 5: Configure SteamVR or Meta Quest Settings
The in-headset and platform-level settings have an enormous impact on VR performance — often more than in-game graphics settings do.
SteamVR settings
- Open SteamVR > Settings > Video
- Render Resolution: Start at 100% (1.0x). Only increase if your GPU consistently maintains 90 fps. Supersampling (above 100%) is visually beautiful but GPU-intensive — increase in 10% increments.
- Refresh Rate: Set to your headset’s native rate — 90Hz for most headsets, 120Hz for supported models (Valve Index, Quest 3, Bigscreen Beyond). Lower Hz = more GPU headroom.
- Motion Smoothing: Enable this in SteamVR. It generates in-between frames when your GPU can’t hit the target frame rate, preventing judder.
- Advanced Supersample Filtering: Enable for cleaner visuals at the same resolution cost.
Meta Quest (Air Link or Link Cable)
- Open Oculus PC app > Devices > your headset > Graphics Preferences
- Set Render Resolution to a fixed value rather than automatic — automatic often over-targets and causes stuttering.
- Enable Asynchronous Spacewarp (ASW): This is Meta’s frame extrapolation technology — it kicks in when your GPU drops below the target frame rate, generating synthetic frames to maintain comfort. Keep it on.
- Oculus Debug Tool (ODT): For advanced users, ODT lets you override render resolution, ASW mode, and pixel density with granular control. Access it from your Meta installation folder.
Virtual Desktop (wireless VR)
- Match your Virtual Desktop codec and quality setting to your GPU tier — HEVC or AV1 for RTX 40-series, H.264+ for older GPUs.
- Use 90Hz for the best balance of smoothness and visual quality.
- Ensure your laptop is on wired Ethernet and your VR headset is connected to a Wi-Fi 6 or 6E router on 5GHz or 6GHz band. Wireless VR on a congested 2.4GHz network will stutter regardless of GPU performance.
Step 6: Optimize In-Game Graphics Settings
Once your platform is configured correctly, adjust individual game settings for maximum VR performance.
Settings to reduce first (biggest GPU savings):
- Shadows: The single most GPU-expensive setting in most VR titles. Drop from Ultra to Medium or Low.
- Anti-Aliasing: In VR, supersampling handles much of the aliasing work. Reduce or disable in-game AA.
- Ambient Occlusion: Visually subtle in VR — set to Low or Off.
- Post-Processing Effects: Motion blur, depth of field, lens flare — disable all of these. They add GPU cost with no meaningful VR benefit, and motion blur actively makes VR less comfortable.
- Vegetation and Object Draw Distance: Reduce by one step — the performance gain is significant in open-world VR titles.
Settings to keep high (visual clarity in VR):
- Texture Quality: High or Ultra — textures are close to your face in VR and low-res textures are immediately noticeable.
- Anisotropic Filtering: Keep at 8x or 16x — low cost, big visual payoff.
Step 7: Optimize Your Physical Connection
A poor cable or USB connection can cause tracking failures, display cutouts, and latency that no software fix will resolve.
Wired VR connection tips:
- Plug your headset’s USB cable directly into your laptop’s native USB 3.0 or USB-C port — not into a hub.
- For Oculus Link, use a certified USB-C cable rated for high-speed data and power delivery (the official Meta Link Cable or Anker Powerline+ are reliable choices).
- Use HDMI or DisplayPort directly from your laptop to any external device — avoid adapters and dongles where possible as they can introduce latency.
- Verify USB 3.0 speed: Open Device Manager > Universal Serial Bus Controllers and confirm your headset shows as a USB 3.0 device, not USB 2.0.
Wireless VR connection tips:
- Use a dedicated Wi-Fi 6 or 6E router — not your home’s general router shared with other devices.
- Position the router at eye level and within 20 feet of your play space for the cleanest signal.
- Connect your laptop to the router via Ethernet cable, not Wi-Fi, to eliminate wireless interference on the PC side.
Step 8: Advanced Tweaks for Maximum Performance
Once the fundamentals are solid, these advanced settings offer meaningful additional gains.
NVIDIA DLSS Upscaling and AMD FSR in VR
Many modern VR titles support DLSS upscaling (NVIDIA) or FSR (AMD). These render the image at a lower native resolution and upscale intelligently — delivering near-native image quality at significantly lower GPU cost. Enable DLSS Quality or Balanced mode in supported titles for a strong performance-to-visual quality trade-off. This works excellently in VR and is one of the best ways to recover frame rate headroom without sacrificing too much visual clarity.
Important: Do not use Frame Generation in VR
DLSS 3 and FSR 3 Frame Generation — while useful in flat-screen gaming — are incompatible with VR and should never be enabled for VR titles. These technologies interpolate frames without accounting for the physical movement of the headset, which adds substantial latency and causes severe motion sickness. VR has its own purpose-built frame extrapolation systems — ASW (Meta) and SteamVR Motion Smoothing — which are specifically designed to handle frame shortfalls safely. Use those instead.
Undervolting your CPU (advanced — with important caveats)
On older gaming laptops, undervolting using Intel XTU or Throttlestop can reduce CPU temperatures meaningfully while maintaining clock speeds. However, Intel has permanently hardware-locked undervolting on the vast majority of modern laptop CPUs — including almost all Core Ultra series and most Core i-HX/H chips from recent generations. If you open Intel XTU and the voltage offset sliders are greyed out, your CPU is locked and undervolting is not possible. In that case, focus on improving airflow, cleaning vents, repasting, and adjusting power limits in your laptop’s manufacturer utility (Armoury Crate, Dragon Center, OMEN Gaming Hub, etc.) instead.
Disable Dynamic Resolution Scaling in VR
Some VR games automatically lower render resolution when frame rates drop. While this prevents judder, it can cause blurry visual artifacts that are disorienting in headset. In competitive or precision VR experiences, setting a fixed resolution and using ASW or Motion Smoothing as the fallback instead often produces better results.
According to Puget Systems’ VR hardware recommendations, VR systems benefit most from high single-core CPU clock speeds rather than high core counts — which means ensuring your laptop’s CPU is running at its rated boost speed without thermal throttling is more impactful than adding cores or RAM.
VR Performance Quick-Reference Checklist
Use this before every VR session for consistent performance.
Pre-session checklist:
- ✅ Laptop plugged in — not running on battery
- ✅ Power plan set to High Performance or Ultimate Performance
- ✅ Background apps closed (Chrome, Discord, Spotify, etc.)
- ✅ Game Mode enabled in Windows settings
- ✅ HAGS disabled (re-enable only if a specific title recommends it)
- ✅ GPU drivers up to date
- ✅ Headset firmware up to date
- ✅ Laptop on a hard surface with vents unobstructed — or on a cooling pad
- ✅ USB headset cable plugged directly into native laptop port
- ✅ SteamVR/Oculus render resolution set to fixed value (not auto)
- ✅ ASW or Motion Smoothing enabled as frame rate safety net
- ✅ Frame Generation disabled for VR titles
Common VR Performance Problems and Fixes

Problem: Constant stuttering and frame drops
Most likely cause: Thermal throttling or insufficient power plan. Check temperatures with HWiNFO64 and switch to High Performance power mode. Add a cooling pad if temps exceed 90°C under load. If stuttering persists, disable HAGS in Windows display settings — this is a known VR culprit in 2026.
Problem: Tracking loss or controller drift
Most likely cause: USB bandwidth issues or USB port sharing. Move your headset to a different native USB 3.0 port. Avoid USB hubs. Check Device Manager to confirm USB 3.0 connection speed.
Problem: Blurry or smeared visuals
Most likely cause: Render resolution set too low, or Motion Smoothing/ASW generating synthetic frames due to frame rate drops. Either increase GPU performance (via the steps above) or accept lower visual settings to maintain target frame rate natively.
Problem: High latency or motion sickness
Most likely cause: Frame rate inconsistency rather than low average frame rate. Enable Low Latency Mode Ultra in NVIDIA Control Panel, and ensure your target frame rate matches your headset’s native refresh rate exactly. Disable HAGS if enabled.
Problem: Wireless VR stuttering (Air Link / Virtual Desktop)
Most likely cause: Wi-Fi interference or router congestion. Switch to a dedicated 5GHz or 6GHz Wi-Fi 6/6E router, connect your PC via Ethernet, and reduce the distance between router and headset. Also disable HAGS — it is a known cause of wireless VR encoding lag.
FAQ: Gaming Laptop VR Optimization
What GPU do I need for smooth VR on a laptop?
An RTX 3060 laptop GPU is the practical sweet spot for smooth 90 fps VR on most current titles at comfortable settings. An RTX 4060 or 4070 opens up higher render resolution and more demanding titles. Anything below an RTX 2060 will struggle to maintain comfortable frame rates in modern VR content.
Why does my VR stutter even though my specs look fine?
The most common causes are thermal throttling, HAGS being enabled, background processes consuming RAM or CPU, or power plan settings limiting performance. Disable HAGS first, then work through Steps 1–4 of this guide before adjusting any in-game settings.
Should I use wired or wireless VR with a laptop?
Both are viable with proper setup. Wired (via Oculus Link or DisplayPort) gives lower latency and more consistent performance. Wireless (Air Link or Virtual Desktop) gives more freedom of movement but requires a strong Wi-Fi 6/6E setup and a laptop connected to the router via Ethernet. For competitive VR or precision experiences, wired is preferred.
Does RAM speed matter for VR?
Yes — VR benefits from faster RAM. DDR5 or high-speed DDR4 (3200MHz+) reduces latency between the CPU and GPU. If your laptop allows RAM upgrades, 32GB of dual-channel memory is the ideal configuration for VR in 2026.
Is 60Hz VR playable on a lower-end laptop?
60Hz VR is technically functional but uncomfortable for extended sessions — most people experience motion sickness below 90Hz. If your laptop can only maintain 60 fps in VR, reduce all graphics settings aggressively and enable ASW/Motion Smoothing to fill frames up to 90Hz artificially.
Can I use VR on a laptop without a dedicated GPU?
No — integrated graphics (Intel Iris Xe, AMD Radeon integrated) are not capable of running PC VR. A dedicated GPU is an absolute minimum requirement for any PC VR experience.
Does cooling pad placement matter?
Yes — position the cooling pad so its fans align with your laptop’s intake vents (usually on the bottom). A pad with fans blowing in the wrong direction or covering the vents can actually make temperatures worse. Check your laptop model’s airflow diagram before buying a cooling pad.
Should I enable HAGS for VR?
No — in the VR community, HAGS is a well-known cause of micro-stutters, frame drops, and encoding lag, especially over wireless connections. Disable it by default. Only re-enable it if a specific game or platform documentation explicitly recommends it for your configuration.
Final Thoughts
Optimizing a gaming laptop for VR is a layered process — but the gains from following these steps properly are substantial. In my experience, most VR performance problems on laptops trace back to just three root causes: thermal throttling, incorrect power settings, and HAGS being enabled. Fix those three things first and everything else becomes incremental polish.
For a full visual walkthrough of gaming laptop optimization for maximum performance in 2026 — including NVIDIA Control Panel settings and Windows optimizations that apply directly to VR workloads — this YouTube guide to full gaming laptop optimization for 2026 is one of the most thorough walkthroughs available and pairs perfectly with the steps in this guide.