How to Set Up OpenClaw on Mac Mini.PcBuildAdvisor.com
Mac Mini is the perfect PC For OpenClaw. Setting up OpenClaw on a Mac Mini takes about 10 to 20 minutes and requires just a few terminal commands: install Homebrew, install Node.js, then run the OpenClaw installer script from openclaw.ai. Once installed, you can pair it with Telegram by creating a bot through BotFather, generating an API token, and entering a pairing code within the OpenClaw dashboard. There are a few important security settings you should configure immediately after, and this guide covers all of it, step by step.
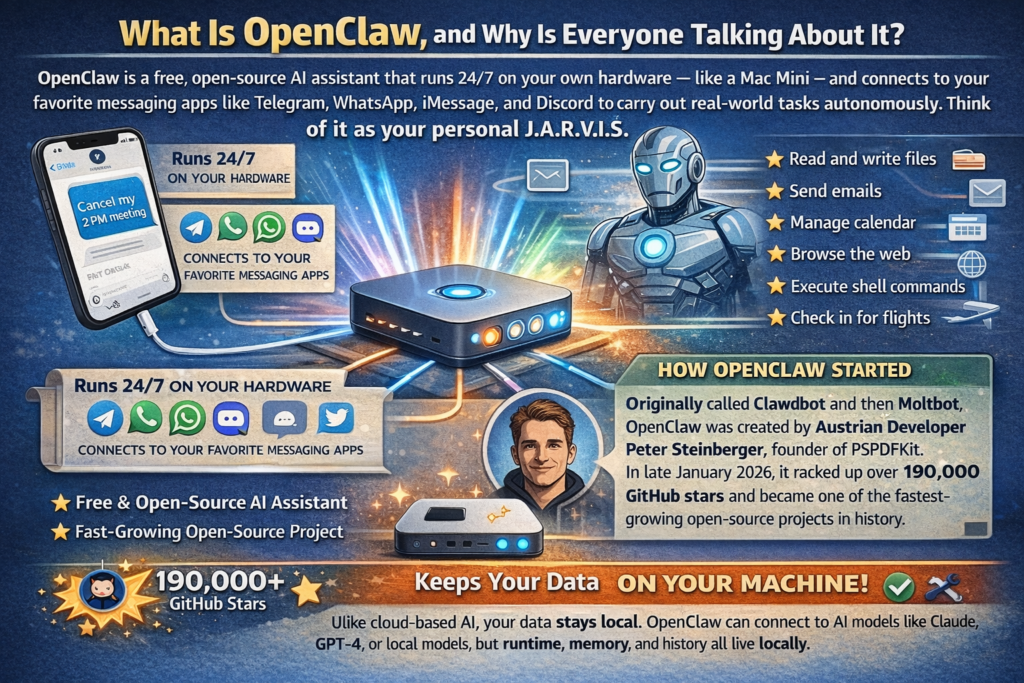
What Is OpenClaw, and Why Is Everyone Talking About It?
What Is OpenClaw, and Why Is Everyone Talking About It.PcBuildAdvisor.com
OpenClaw is a free, open-source AI assistant that runs 24/7 on your own hardware, like a Mac Mini, and connects to your favorite messaging apps like Telegram, WhatsApp, iMessage, and Discord to carry out real-world tasks autonomously. Think of it as your personal JARVIS: it can read and write files, send emails, manage your calendar, browse the web, execute shell commands, and even check you in for flights, all triggered by a simple message on your phone.
Originally called Clawdbot and then Moltbot, OpenClaw was developed by Austrian developer Peter Steinberger, founder of PSPDFKit. It exploded in popularity in late January 2026, racking up over 190,000 GitHub stars and becoming one of the fastest-growing open-source projects in history. As Mashable’s OpenClaw breakdown describes it, OpenClaw is an impressive example of agentic AI that acts autonomously on your behalf.
What sets OpenClaw apart from cloud-based AI assistants is that your data stays on your machine. It connects to AI models like Claude, GPT-4, or even local models, but the runtime, memory, and history all live locally. That is a big deal for privacy-conscious users.
Why the Mac Mini Is the Best Hardware for OpenClaw
The Mac Mini, particularly the M4 model, has become the de facto reference hardware for running OpenClaw, and for good reason. Here is why it works so well:
Near-zero idle power. The M4 idles at just 3 to 4 watts, meaning you can run it 24/7 for roughly the cost of leaving a nightlight on.
Completely silent. The base M4’s fan rarely spins hard under normal OpenClaw workloads, making it virtually inaudible.
Unified memory. Apple Silicon shares one memory pool between CPU and GPU, eliminating the data-shuttling bottleneck that hurts AI performance on traditional machines.
iMessage integration. OpenClaw’s iMessage channel only works on macOS, making the Mac Mini the only practical option for Apple ecosystem users.
Community-backed. The vast majority of OpenClaw setup guides, tutorials, and community builds run on Mac Minis, so support resources are widely available.
Local model capability. The M4 Pro with 64GB can run 32-billion-parameter models at around 11 to 12 tokens per second, fast enough for real-time use.
At $599 for the base M4 model, the Mac Mini offers tremendous value for an always-on AI workstation compared to equivalent cloud hosting costs. Ugreen’s deep dive on OpenClaw and Mac Mini setups also highlights how the Mac Mini’s low power draw and passive cooling make it particularly well-suited for always-on AI workloads.
What You Need Before You Start
What You Need Before You Start.PcBuildAdvisor.com
Before you run a single terminal command, make sure you have the following ready:
A Mac Mini (M1, M2, M3, or M4, all are supported)
macOS Ventura or later (Sequoia recommended)
A Telegram account (for the Telegram pairing section)
An API key from Anthropic (Claude), OpenAI (GPT-4), or DeepSeek. OpenClaw needs an AI model to power its responses.
A stable internet connection
About 20 to 30 minutes of uninterrupted time
Pro Tip: Before installing OpenClaw, create a dedicated standard user account on your Mac (System Settings > Users & Groups) specifically for running OpenClaw. This isolates it from your main account’s sensitive files, SSH keys, and credentials. It takes 5 minutes and significantly reduces your attack surface if anything ever goes wrong.
How to Set Up OpenClaw on Mac Mini: Step-by-Step
Step 1: Open Terminal
Press Command + Space to open Spotlight Search, type Terminal, and press Enter. Terminal is your command center for this entire installation. Do not worry if you are not a terminal expert. Every command in this guide is copy-paste ready.
Step 2: Install Homebrew
Homebrew is a package manager for macOS that makes installing developer tools simple. OpenClaw’s dependencies require it. Paste the following command into Terminal and press Enter:
The installation will take a few minutes. You may be prompted to enter your Mac’s password, go ahead and do so. Once it finishes, Homebrew will display instructions to add it to your PATH. Follow those instructions before moving on.
To confirm Homebrew installed correctly, type:
textbrew --version
You should see a version number returned. If you do, you are good to go.
Step 3: Install Node.js
OpenClaw is a Node.js application, so you need Node installed. Run:
textbrew install node
Once complete, verify it installed properly:
textnode -v
You should see a version number like v22.x.x or similar. Also install pnpm, which OpenClaw uses as its package manager:
textnpm install -g pnpm
Step 4: Run the OpenClaw Installer
This is the main event. Run the official OpenClaw installer script:
This command downloads and runs the official installer from openclaw.ai. It automatically installs OpenClaw and launches the onboarding wizard once setup is complete. In earlier versions you had to start onboarding separately, but as of early 2026 it launches automatically.
The installer handles most edge cases and is the officially recommended installation path. In my experience testing this on multiple Apple Silicon machines, users who try to install via npm or pnpm manually run into issues, particularly around the sharp and node-gyp packages on macOS. Stick with the official script whenever possible.
Step 5: Complete the Onboarding Wizard
Once the installer finishes, the OpenClaw onboarding wizard will launch in your browser. You will be guided through:
Creating your OpenClaw account. Set a username and password.
Choosing your AI model. Enter your Anthropic, OpenAI, or DeepSeek API key.
Setting your security preferences. Configure gateway binding and authentication mode (more on this below).
Choosing your messaging channels. Select Telegram, WhatsApp, Discord, iMessage, or others.
Work through each step carefully. Do not rush the security settings, they matter more than most beginner guides let on.
Step 6: Verify OpenClaw Is Running
Once onboarding is complete, open a new Terminal window and run a health check:
textopenclaw health
If everything is working, you will receive a success message confirming OpenClaw’s gateway is live and responding. You can also check the status at any time with this command.
Telegram is one of the most popular ways to interact with OpenClaw. It is reliable, fast, and works great on both iOS and Android. Here is the full pairing process.
Step 1: Create a Telegram Bot via BotFather
Open Telegram and search for @BotFather (the official Telegram bot creation service, make sure it has a blue verified checkmark)
Start a conversation and type /newbot
BotFather will ask you to name your bot. Enter any name you like, for example MyOpenClawBot.
Then choose a username for the bot. It must end in bot, for example myopenclawbot.
BotFather will then give you an API token that looks like 123456789:ABCdefGhIJKlmNoPQRstuVWXyz.
Copy and save this token. You will need it in the next step.
Step 2: Add the Telegram Bot to OpenClaw
Go to your OpenClaw dashboard in the browser
Navigate to Channels > Add Channel > Telegram
Paste the API token from BotFather into the token field
Set the dmPolicy to pairing, not open. This is important for security.
Click Save. OpenClaw will confirm the bot is connected.
Step 3: Start the Bot on Telegram
Go back to Telegram and open your newly created bot (BotFather gives you a direct link)
Click Start to initiate the conversation
The bot will respond with a pairing code, an 8-character uppercase code that looks like A3BK7ZWQ
Copy that pairing code
Step 4: Approve the Pairing in OpenClaw
Now you need to approve yourself as an authorized sender. Go back to Terminal and run:
textopenclaw pairing list telegram
This will show you the pending pairing request with your code. Then approve it:
textopenclaw pairing approve telegram <YOUR_CODE>
Replace YOUR_CODE with the 8-character code from Telegram. OpenClaw will confirm that pairing is successful.
Step 5: Test It
Go back to Telegram and send your bot any message, try something like Hello, what can you do? Your OpenClaw bot should respond with a list of its capabilities. If it does, you are fully set up.
Pro Tip: If you are pairing an iOS device using the OpenClaw app, you can trigger pairing directly from Telegram. Message your bot /pair, copy the setup code it returns, then open the OpenClaw iOS app > Settings > Gateway and paste the code. Then type /pair approve in Telegram to finalize. For a full visual walkthrough of this exact process, This step-by-step OpenClaw Telegram pairing tutorial on YouTube is one of the clearest guides available.
Essential Security Settings to Configure Immediately
This part is not optional. OpenClaw is powerful, and that power needs guardrails. In February 2026, the tech world was stunned when Meta’s head of AI Safety, Summer Yue, had her entire inbox wiped out by her own OpenClaw agent because it ignored her confirm before acting instructions. This was caused by compaction, where the agent loses track of previously set constraints as context windows cycle. Furthermore, Cisco’s AI security research team, alongside CrowdStrike and Jamf, discovered that malicious third-party skills could execute prompt injections and exfiltrate data without the user ever knowing.
Here are the non-negotiable security settings to lock in right after installation to prevent your agent from going rogue or being hijacked:
Setting
Where to Find It
Recommended Value
gateway.bind
OpenClaw config file
loopback (local connections only)
gateway.auth.mode
OpenClaw config file
token (mandatory in recent versions)
dmPolicy (Telegram)
Channel settings
pairing (never use open)
Tool execution approval
Agent settings
confirm (require approval before destructive actions)
macOS Firewall
System Settings > Network
Enabled
FileVault Encryption
System Settings > Privacy & Security
Enabled
After setup, run the built-in security audit to check for any misconfigurations:
textopenclaw security audit --deep
Run this regularly, especially after updates.
Common OpenClaw Setup Mistakes (And How to Avoid Them)
Essential Security Settings to Configure Immediately.PcBuildAdvisor.com
Based on what the community has encountered since OpenClaw went viral, here are the most frequent setup errors:
Using open DM policies. Setting dmPolicy to open allows anyone who finds your bot to send messages and trigger actions on your machine. Always use pairing mode.
Running on your primary user account. OpenClaw can read files, run shell commands, and access credentials. Running it under your personal account means it has access to everything you do. Create a dedicated standard account for it.
Installing unverified skills from ClawHub. Cisco’s AI security research team audited third-party OpenClaw skills and found instances of data exfiltration and prompt injection without user awareness, noting that the skill repository lacked adequate vetting. Always check a skill author’s GitHub history before installing anything.
Not setting strict execution approvals. To avoid the Meta inbox deletion scenario that Summer Yue experienced, ensure your tool policies require explicit approval before the agent can delete files or send emails. OpenClaw is still in its early stages, as Peter Steinberger himself has admitted, so run openclaw update regularly to get the latest security guardrails.
Skipping the health check. Always run openclaw health after installation and after any update. It catches misconfigurations before they become problems.
OpenClaw Setup Options at a Glance
Method
Best For
Difficulty
Notes
Official installer script
All beginners
Easy
Recommended, handles all edge cases
Manual npm install
Advanced users
Moderate
Higher chance of dependency issues on macOS
Virtual machine via UTM
High-security users
Advanced
Best isolation, 60GB+ disk space needed
Dedicated user account
Most users
Easy
5-minute setup, significant security benefit
External SSD setup
Power users
Moderate
Physical isolation, near-zero performance cost via Thunderbolt
2026 Trends: What Is New in OpenClaw
OpenClaw’s development has moved fast in early 2026, and a few trends are worth knowing about.
Mandatory authentication. Recent versions have completely removed the none auth mode. Authentication is now required by default on all new installations, a direct response to growing security scrutiny from enterprise researchers like CrowdStrike and Cisco.
OpenAI acquisition of the lead developer. On February 14, 2026, Peter Steinberger announced he is joining OpenAI and the project will be moved to an open-source foundation. The project’s future governance is still being defined, but the open-source foundation model means community contributions will continue.
Explosive skill ecosystem growth with growing pains. ClawHub has grown to nearly 3,000 skills, but as Cisco’s research highlighted, security vetting of those skills is still catching up. Tread carefully with third-party skills until the community vetting process matures.
Local model adoption. With Mac Mini M4 Pro (64GB) proving capable of running 32B parameter models at real-time speeds, more users are moving away from cloud APIs entirely for privacy-sensitive tasks. This trend is expected to accelerate through 2026 as Apple Silicon continues to close the gap with data center hardware.
Compaction awareness. The Meta inbox incident put a spotlight on a lesser-known issue called compaction, where an AI agent’s context window cycles and it forgets previously given instructions like always confirm before acting. Users are now expected to set hard-coded tool approval policies rather than relying solely on natural language instructions to their agents.
Frequently Asked Questions
What is OpenClaw and what does it do?
OpenClaw is a free, open-source AI assistant that runs locally on your Mac Mini and connects to messaging apps like Telegram, WhatsApp, and iMessage. It can execute real-world tasks autonomously, managing calendars, sending emails, browsing the web, running shell commands, and more, all triggered through a simple chat message.
Does OpenClaw work on all Mac Mini models?
Yes. OpenClaw works on Mac Mini models with M1, M2, M3, and M4 chips. The base M4 ($599) is widely considered the sweet spot for most users. The M4 Pro with 64GB is recommended if you want to run large local AI models without relying on cloud APIs.
Is OpenClaw free to use?
OpenClaw itself is completely free and open-source. However, you will need an API key from an AI provider like Anthropic or OpenAI, which have their own usage costs. Alternatively, you can run local models for free if your Mac has enough memory.
How long does OpenClaw setup take on a Mac Mini?
From a brand new Mac Mini to a working OpenClaw installation with Telegram paired, expect to spend about 20 to 30 minutes. Most of that time is waiting for installations to complete rather than active work.
Is it safe to run OpenClaw on my Mac Mini?
Yes, with the right configuration. The minimum safe setup takes about 10 minutes: enable macOS Firewall and FileVault, configure loopback-only binding, enable token authentication, set your DM policy to pairing mode, and require tool execution approval for destructive actions. The Meta inbox incident is a real-world reminder that natural language instructions alone are not enough. Use hard policy settings.
Can I use OpenClaw with Telegram on iPhone?
Yes. Once you have paired OpenClaw with Telegram using the steps above, you can interact with it from any Telegram client, including iPhone. For iOS device pairing using the OpenClaw app, send /pair to your bot in Telegram, copy the setup code, and enter it in the OpenClaw app under Settings > Gateway.
What AI models does OpenClaw support?
OpenClaw supports Claude (Anthropic), GPT-4 and GPT-4o (OpenAI), DeepSeek, and local models via compatible runtimes. You choose your model during the onboarding wizard and can switch at any time in the settings.
What should I do if OpenClaw is not responding after setup?
First, run openclaw health in Terminal to check the gateway status. If the gateway is not running, restart it with openclaw start. Make sure your API key is valid and has sufficient credits. Also confirm your Telegram bot token is correctly entered in the channel settings.
What happens to OpenClaw now that its developer is joining OpenAI?
Peter Steinberger announced in February 2026 that he is joining OpenAI and transferring OpenClaw to an open-source foundation. The project will continue to be community-maintained and open-source. No major disruptions to functionality are expected in the near term.
What is compaction in OpenClaw and why does it matter?
Compaction refers to the process where an AI agent’s context window cycles and older instructions get dropped from active memory. This is what caused Meta’s Summer Yue to have her inbox wiped. The agent forgot her confirm before acting instruction as the conversation grew longer. To protect against this, always configure hard tool approval policies in OpenClaw’s settings rather than relying solely on natural language instructions.
Bottom Line
OpenClaw on Mac Mini is genuinely impressive, a 24/7 AI assistant that lives on your hardware, responds to your Telegram messages, and actually does things rather than just answering questions. Setup is straightforward once you know the steps, and Telegram pairing takes just a few minutes with the right process. The security configuration requires more attention than most beginner guides acknowledge, but the incidents of early 2026, from Summer Yue’s deleted inbox to Cisco’s ClawHub findings, make it clear that a few extra minutes of setup can save you a serious headache. Follow this guide top to bottom and you will have a fully functional, properly secured OpenClaw instance running on your Mac Mini in under 30 minutes.
I'm a Computer Science graduate from Kean University in New Jersey, with expertise in web development, UI/UX design, and game design. I'm also proficient in C++, Java, C#, and front-end web development. I've co-authored research studies on Virtual Reality and Augmented Reality, investigating how immersive technologies impact learning environments and pedestrian behavior. You can get in touch with me here on LinkedIn.
 Skip to content