Installing a 2.5-inch SSD in a mini PC takes 10-15 minutes and requires only a Phillips screwdriver in most cases. First, verify your mini PC has a 2.5-inch SATA bay—many 2026 models prioritize dual M.2 slots instead, so check specifications before purchasing drives. Power off completely, open the bottom panel by removing 4-6 screws, locate the SATA connector (usually a ribbon cable), slide the SSD into the bay with the label facing down and connector side first, secure with 4 mounting screws, close the case, and boot into BIOS to verify detection. The entire process requires no technical expertise, though formatting and partitioning the drive in Windows or Linux adds another 5-10 minutes. Popular mini PCs with 2.5-inch bays include Beelink SER9 series, GEEKOM GT1 Mega, Minisforum UM890/UM990, and HP/Dell business models, while newer compact designs from GMKtec and similar brands have eliminated SATA support entirely in favor of dual M.2 NVMe slots.
Why Install a 2.5 Inch SSD in Your Mini PC?
By 2026, the mini PC storage landscape has shifted dramatically toward M.2 NVMe drives, but 2.5-inch SATA SSDs still offer compelling advantages for specific use cases—though not always for the reasons you might expect.
Slot availability, not cost savings: The traditional cost advantage of SATA over NVMe has vanished by 2026. Recent industry analysis confirms that 4TB SATA SSDs now cost MORE than equivalent NVMe drives in many cases, with manufacturers prioritizing DRAM over NAND production and effectively phasing out SATA. A 4TB NVMe Gen4 drive costs around $340, while a 4TB SATA SSD runs $280-300—minimal savings for significantly lower performance.
Easy expansion without replacing existing storage: The real advantage of 2.5-inch SATA in 2026 is slot availability. Most mini PCs with 2.5-inch bays also include M.2 slots. You can keep your fast NVMe boot drive and add a SATA SSD for additional capacity without sacrificing your existing setup or using your limited M.2 slots.
Reusing drives from older systems: If you’re upgrading from a laptop or desktop, that 1TB or 2TB SATA SSD doesn’t need to go to waste. Install it in your mini PC for instant extra storage at zero cost.
Sufficient performance for cold storage workloads: SATA III maxes out at 550-560 MB/s sequential speeds, compared to NVMe’s 3,500-7,500 MB/s. However, for media storage, document files, archived projects, and infrequently accessed data, The speed difference is imperceptible in real-world use. Only tasks like video editing from the drive or frequent large file transfers benefit meaningfully from NVMe speeds.
Important 2026 reality check: The trend away from 2.5-inch SATA is accelerating rapidly. Samsung and other major manufacturers are halting SATA SSD production, with NAND fab allocation shifting to more profitable NVMe products. Reddit discussions from late 2025 confirm that newer mini PC models increasingly omit SATA bays entirely, with manufacturers like GMKtec abandoning the format across their entire lineup. Community members note that “this hardware is outdated, especially in a category where compactness is crucial”, though brands like Beelink, GEEKOM, and Minisforum still include 2.5-inch support in select 2025-2026 models.
Pro Tip: “Before buying a 2.5-inch SSD for your mini PC, verify two things: (1) that your specific model actually has a SATA bay and SATA cable included, and (2) that high-capacity drives (2TB+) are 7mm thick, not 9.5mm or 15mm. Check the manufacturer’s detailed specifications or disassembly videos on YouTube—many ‘compact’ mini PCs under 0.5L volume have dropped SATA support entirely, and thicker drives won’t fit in mini PC chassis.”
Check Compatibility First: Does Your Mini PC Support 2.5 Inch Drives?
Not all mini PCs include 2.5-inch SATA bays in 2026. Before purchasing a drive, verify compatibility.
How to check if your mini PC has a 2.5-inch bay:
Method 1 – Check specifications: Visit the manufacturer’s product page and look for “2.5-inch SATA bay” or “SATA HDD/SSD support” in the storage expansion section. Specifications should explicitly state if a SATA bay is present.
Method 2 – Physical inspection: Power off your mini PC, remove the bottom panel (usually 4-6 Phillips screws), and look for a flat rectangular space (roughly 10cm x 7cm x 0.7cm) with either a SATA ribbon cable attached or mounting holes for a 2.5-inch drive.
Method 3 – Search for installation videos: YouTube hosts disassembly and upgrade videos for most popular mini PC models. Search “[your mini PC model] SSD upgrade” to see if others have successfully installed 2.5-inch drives.
Mini PC brands/models that commonly support 2.5-inch SSDs (2025-2026):
- Beelink SER9 / SER9 Pro / SER9 Max: Current 2025-2026 models include SATA ribbon cables and dedicated 2.5-inch bays
- GEEKOM GT1 Mega: Features 16-pin FPC SATA connector alongside M.2 expansion
- Minisforum UM890 Pro / UM990: 2025 models with AMD Ryzen 9 8945HS support both M.2 and 2.5-inch expansion
- HP EliteDesk 800 G6/G8/G9 Mini: Business models include 2.5-inch bays (except 125W processor variants)
- Dell Optiplex Micro (7000/5000 series): Most configurations support 2.5-inch drives
- Intel NUC 12/13 Pro: Include 2.5-inch mounting alongside M.2 slots
Mini PC brands/models that typically DO NOT support 2.5-inch drives:
- GMKtec entire lineup (2025-2026): Eliminated SATA support across all models in favor of dual M.2
- Most ultra-compact designs (<0.5L volume): Physical space constraints eliminate SATA bays
- Budget Intel N100 models: Entry-level systems prioritize cost reduction by removing SATA
- Apple Mac Mini (all generations): Uses proprietary storage, no user-serviceable SATA
What You’ll Need: Tools and Materials
Required items:
2.5-inch SATA SSD (7mm thickness): Any SATA III SSD works, but verify thickness. Standard 2.5-inch SSDs are 7mm thick. Older 2.5-inch HDDs came in 9.5mm and 15mm variants that won’t fit mini PC chassis. Capacity options range from 240GB ($25) to 4TB ($280-300). Recommended brands include Samsung 870 EVO, Crucial MX500, Western Digital Blue, and Kingston A400.
Important: High-capacity drives (2TB+) should explicitly state “7mm” or “7mm height” in specifications. Some older 4TB 2.5-inch HDDs used 15mm thickness, which is incompatible with mini PCs. Modern SSDs are universally 7mm, but verify before purchasing.
Phillips #1 screwdriver: The most common size for mini PC case screws and SSD mounting screws. Magnetic tips help prevent dropped screws in tight spaces.
Optional but helpful:
Anti-static wrist strap: Protects components from electrostatic discharge. Not essential for simple SSD installation, but good practice for $5-10.
Flashlight or headlamp: Mini PC interiors are cramped and poorly lit. A flashlight helps identify connectors and mounting points.
Plastic pry tool or guitar pick: Useful for gently separating bottom panels that clip in addition to being screwed down.
Compressed air: Clean dust from your mini PC while it’s open. Improves cooling and prevents thermal throttling.
What’s usually included with your mini PC:
Most mini PCs with 2.5-inch bay support include:
- SATA data ribbon cable pre-installed
- SATA power connector integrated into the cable (no separate power cable needed)
- 4× mounting screws (sometimes pre-installed in mounting holes)
If your mini PC didn’t come with the SATA cable, replacement cables cost $8-15 on Amazon or Newegg. Search for “[your mini PC model] SATA cable” to ensure connector compatibility.
Step-by-Step: Installing a 2.5 Inch SSD in Your Mini PC
Step 1: Backup data and power down completely
If your mini PC is currently in use, back up any important data to external storage or cloud services. Once backed up, shut down through your operating system (don’t just unplug).
After shutdown completes, unplug the power cable and wait 30 seconds for residual power to dissipate. If connected to monitors, keyboards, or other peripherals, disconnect those as well.
Step 2: Open the mini PC case
Place your mini PC on a clean, flat surface. Most mini PCs open from the bottom.
Flip the unit upside down and locate the mounting screws—typically 4-6 Phillips screws around the perimeter of the bottom panel. Some models also use rubber feet that conceal screws underneath, so check beneath any removable feet.
Remove all screws and set them aside in a small container (magnetic trays work perfectly).
Important: Gently lift the bottom panel. Don’t yank or pull hard—many mini PCs have SATA ribbon cables attached to the bottom panel that can tear if you force it. If you feel resistance, look for clips or additional screws you may have missed.
Step 3: Locate the 2.5-inch drive bay and SATA connector
With the case open, identify the 2.5-inch bay. It’s usually:
- A flat rectangular area with mounting holes
- Located along the side wall or bottom of the case
- Near the front or rear panel (varies by model)
Look for a SATA ribbon cable—it’s a thin, flat cable (usually orange, black, or gray) with an L-shaped connector at the end. The ribbon cable often runs from the motherboard to the drive bay area. Some models have the cable attached to the bottom panel you just removed.
In Beelink SER9 models specifically, the SATA ribbon cable connects to a small PCB on the bottom panel, with the drive bay positioned in the center of the case.
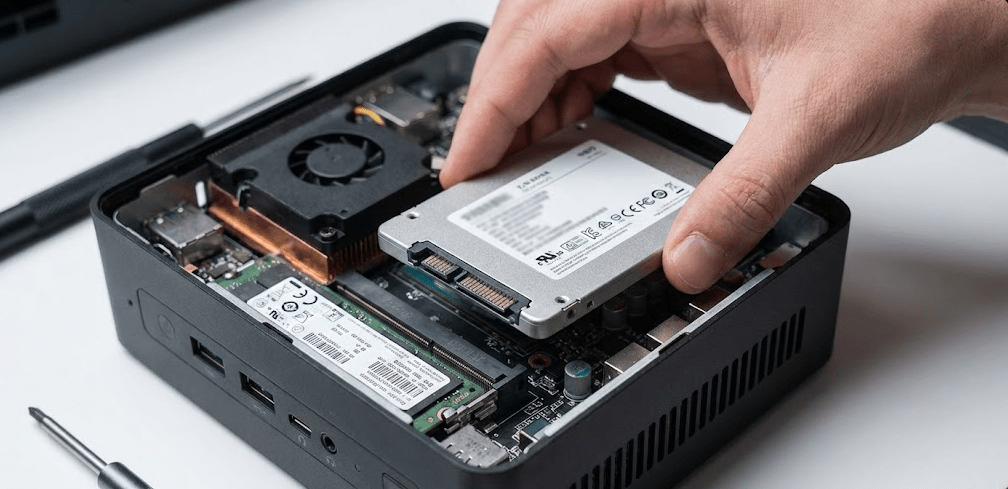
Step 4: Position and insert the SSD
Hold your 2.5-inch SSD with the label facing downward (away from the motherboard) and the SATA connector edge facing toward the SATA ribbon cable.
The orientation is critical: the L-shaped SATA connector on your SSD must align with the L-shaped connector on the ribbon cable. They only fit one way.
Carefully slide the SSD into the bay, pushing it gently toward the SATA connector until it seats fully. You should feel a subtle click or resistance when the connectors mate properly. Don’t force it—if it doesn’t slide in easily, check your orientation.
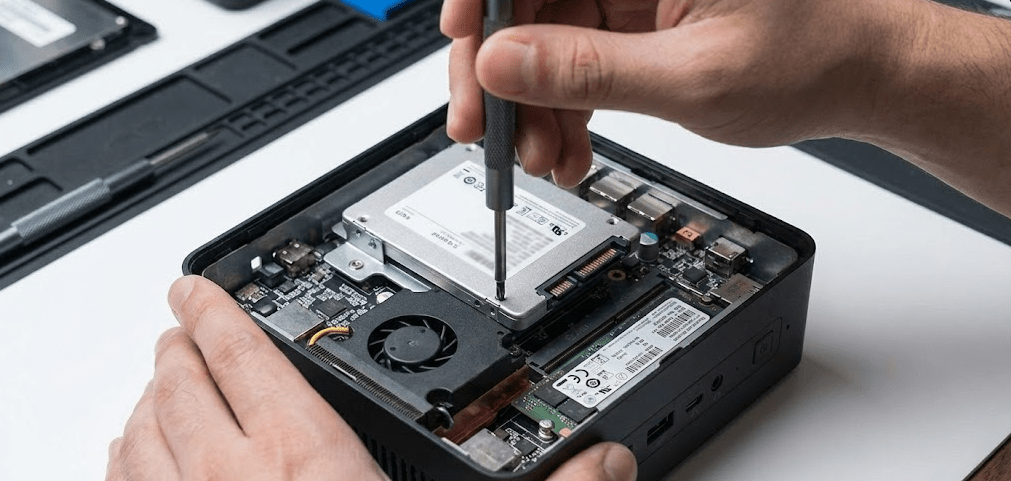
Step 5: Secure the SSD with mounting screws
Once the SSD is connected, it needs to be secured to prevent movement or disconnection during use.
Locate the 4 mounting holes on the sides of your SSD—two on each long edge. Align these holes with the threaded mounting points or holes in your mini PC’s drive bay.
Thread in the 4 mounting screws by hand first, ensuring they catch the threads correctly. Once all 4 are started, tighten them in a cross pattern (tighten one, then its diagonal opposite, then the remaining two). This distributes pressure evenly.
Important: Don’t overtighten. The screws should be snug but not torqued down. Over-tightening can crack the SSD circuit board or strip the threads. Finger-tight plus a quarter turn is sufficient.
If your mini PC uses a sliding tray system (common in HP and Dell models), you may need to first mount the SSD to the tray with screws, then slide the entire tray assembly into the bay until it clicks.
Step 6: Verify cable connections
Before closing the case, double-check that:
- The SATA data connector is fully seated (no gaps between connector and SSD)
- The cable isn’t pinched, kinked, or blocking any cooling fans
- No other cables or components were disturbed during installation
Route the SATA cable neatly around the edges of the case rather than across the motherboard or CPU cooler. This improves airflow and prevents cable damage from heat.
Step 7: Close the case and reconnect power
Carefully reposition the bottom panel, ensuring no cables are pinched in the seam. Start by aligning any clips or tabs, then gently press the panel into place.
Reinstall all mounting screws in their original positions, tightening in a cross pattern to ensure even pressure.
Flip the mini PC right-side up, reconnect the power cable, and reconnect any peripherals (monitor, keyboard, mouse).
Step 8: Boot and verify SSD detection in BIOS
Press the power button. As the system boots, immediately press the BIOS key (usually Del, F2, F10, or F12 depending on manufacturer) repeatedly until the BIOS menu appears.
Navigate to the storage or drive information section. You should see your newly installed 2.5-inch SSD listed alongside any existing M.2 drives. It may be labeled as “SATA 0”, “SATA 1”, or by its model number.
If the SSD doesn’t appear:
- Power off completely and reseat the drive (remove and reinstall)
- Check that the SATA cable wasn’t damaged during installation
- Verify SATA ports are enabled in BIOS (some systems allow disabling unused ports)
Once you confirm the drive appears in BIOS, save settings and exit to boot into your operating system.
Formatting and Initializing Your New SSD (Windows)

BIOS detection confirms the hardware connection works, but Windows needs one more step before you can use the drive.
Step 1: Open Disk Management
Right-click the Start button and select Disk Management. Alternatively, press Windows Key + X and choose Disk Management from the menu.
After a few seconds, Disk Management will scan for all connected drives.
Step 2: Initialize the disk
If this is a brand new SSD (never used before), Windows will prompt you to initialize it. A dialog box will appear asking you to choose a partition style:
- GPT (GUID Partition Table): Choose this for modern systems and drives over 2TB
- MBR (Master Boot Record): Only if you need compatibility with very old systems
Select GPT and click OK.
Step 3: Create a new volume
After initialization, the new SSD will show as “Unallocated” space in Disk Management. Right-click the unallocated space and select New Simple Volume.
Follow the wizard:
- Volume size: Use the maximum available space (or partition into smaller volumes if desired)
- Drive letter: Choose any available letter (D:, E:, F:, etc.)
- Format settings:
- File system: NTFS (best for Windows)
- Allocation unit size: Default
- Volume label: Give it a descriptive name like “Storage” or “Media”
- Check “Perform a quick format”
Click Next, then Finish. Windows will format the drive, which takes 1-5 minutes depending on capacity.
Step 4: Verify the drive is accessible
Open File Explorer and look for your new drive letter. You should see your newly labeled drive with nearly all capacity available (some space is reserved for file system overhead).
Try creating a folder and copying a file to confirm read/write functionality works correctly.
Formatting and Initializing Your New SSD (Linux)
Linux users can partition and format their new SATA SSD using command-line or graphical tools.
Method 1: Using GParted (graphical interface)
Install GParted if not already present:
textsudo apt install gparted
Launch GParted with sudo privileges:
textsudo gparted
From the dropdown menu in the top-right, select your new SSD (usually /dev/sdb or /dev/sdc).
Right-click the unallocated space and select New. Configure:
- File system: ext4 (for Linux), NTFS (for Windows compatibility), or exFAT (cross-platform)
- Label: Descriptive name for the drive
Click Add, then click the green checkmark to apply changes.
Method 2: Using command line (fdisk + mkfs)
Identify your new drive:
textlsblk
Your new SSD will appear as /dev/sdb or /dev/sdc (never /dev/sda, which is your boot drive).
Create a partition:
textsudo fdisk /dev/sdb
Within fdisk:
- Press
nfor new partition - Press
pfor primary partition - Accept defaults for partition number, first sector, and last sector
- Press
wto write changes and exit
Format the partition:
textsudo mkfs.ext4 /dev/sdb1
Create a mount point and mount the drive:
textsudo mkdir /mnt/storage
sudo mount /dev/sdb1 /mnt/storage
To auto-mount on boot, add an entry to /etc/fstab.
Troubleshooting Common Installation Issues
SSD not detected in BIOS
Cause: Poor connection, damaged cable, or disabled SATA port.
Solution:
- Power off and reseat the drive, ensuring the SATA connector fully clicks into place
- Inspect the SATA ribbon cable for tears, kinks, or bent pins
- Try a different SATA port if your mini PC has multiple (some models have 2+ SATA connectors)
- Check BIOS settings for “SATA Configuration” and ensure SATA ports are enabled
Drive detected in BIOS but not in Windows
Cause: Drive needs initialization and formatting.
Solution: Follow the “Formatting and Initializing Your New SSD (Windows)” section above. New drives always require this step before Windows can use them.
SSD disconnects or disappears randomly
Cause: Loose connection or insufficient power delivery.
Solution:
- Check mounting screws—loose drives can wiggle and disconnect
- Verify the SATA connector is fully seated (remove and reinstall firmly)
- Inspect the cable for damage—replace if necessary
- Some mini PCs have underpowered SATA power delivery for high-capacity SSDs; try a different SSD if possible
Slower than expected performance
Cause: SATA III operates at 550-560 MB/s maximum, which is normal and expected.
Solution: This is not a problem. SATA III is limited to ~560 MB/s regardless of the SSD. If you need faster speeds, you need an NVMe drive, not SATA. For typical use cases (media storage, documents, game libraries), SATA performance is completely adequate.
Drive doesn’t fit in the bay (too thick)
Cause: Drive is 9.5mm or 15mm thick instead of standard 7mm.
Solution: Mini PCs only accommodate 7mm 2.5-inch drives. If you purchased a thicker drive (common with older 4TB 2.5-inch HDDs), you need to exchange it for a 7mm SSD. All modern 2.5-inch SSDs are 7mm, but verify specifications before purchasing high-capacity drives.
Cannot remove bottom panel
Cause: Hidden screws, clips, or attached ribbon cable preventing removal.
Solution:
- Check under rubber feet for hidden screws
- Look for plastic clips around the perimeter—gently pry with a plastic tool
- If you feel resistance, stop pulling. The SATA ribbon cable may be attached to the bottom panel. Gently lift a corner to peek inside and identify what’s catching
Screws don’t fit or won’t tighten
Cause: Wrong screw size or cross-threaded screws.
Solution:
- SSD mounting screws are M3 size. If you lost the originals, purchase M3 × 5mm screws
- If screws won’t catch threads, they may be cross-threaded. Remove, realign, and start threading by hand (not with a screwdriver) to ensure proper alignment
- Don’t force screws. If they don’t thread easily, you’re using the wrong size or they’re misaligned
2.5 Inch vs M.2 SSD: Which Should You Choose in 2026?
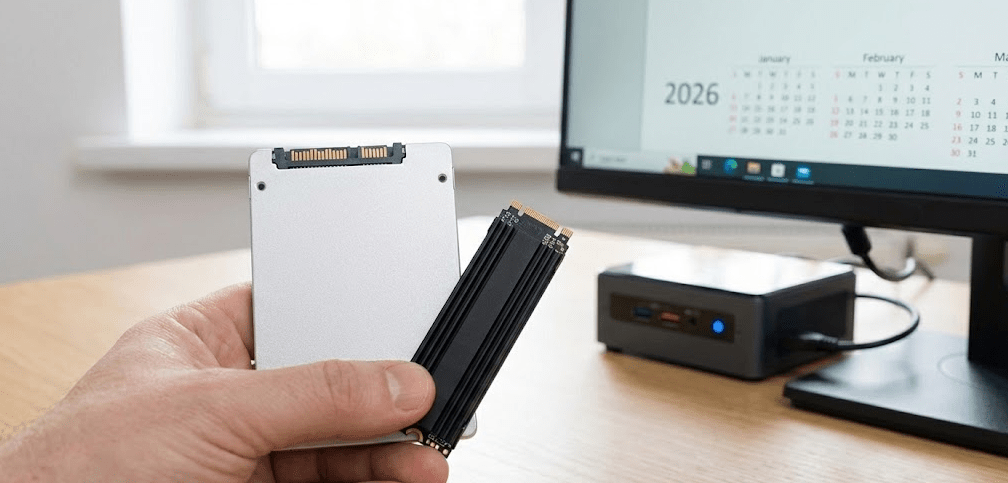
By 2026, most users should prioritize M.2 NVMe drives for new installations, with 2.5-inch SATA reserved only for slot expansion needs.
Choose 2.5-inch SATA SSD if:
- You’re adding secondary storage to a mini PC that already has M.2 slots filled
- Your mini PC has a 2.5-inch bay but limited/no available M.2 slots
- You’re reusing an existing 2.5-inch drive from an old laptop or desktop
- Your workload is pure cold storage (archived media, infrequent backups)
- You already own the SATA drive and installation is free
Choose M.2 NVMe SSD if:
- This is your boot/primary drive (OS benefits tremendously from NVMe speeds)
- Your mini PC doesn’t have a 2.5-inch bay (increasingly common in 2026)
- You need performance for video editing, databases, or development work
- You want the cleanest possible build with no cables (M.2 installs directly on motherboard)
- You’re buying new storage (NVMe costs the same or less than SATA in 2026)
- Future upgradability matters—M.2 is the current standard and SATA production is ending
- 2.5-inch SATA III: 550-560 MB/s sequential read/write
- M.2 SATA: 550-560 MB/s sequential read/write (same as 2.5-inch, just different form factor)
- M.2 NVMe (PCIe 3.0): 3,500 MB/s read, 3,000 MB/s write
- M.2 NVMe (PCIe 4.0): 7,000 MB/s read, 6,000 MB/s write
The 6-13× speed advantage of NVMe sounds dramatic, but real-world impact depends on your workload. Booting Windows takes 8 seconds with NVMe vs 15 seconds with SATA. Loading a game takes 5 seconds vs 10 seconds. For media playback or document work, the difference is imperceptible.
Mini PC Storage Upgrade Comparison Table
| Storage Type | Form Factor | Speed | Capacity Range | Price Range (2026) | Installation | Best For |
|---|---|---|---|---|---|---|
| 2.5″ SATA SSD | 100mm × 70mm × 7mm | 550 MB/s | 240GB – 4TB | $25-$300 | Requires screws + cable | Slot expansion only |
| M.2 SATA SSD | 22mm × 80mm | 550 MB/s | 240GB – 2TB | $30-$180 | Single screw | Legacy system upgrades |
| M.2 NVMe (PCIe 3.0) | 22mm × 80mm | 3,500 MB/s | 256GB – 4TB | $35-$320 | Single screw | General use, value builds |
| M.2 NVMe (PCIe 4.0) | 22mm × 80mm | 7,000 MB/s | 500GB – 4TB | $55-$340 | Single screw + heatsink | Gaming, video editing, pro work |
| 3.5″ HDD | 146mm × 101mm × 26mm | 120 MB/s | 1TB – 20TB | $40-$350 | Requires screws + cables | Cold storage, archives (not mini PCs) |
Data compiled from manufacturer specifications and market prices as of January 2026.
FAQ: Installing 2.5 Inch SSDs in Mini PCs
Do all mini PCs support 2.5-inch SSDs?
No. By 2026, many mini PCs have eliminated 2.5-inch SATA bays in favor of dual M.2 slots. Brands like GMKtec dropped SATA support entirely across their lineup, while Beelink SER9, GEEKOM GT1 Mega, and Minisforum UM890/UM990 still include it in select models. Always verify specifications before purchasing a 2.5-inch drive.
Can I use a 2.5-inch HDD instead of an SSD?
Technically yes, but it’s not recommended. 2.5-inch HDDs (hard disk drives) are significantly slower (100-120 MB/s vs 550 MB/s for SSDs), more fragile (moving parts can fail from vibration), and noisier. With 2TB SSDs costing under $100 in 2026, there’s no compelling reason to use mechanical drives in mini PCs.
Will adding a 2.5-inch SSD void my warranty?
Usually no, but check your manufacturer’s policy. Most consumer mini PCs explicitly allow user-installed storage upgrades. Business models from HP, Dell, and Lenovo include upgrade instructions in official documentation. However, physical damage caused during installation (torn cables, bent pins) may not be covered.
Are 2.5-inch SATA SSDs cheaper than NVMe in 2026?
No. The traditional cost advantage has disappeared. A 4TB NVMe Gen4 costs $340 while a 4TB SATA costs $280-300—minimal savings for dramatically lower performance. Major manufacturers like Samsung are halting SATA production, making SATA a legacy format.
Can I install both M.2 and 2.5-inch SSDs simultaneously?
Yes, if your mini PC has both types of bays. This is the most common configuration—install a fast M.2 NVMe drive for your OS and applications, then add a 2.5-inch SATA SSD for additional storage if M.2 slots are full. Most mid-range and higher mini PCs support this dual-drive setup.
What thickness 2.5-inch drive do I need?
7mm only. Mini PCs cannot accommodate 9.5mm or 15mm thick drives. All modern 2.5-inch SSDs are 7mm, but some older high-capacity HDDs used 9.5mm or 15mm form factors. Verify “7mm” in specifications before purchasing, especially for 4TB drives.
Do 2.5-inch SSDs need separate power cables like in desktop PCs?
No, not in mini PCs. Desktop towers use separate SATA data and SATA power cables because the power supply is physically distant from the drives. Mini PCs use ribbon cables that combine data and power into a single connector, simplifying installation significantly.
Should I clone my existing drive or do a fresh install?
For boot drives, fresh OS installs generally perform better than clones. For secondary storage drives, you don’t need to do anything special—just install the drive, format it, and start copying files. Cloning makes sense only if you’re replacing your existing boot drive and want to avoid reinstalling Windows and all applications.
The Bottom Line: When 2.5 Inch SSDs Still Make Sense in 2026
How to install a 2.5-inch SSD in a mini PC? The process takes 10-15 minutes with a screwdriver, requires no technical expertise, and provides instant storage expansion for systems with available SATA bays.
However, the broader question is whether you should install a 2.5-inch SSD in 2026. The answer has changed dramatically from previous years. SATA is no longer cheaper than NVMe, with manufacturers actively phasing out production. The only valid reason to choose 2.5-inch SATA in 2026 is slot availability—if your M.2 slots are full but you have a 2.5-inch bay available, SATA provides additional capacity without replacing existing drives.
If your mini PC has a 2.5-inch bay and you need expansion storage, a 1-2TB SATA SSD delivers adequate value at $50-100. The 550 MB/s sequential speeds are completely sufficient for archived media, backups, or cold storage workloads. But for new primary storage, prioritize M.2 NVMe drives—they cost the same or less with 6-13× better performance.
The industry trend is irreversible: 2.5-inch SATA support is declining. Newer compact mini PCs like the GEEKOM GT1 Mega and Beelink SER9 series still include SATA bays, but brands like GMKtec have eliminated them entirely. As one Reddit user noted, “In the area designated for a 2.5-inch drive, you can actually accommodate two NVMe SSDs,” which is exactly what manufacturers are doing.
For 2026 and beyond, install 2.5-inch SATA only for slot expansion on compatible systems or when reusing existing drives at zero cost. For all new storage purchases, choose M.2 NVMe. The installation process itself remains straightforward and user-friendly—just verify compatibility and drive thickness (7mm only) before you buy.