Switching GPUs between NVIDIA and AMD is straightforward but requires one critical step that most guides skip or rush: you must fully remove the old drivers before installing the new card, not after. Skipping a proper driver clean causes the most common post-swap problems including black screens, display artifacts, crashes, and the new GPU not being recognized correctly. The correct order is: uninstall old drivers first using DDU in Safe Mode, shut down, physically swap the GPU, then boot and install new drivers from scratch. This guide walks you through both directions — NVIDIA to AMD and AMD to NVIDIA — with exact steps, the right tools, and how to fix every common problem you might encounter.
What You Need Before You Start
Before touching any hardware or drivers, gather the following:
Software to download in advance (while your current GPU is still installed):
- Display Driver Uninstaller (DDU): The most important tool in this entire process. Download it free from Guru3d.com. DDU removes every trace of GPU drivers including registry keys, folders, and leftover files that Windows’ built-in uninstaller misses.
- New GPU drivers downloaded and saved locally: Do this before the swap so they are ready to install offline after the clean. For AMD, download AMD Adrenalin from amd.com. For NVIDIA, download the Game Ready or Studio driver from nvidia.com. Save the installer file to your desktop or a USB drive.
Physical tools:
- Phillips head screwdriver (PH2 for most GPU bracket screws)
- Anti-static wrist strap (recommended but a grounded metal case or PSU chassis works as an improvised ground)
- A clean, dry workspace with good lighting
- Your new GPU, still in its box with all included power adapter cables
Things to check before starting:
- Confirm your PSU has enough wattage for the new GPU. Every GPU’s product page lists its TDP (thermal design power) and recommended PSU wattage. Do not skip this step if upgrading to a significantly more powerful card
- Confirm your PSU has the correct PCIe power connectors. NVIDIA’s 4000-series cards use the 16-pin 12VHPWR connector. AMD’s RX 7000-series cards use standard 8-pin PCIe connectors. Adapters exist but using quality cables directly from your PSU is always preferred
- Confirm your PCIe slot version. Most modern GPUs require a PCIe x16 slot. Virtually all desktop motherboards from the last decade have at least one
- Back up anything important. A driver swap rarely goes catastrophically wrong, but it is always better to have a current backup before making any significant system change
Direction 1: Switching from NVIDIA to AMD
Overview of the Process
The full NVIDIA-to-AMD swap has four phases:
- Uninstall NVIDIA drivers cleanly using DDU in Safe Mode (with the NVIDIA card still installed)
- Shut down and physically swap the GPU
- Boot normally with the AMD card installed
- Install AMD Adrenalin drivers fresh
Phase 1: Uninstall NVIDIA Drivers with DDU in Safe Mode
Why Safe Mode matters: Windows continuously monitors your hardware and can automatically reinstall drivers in the background while DDU is trying to remove them. Safe Mode disables this auto-reinstall behavior, letting DDU do a complete clean without interference. As the Official DDU guide from Wagnardsoft explains, running DDU in Safe Mode is the recommended approach for stability, particularly when switching GPU vendors entirely.
Step 1: Download DDU and your AMD drivers now
While still on your NVIDIA card and in normal Windows:
- Download DDU from guru3d.com
- Download the latest AMD Adrenalin installer from amd.com
- Save both files to an easy-to-find location (desktop or a USB drive)
Step 2: Boot into Safe Mode using Shift + Restart
The safest and most reliable way to enter Safe Mode is the Shift + Restart method. Unlike the msconfig method, this boots into Safe Mode exactly once and returns to normal boot afterward automatically — which is exactly what you want before a hardware swap.
- Click the Start menu
- Click the Power icon
- Hold the Shift key on your keyboard and click Restart while still holding Shift
- Windows will reboot into the recovery environment
- Click Troubleshoot → Advanced Options → Startup Settings → Restart
- After the second reboot, press 4 or F4 to enter Safe Mode
⚠️ Why not use msconfig for this? If you check “Safe boot” in msconfig, Windows will boot into Safe Mode on every restart until you manually go back and uncheck it. Since DDU’s next step is to shut the computer down entirely (so you can swap the GPU), your PC would then boot back into Safe Mode with the new card installed — preventing you from installing the new drivers properly. The Shift + Restart method avoids this entirely because it only triggers Safe Mode for one boot.
Step 3: Run DDU in Safe Mode
Once in Safe Mode:
- Open DDU (it does not need installation, just run the extracted executable)
- A settings window may appear — the defaults are fine for most users, close it
- In the right panel, set Select device type to GPU
- Set Select device to NVIDIA
- Click Clean and shutdown — this option is specifically designed for when you intend to physically swap the GPU immediately after
DDU will strip every NVIDIA driver file, folder, and registry entry from the system, then shut the computer down completely. Your display may go black briefly during the process — this is completely normal.
⚠️ Important: Do not reconnect to the internet after DDU shuts down and before you have installed the new drivers. Windows Update can automatically push GPU drivers in the background, which may interfere with your clean install.
Phase 2: Physically Remove the NVIDIA GPU
With the computer fully powered off and the PSU switch turned off (or the power cable unplugged):
Step 1: Ground yourself
Touch the bare metal of the PC case or power supply chassis to discharge any static. An anti-static wrist strap clipped to the case frame is ideal. Avoid working on carpet.
Step 2: Open the case
Remove the side panel. Most modern cases use thumbscrews. Set the panel aside on a clean surface.
Step 3: Disconnect PCIe power cables
Locate the power connectors plugged into the GPU. Press the release tab or squeeze the clip on each connector and pull straight out. Do not yank at an angle. For 16-pin 12VHPWR connectors on recent NVIDIA cards, press the small side tab while pulling.
Step 4: Remove the GPU bracket screw(s)
At the rear of the case, one or two screws secure the GPU’s metal bracket to the case frame. Remove these and set them aside — you will need them for the new card.
Step 5: Release the PCIe slot retention latch
At the end of the PCIe x16 slot on the motherboard there is a small plastic latch or clip. Press it to release the GPU. The latch location varies by motherboard: it may be a push tab, a pull tab, or a lever. Some high-end motherboards have a tool-assisted quick-release button. Do not force the card — if it is not releasing, the latch has not been fully disengaged.
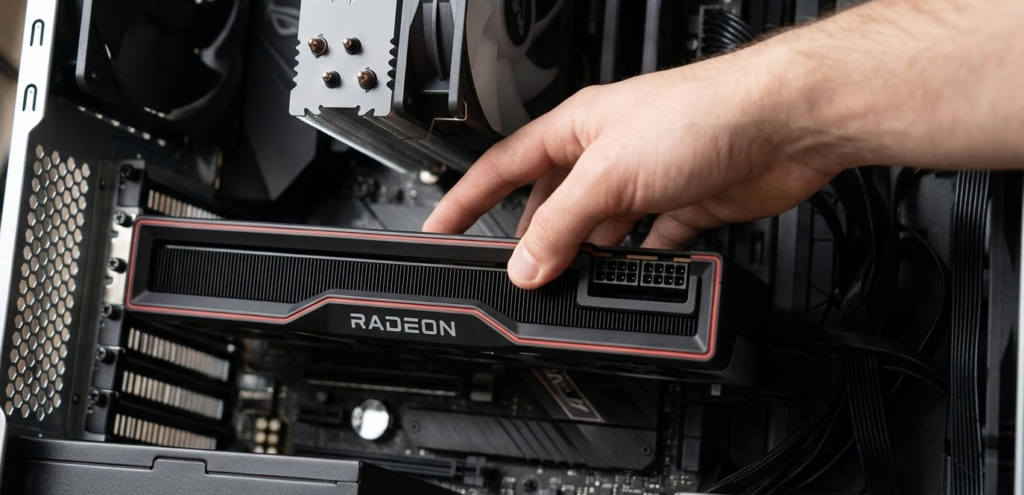
Step 6: Remove the GPU
With the latch released, grip the GPU by its edges (never by the fans or heatsink fins) and pull it straight up and out of the slot with even pressure. Set it on a clean antistatic surface, or place it in the antistatic bag from your new card’s packaging.
Phase 3: Install the AMD GPU
Step 1: Remove the AMD card from packaging
Handle it by the edges and PCB only. Do not touch the gold contacts on the bottom edge.
Step 2: Identify the correct PCIe slot
Use the primary PCIe x16 slot — typically the topmost full-length slot on the motherboard, closest to the CPU. Consult your motherboard manual if unclear.
Step 3: Seat the AMD GPU
Align the gold contacts with the PCIe slot, ensure the bracket aligns with the rear case opening, and press firmly and evenly until the retention latch clicks. Confirm the card is fully seated — a partially inserted GPU is a common cause of no-display issues.
Step 4: Reinstall the bracket screw(s)
Secure the GPU’s metal bracket to the rear of the case using the same screws from the NVIDIA card.
Step 5: Connect PCIe power cables
Plug in the required power connectors from your PSU. Most AMD RX 7000-series cards use one or two standard 8-pin PCIe connectors. Refer to the AMD GPU’s manual for the exact connector requirement. A GPU that does not receive adequate power will fail to POST or crash under load.
Step 6: Close the case and reconnect peripherals
Reinstall the side panel and reconnect your monitor cable to the AMD GPU’s display outputs, not the motherboard’s integrated display outputs.
Phase 4: Install AMD Adrenalin Drivers
Step 1: Power on
Boot the system normally. Windows may boot to a low resolution generic display driver. This is expected — it means Windows recognized the AMD GPU but is running without proper drivers yet.
Step 2: Stay offline
Keep your internet connection disabled until you have installed the AMD drivers manually. This prevents Windows Update from pushing an older driver version that could conflict with your fresh install.
Step 3: Run the AMD Adrenalin installer
Launch the AMD Adrenalin installer file you downloaded before the swap:
- Accept the license agreement
- Click Additional Options to expand install type settings
- Select Full Install for the complete software suite, or Driver Only if you want a minimal footprint without AMD’s companion software
- Click Install
- Your display will flash black several times during installation — this is normal
Step 4: Reboot when prompted
After installation completes, reboot. After the reboot, reconnect to the internet and verify AMD Adrenalin opens correctly and recognizes your GPU model.
Step 5: Verify the installation
Open Device Manager (right-click Start → Device Manager) and expand Display adapters. You should see your AMD GPU listed without any warning icons. If you see a yellow exclamation mark, the driver did not install correctly — reinstall using the AMD Adrenalin installer and reboot again.
Direction 2: Switching from AMD to NVIDIA
The AMD-to-NVIDIA process follows the same four-phase structure but uses AMD’s own Cleanup Utility as an alternative to DDU, and ends with NVIDIA’s driver installer rather than AMD Adrenalin.
Phase 1: Uninstall AMD Drivers
Option A (Recommended): Use DDU in Safe Mode
The process is identical to the NVIDIA-to-AMD direction above, but in DDU’s device selector, choose AMD/ATI instead of NVIDIA. Download your NVIDIA drivers first, use Shift + Restart to enter Safe Mode, run DDU with Clean and shutdown, and proceed to the physical swap.
Option B: Use AMD’s Built-in Cleanup Utility
AMD provides its own Radeon Cleanup Utility as part of the Adrenalin software suite. As How-To Geek’s clean GPU driver install guide notes, before using AMD’s Cleanup Utility you may need to disable Windows’ automatic driver replacement to prevent Windows from pushing drivers back during the cleanup process:
- Press
Win + R, typesysdm.cpl, press Enter - Click the Hardware tab → Device Installation Settings
- Select No (your device might not work as expected) and save
Then:
- Open AMD Adrenalin software
- Click the gear icon (Settings) → System → Radeon Software Cleanup Utility
- Click Clean and Restart
- After the reboot, the AMD drivers and software will be fully removed
After cleanup completes, proceed directly to the physical swap — do not reinstall AMD drivers.
Phase 2: Physically Remove the AMD GPU
The physical removal process is identical to removing the NVIDIA card described in Direction 1:
- Power off completely, flip PSU switch off or unplug
- Ground yourself
- Disconnect PCIe power cables from the AMD GPU
- Remove the bracket screw(s) at the rear of the case
- Release the PCIe slot retention latch
- Pull the AMD GPU straight out by its edges
- Set it safely aside in an antistatic bag
Phase 3: Install the NVIDIA GPU
Step 1: Seat the NVIDIA GPU in the primary PCIe x16 slot
Align the card, press firmly until the retention latch clicks, and confirm full seating.
Step 2: Reinstall the bracket screw(s)
Step 3: Connect PCIe power cables
NVIDIA’s power connector requirements vary significantly by generation:
| NVIDIA GPU Generation | Power Connector |
|---|---|
| RTX 4000 series | 16-pin 12VHPWR (adapter included in box) |
| RTX 3000 series | 1 or 2x 8-pin PCIe |
| RTX 2000 series | 1 or 2x 8-pin PCIe |
| GTX 1600 / 1000 series | 6-pin or 8-pin PCIe depending on model |
If using the 12VHPWR adapter included with RTX 4000-series cards, ensure all pigtail connectors from the adapter are plugged into your PSU — leaving any pigtail disconnected causes dangerous power delivery issues. NVIDIA’s recommendation is to use a single native 16-pin cable from your PSU if available rather than the adapter.
Step 4: Connect your monitor to the NVIDIA GPU’s display outputs
Step 5: Close the case
Phase 4: Install NVIDIA Drivers
Step 1: Power on
Boot normally to Windows. As with AMD, Windows will load a basic generic display driver.
Step 2: Stay offline until manual driver installation is complete
Step 3: Run the NVIDIA driver installer
Launch the NVIDIA driver installer file you downloaded before the swap:
- Choose a path for driver package extraction and click OK
- Select NVIDIA Graphics Driver and GeForce Experience for the full package, or NVIDIA Graphics Driver only for a minimal install
- Click Agree and Continue
- Select Custom (Advanced) rather than Express
- Check Perform a clean installation — this removes any residual driver fragments even after DDU and is good practice
- Click Next
Your display will flash black several times. This is normal. After installation completes, click Restart Now.
Step 4: Verify the installation
After reboot, open Device Manager → Display adapters. Your NVIDIA GPU should appear without warning icons. Open NVIDIA Control Panel or the new NVIDIA App to confirm the GPU is recognized correctly.
Step 5: Reconnect to the internet and run GeForce Experience (optional)
GeForce Experience can automatically optimize game settings for your new GPU and keep drivers updated. It is optional — many users prefer a driver-only installation and manage updates manually.
The DDU Detailed Walkthrough (Both Directions)
Because DDU is the most important tool in this entire process and the step most users either skip or rush, here is a complete standalone walkthrough for both vendor directions.
Download and extract DDU:
- Go to guru3d.com/download/display-driver-uninstaller-download
- Download the latest version and extract the zip file to your desktop
Boot into Safe Mode using Shift + Restart:
- Click Start → Power icon → hold Shift and click Restart
- Troubleshoot → Advanced Options → Startup Settings → Restart
- Press 4 or F4 at the Startup Settings screen to enter Safe Mode
✅ Why Shift + Restart is the right method: It only triggers Safe Mode for one single boot, then automatically returns to normal booting. This is critical for a GPU swap because DDU will shut the machine down, and you need the next boot (with your new card installed) to go to normal Windows so you can install the new drivers — not back into Safe Mode.
In Safe Mode, launch DDU:
- Run the extracted DDU executable
- An Options window appears — review or close it (defaults are appropriate for most users)
- On the right side, set Select device type to GPU
- Set Select device to your current GPU’s vendor: NVIDIA or AMD/ATI
Choose the correct removal option:
| Situation | DDU Button to Use |
|---|---|
| Cleaning drivers, keeping same GPU | Clean and restart |
| Switching GPU vendors (swapping hardware after) | Clean and shutdown |
| Removing multiple vendors’ drivers sequentially | Clean and do NOT restart (repeat for each vendor, then restart) |
As the Wagnardsoft DDU official guide specifies, Clean and shutdown is the correct choice when you intend to physically swap the GPU immediately after DDU finishes, because it gives you the cleanest possible state before the new hardware is introduced.
After DDU shuts down the system:
- Keep the system offline after booting with the new GPU
- Install new drivers from your locally saved installer file
- Reboot
- Then reconnect to the internet
Linux: Switching GPU Vendors
GPU vendor swapping on Linux is handled differently from Windows, and in many ways it is simpler because Linux’s display driver architecture separates the kernel module from the display server.
Switching from NVIDIA to AMD on Linux:
NVIDIA’s proprietary Linux driver is a kernel module that requires explicit installation and removal. AMD’s Linux driver (AMDGPU) is open-source and ships built into the Linux kernel, meaning it typically requires no manual driver installation at all.
bash# On Ubuntu/Debian: Remove NVIDIA proprietary drivers
sudo apt-get remove --purge nvidia-*
sudo apt-get autoremove

# Remove any NVIDIA kernel modules
sudo apt-get remove --purge libnvidia-*

# Reboot (AMD card should be installed before this point)
sudo reboot
After reboot with the AMD card installed, the AMDGPU kernel module will load automatically. Verify with:
bashlspci | grep -i vga
glxinfo | grep "OpenGL renderer"
For AMD Adrenalin Pro drivers or ROCm compute support on Linux, download the appropriate installer from amd.com/en/support/linux-drivers.
Switching from AMD to NVIDIA on Linux:
bash# Install NVIDIA proprietary drivers (Ubuntu example)
sudo apt-get update
sudo ubuntu-drivers install

# Or specify a version manually
sudo apt-get install nvidia-driver-570

# Reboot with NVIDIA card installed
sudo reboot
Verify the NVIDIA driver loaded correctly:
bashnvidia-smi
If nvidia-smi returns GPU info and driver version, the installation succeeded.
On Arch Linux, the process is even more direct:
- AMD: Install
mesaandxf86-video-amdgpupackages, remove any NVIDIA packages - NVIDIA: Install
nvidiaornvidia-openpackages, remove any AMD-specific packages - Reboot with the appropriate card installed
Common Problems and How to Fix Every One
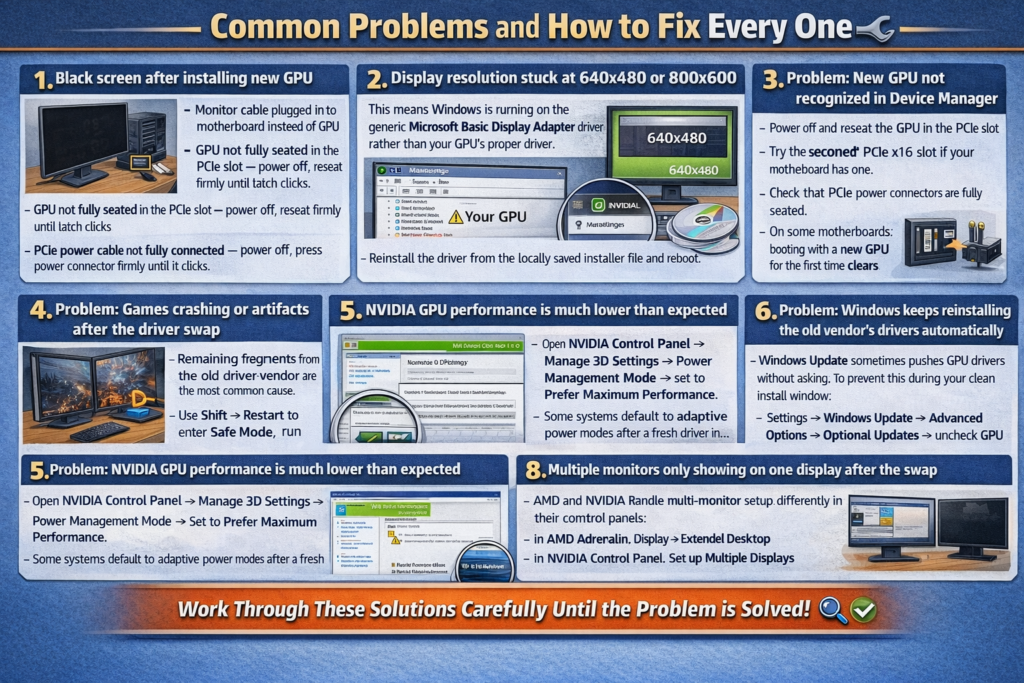
Problem: Black screen after installing new GPU
This is the most common post-swap issue. Before assuming a hardware problem, work through these causes in order:
- Monitor cable plugged into motherboard instead of GPU — unplug from motherboard and plug into GPU outputs
- GPU not fully seated in the PCIe slot — power off, reseat firmly until latch clicks
- PCIe power cable not fully connected — power off, press power connector firmly until it clicks
- Old drivers still conflicting — use Shift + Restart to enter Safe Mode, run DDU again, reinstall fresh
Problem: Display resolution stuck at 640×480 or 800×600
This means Windows is running on the generic Microsoft Basic Display Adapter driver rather than your GPU’s proper driver. The GPU driver either was not installed or did not install correctly. Reinstall the driver from the locally saved installer file and reboot.
Problem: New GPU not recognized in Device Manager
- Power off and reseat the GPU in the PCIe slot
- Try the second PCIe x16 slot if your motherboard has one
- Check that PCIe power connectors are fully seated
- On some motherboards, booting with a new GPU for the first time clears CMOS — if the system fails to POST, try resetting the CMOS via the motherboard jumper or by removing the CMOS battery for 30 seconds
Problem: Games crashing or artifacts after the driver swap
Remaining fragments from the old driver vendor are the most common cause. Use Shift + Restart to enter Safe Mode, run DDU again with Clean and restart, and reinstall the new vendor’s drivers fresh. After reinstalling, verify there is no yellow exclamation mark on the GPU in Device Manager.
Problem: NVIDIA GPU performance is much lower than expected
Open NVIDIA Control Panel → Manage 3D Settings → Power Management Mode → set to Prefer Maximum Performance. Some systems default to adaptive power modes after a fresh driver install.
Problem: AMD GPU performance is much lower than expected
Open AMD Adrenalin → Performance → Tuning → set to Auto or enable Rage Mode for supported cards. Check that AMD’s Smart Access Memory (SAM/Resizable BAR) is enabled in the BIOS if your CPU and motherboard support it — this can add 5 to 15% performance in some titles at no cost.
Problem: Windows keeps reinstalling the old vendor’s drivers automatically
Windows Update sometimes pushes GPU drivers without asking. To prevent this during your clean install window: Settings → Windows Update → Advanced Options → Optional Updates → uncheck GPU driver updates. Alternatively, use the registry group policy method:
Win + R→gpedit.msc(Windows Pro/Enterprise only)- Computer Configuration → Administrative Templates → System → Device Installation → Device Installation Restrictions
- Enable “Prevent installation of devices that match any of these device IDs” and add the old GPU’s hardware ID
Problem: Multiple monitors only showing on one display after the swap
AMD and NVIDIA handle multi-monitor setup differently in their control panels. In AMD Adrenalin: Display → Extended Desktop. In NVIDIA Control Panel: Set up Multiple Displays. After setting up, check your display output cables — some GPUs disable secondary outputs until a driver is loaded.
Before-You-Swap Checklist
Print or save this before starting. Work through it in order:
- New GPU drivers downloaded and saved locally (not just a browser shortcut — the actual installer file)
- DDU downloaded and extracted
- PSU wattage confirmed adequate for new GPU
- PCIe power cable compatibility confirmed (especially 12VHPWR for RTX 4000 series)
- Important data backed up
- Safe Mode entry method confirmed: hold Shift and click Restart from the Start menu
- Internet connection to be disabled after DDU runs and before new drivers install
- Anti-static precautions ready
- Screwdriver located
After-You-Swap Checklist
- GPU visible in Device Manager with no warning icons
- Correct display resolution restored
- AMD Adrenalin or NVIDIA App/Control Panel opens and shows correct GPU model
- Internet reconnected
- Windows Update checked — no conflicting driver pushed automatically
- Test game or benchmark run to confirm stability and expected performance
- For NVIDIA: Power Management Mode set to Prefer Maximum Performance
- For AMD: Resizable BAR (SAM) enabled in BIOS if supported
Frequently Asked Questions
Do I have to use DDU when switching GPU brands?
DDU is not technically mandatory, but it is very strongly recommended specifically when switching between vendors. NVIDIA and AMD driver files occupy different registry locations, install different kernel modules, and can conflict when both are partially present. Windows’ built-in uninstaller leaves enough fragments behind to cause post-swap instability in a meaningful percentage of cases. DDU removes everything. The 10 minutes it takes to run DDU in Safe Mode is always worth it.
Can I just uninstall NVIDIA drivers from Device Manager before swapping?
This removes the driver but leaves behind associated software, registry entries, and auxiliary components that can conflict with AMD’s installer. It is better than nothing but not a substitute for DDU.
Do I need to uninstall my old GPU drivers before installing the new card or after?
Before. Uninstall old drivers with DDU while the old GPU is still in the system. Then shut down, swap the GPU, boot with the new card, and install new drivers. Doing it in this order gives you the cleanest possible starting state.
What is the correct DDU button to use when swapping GPUs?
Use Clean and shutdown. This is specifically designed for when you are about to physically remove the GPU immediately after DDU finishes. It cleanly removes all driver traces and shuts down the system in one step, ready for the hardware swap.
Why should I use Shift + Restart instead of msconfig to enter Safe Mode?
The msconfig “Safe boot” checkbox makes Windows boot into Safe Mode on every restart until you manually go back and uncheck it. In a GPU swap workflow, DDU shuts the machine down after cleaning, meaning your next boot — with the new card installed — would land in Safe Mode with generic drivers, blocking new driver installation entirely. Shift + Restart only triggers Safe Mode once and then returns to normal boot automatically, which is exactly what this workflow requires.
Will switching from NVIDIA to AMD affect my game saves or settings?
No. Game saves, Steam library, Epic library, and application data are stored independently of GPU drivers. Your games, saves, and settings are unaffected by a GPU or driver swap.
Do I need to change BIOS settings when swapping GPU brands?
In most cases, no. One exception: on some motherboards, if you were using NVIDIA G-Sync, the BIOS display output may be set to use discrete GPU only, which is fine since AMD cards will also output through the discrete GPU. If your BIOS has a PCIe generation lock (forcing PCIe 3.0 for an older NVIDIA card, for example), update it to Auto or PCIe 4.0/5.0 as appropriate for your new card. Also verify that Resizable BAR (AMD SAM) is enabled in BIOS for AMD installs on supported platforms.
Can I install a newer, more powerful GPU without upgrading my PSU?
Only if your PSU has sufficient wattage and the correct connectors. Check the new GPU’s TDP and the GPU manufacturer’s minimum recommended PSU wattage. As a general rule: if your new GPU is more than one performance tier above the old one (for example, swapping an RX 6700 XT for an RX 9070 XT), check your PSU before assuming it is adequate.
How long does the entire swap process take?
For an experienced user: 30 to 45 minutes total. For a first-timer following this guide carefully: 60 to 90 minutes. The physical hardware swap is the fastest part (15 minutes). The DDU and driver installation steps take the bulk of the time.
Do I need to reinstall Windows when switching GPU brands?
No. A clean Windows reinstall is never required for a GPU brand swap. DDU handles all necessary driver cleanup without touching your operating system, applications, or personal files.
Does switching GPU vendors affect overclocking software like MSI Afterburner?
MSI Afterburner is GPU-vendor-agnostic and works with both NVIDIA and AMD cards. However, the overclocking limits and voltage controls differ between vendors. After swapping, open Afterburner, reset all values to default, and reconfigure any fan curves or power limits appropriate for the new GPU from a clean baseline.
Bottom Line
Switching GPU vendors — in either direction — is a manageable process that any PC owner comfortable with basic hardware installation can complete in under 90 minutes. The physical swap is the easy part. The part that matters most is the software: download the new drivers before you start, use Shift + Restart to enter Safe Mode with the old card still installed, run DDU with Clean and shutdown, swap the hardware, then install the new drivers offline before reconnecting to the internet. Follow that sequence and you avoid the vast majority of post-swap problems. For a visual walkthrough of the complete process including card removal, installation, and DDU usage shown on-screen, This step-by-step GPU swap guide on YouTube covers both the NVIDIA-to-AMD and AMD-to-NVIDIA directions from start to finish.