Skip to content
To clean a laptop fan, power off and unplug your laptop completely, then use short bursts of compressed air through the vents while blocking the fan blades with a plastic toothpick or nylon spudger to prevent reverse-voltage damage. For a deeper clean, open the back panel, remove the fan, wipe the blades with a soft brush and 70% isopropyl alcohol on a microfiber cloth, clean the heatsink fins with compressed air, and reassemble carefully. The external method takes about 10 minutes; the full internal clean takes 30 to 45 minutes but delivers dramatically better results.
If your laptop has been running louder, feeling hotter, or slowing down during tasks it used to handle without breaking a sweat, a clogged fan is almost certainly the reason. Dust is the silent killer of laptop performance. It builds up gradually inside the cooling system, throttles airflow, and forces the CPU and GPU to reduce their clock speeds just to survive thermally.
The good news is that cleaning a laptop fan is one of the most effective maintenance tasks you can do, and it is something most people can handle at home with the right guidance. Based on reviewing and testing dozens of laptops over the years, I have seen machines drop 8 to 15 degrees Celsius in CPU temperatures after a single proper fan clean. That translates directly to better sustained performance, quieter operation, and a longer hardware lifespan.
Why Laptop Fans Get Dirty and Why It Matters
Laptop fans work by pulling air in through intake vents on the bottom or sides of the chassis, pushing it across a metal heatsink, and exhausting hot air out the other side. Every time air moves through that system, it carries airborne particles with it: dust, pet hair, skin cells, fabric fibers, and microscopic debris that accumulates on the fan blades, the heatsink fins, and every surface in between.
Over time, that accumulation acts as insulation. Research from the cooling industry has shown that even a thin layer of dust can reduce a laptop’s cooling efficiency by up to 25%. Once the heatsink fin stack gets clogged, the fan has to spin faster and faster to compensate, generating more noise and wearing down the bearing faster. The CPU and GPU, detecting rising temperatures, start throttling their performance to protect themselves. A laptop that once cruised through video editing or gaming at full speed starts stuttering, dropping frames, and running hot to the touch.
According to Lenovo’s official maintenance guidance, persistent loud fan noise is one of the clearest signs that the fan is clogged and struggling, and that cleaning or replacement may be necessary. Ignoring it rarely ends well.
Signs Your Laptop Fan Needs Cleaning Right Now:
- Fan runs loudly or constantly, even during light tasks like web browsing or document editing
- The laptop chassis feels unusually hot, especially around the exhaust vents or the bottom panel
- CPU temperatures regularly exceed 85 to 90 degrees Celsius under moderate load
- Performance drops noticeably during tasks that used to run smoothly (thermal throttling)
- The laptop shuts down unexpectedly during demanding workloads
- Little or no airflow can be felt from the exhaust vent even when the fan is audibly running
- Visible dust accumulation around the vent grilles on the exterior
What You Need: Tools and Supplies
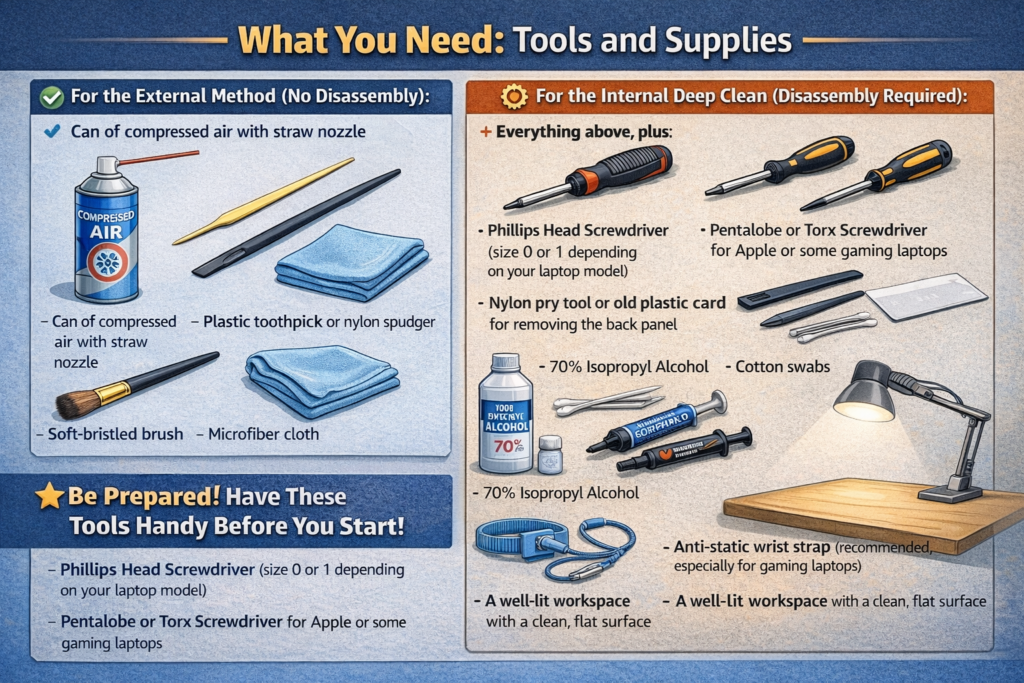
For the External Method (No Disassembly):
- Can of compressed air with straw nozzle
- Plastic toothpick or nylon spudger
- Soft-bristled brush (a clean, unused paintbrush or makeup brush)
- Microfiber cloth
For the Internal Deep Clean (Disassembly Required):
- Everything above, plus:
- Phillips head screwdriver (size 0 or 1 depending on your laptop model)
- Pentalobe or Torx screwdriver for Apple or some gaming laptops
- Nylon pry tool or old plastic card for removing the back panel
- 70% isopropyl alcohol
- Cotton swabs
- Thermal paste (Arctic MX-6, Thermal Grizzly Kryonaut, or similar) if you plan to reseat the heatsink
- Anti-static wrist strap (recommended, especially for gaming laptops)
- A well-lit workspace with a clean, flat surface
What to Avoid:
| Item | Why to Avoid |
|---|---|
| Vacuum cleaners | Generate strong static electricity that can damage components |
| Metal tools near fan blades or motherboard | Risk of short circuit or physical damage |
| Household spray cleaners or water | Corrosive to electronics, leaves mineral residue |
| Blowing air with your mouth | Introduces moisture and saliva directly onto components |
| Tilting compressed air can upside down | Releases propellant liquid that can damage the board |
| High-pressure air compressors | Can physically damage fan bearings and delicate fins |
How Often Should You Clean Your Laptop Fan?
| Usage Environment | Recommended Cleaning Frequency |
|---|---|
| Office or home use, clean environment | Every 6 to 12 months |
| Daily heavy use, development, creative work | Every 4 to 6 months |
| Gaming laptop under regular load | Every 3 to 4 months |
| Homes with pets (pet hair is especially bad) | Every 2 to 3 months |
| Dusty environments, workshops, studios | Every 1 to 2 months |
| MacBook or fanless thin-and-light | Every 6 to 12 months (less critical but still worthwhile) |
Method 1: External Cleaning with Compressed Air (No Disassembly)
This is the right starting point for most users: people who have not opened a laptop before, those whose machine is still under warranty and whose manufacturer does not permit disassembly, or anyone who needs a quick 10-minute maintenance clean between deeper sessions.
The external method does not remove all the dust inside the fan, but it dislodges and expels a meaningful amount of it and provides noticeable improvement in airflow. It is significantly better than doing nothing.
Step 1: Power Off Completely and Unplug Everything
Shut down your laptop fully via the operating system; do not just close the lid or put it to sleep. After shutdown, hold the power button for 5 seconds to drain any residual current from the board. Unplug the power adapter, any USB devices, and any connected monitors. If your laptop has a removable battery, take it out.
Step 2: Work in a Low-Wind Environment
Take your laptop to a table near an open window or go outside. Work away from other electronics if possible. Blasting dust out of a laptop indoors in a closed room just redistributes that dust back into the same machine moments later. A gentle breeze or fresh air environment helps carry the expelled dust away cleanly.
Step 3: Locate the Fan Intake and Exhaust Vents
Flip the laptop over and identify the intake vents, which are typically on the bottom panel, and the exhaust vents, which are usually on the rear edge or sides. Most laptops have one or two fans. Knowing which vents lead to the fan helps you direct your cleaning effort effectively.
Step 4: Block the Fan Blades Before Spraying
This step is non-negotiable and the most commonly skipped, which is exactly why laptops get damaged during cleaning. A laptop fan is a DC motor. When you spin a DC motor with compressed air, the blades rotate in reverse and the motor runs as a generator, sending a reverse voltage directly back into the motherboard. That electrical spike can instantly destroy components including the CPU, GPU, or the entire main board.
To prevent this, take a plastic toothpick or nylon spudger and gently insert it through the vent grate just far enough to make contact with a fan blade and hold it still. You do not need deep access; the goal is simply to prevent the blade from rotating while you spray. Never use anything metal for this, as a metal object near internal components risks a direct short circuit.
Step 5: Spray Compressed Air in Short, Controlled Bursts
Hold the compressed air can upright at all times. Keep the nozzle approximately 6 to 8 inches from the vent opening, angled slightly so the airflow pushes dust out rather than deeper in. Use short 1 to 2 second bursts, not continuous spraying. Fire a burst, let the dust settle outside the machine, then fire another. Work your way through all intake and exhaust vents systematically.
Between each burst, recheck that your plastic toothpick or spudger is still blocking the fan blade. Reposition it if needed before the next burst.
Step 6: Brush the Vent Grilles
Use your soft-bristled brush to gently sweep across the outside of the vent grilles, collecting any dust that has been loosened but not fully expelled. Work in one direction to push debris out rather than back in.
Step 7: Wipe Down the Exterior and Check Airflow
Use a dry microfiber cloth to wipe down the bottom panel and vent areas. Then power the laptop back on and hold your hand near the exhaust vent during startup. You should feel a noticeably stronger stream of air than before. If airflow still feels weak, the internal buildup is substantial enough to warrant the full deep clean described in Method 2.
Method 2: Internal Deep Clean (Full Disassembly)
This is the approach that actually removes dust from the fan blades, the heatsink fins, and every internal surface of the cooling system. It delivers the best results by far and is what I personally recommend for any laptop that is more than 12 months old. This step-by-step YouTube walkthrough on cleaning a laptop fan safely at home is an excellent companion video to follow alongside these written instructions.
Before starting, look up the exact back panel removal procedure for your specific laptop model on iFixit or your manufacturer’s support site. Every laptop is slightly different in how the bottom panel is secured and removed, and knowing the specifics for your model prevents accidental damage.
Step 1: Power Off, Unplug, and Drain Residual Power
Follow the same process as in Method 1: full shutdown, hold power button 5 seconds after shutdown, remove all cables and peripherals, and remove the battery if it is removable.
Step 2: Ground Yourself Against Static
Put on an anti-static wrist strap if you have one. If you do not, touch a grounded metal object like a door hinge or a radiator pipe before touching any internal components. Static discharge from your hands is invisible but can silently damage sensitive motherboard components.
Step 3: Remove the Bottom Panel
Flip the laptop over and locate all the screws on the bottom panel. Most laptops use Phillips head screws, while MacBooks and some gaming laptops use Pentalobe or Torx. Remove every screw and place them in a small container so none roll away. Note that some laptops have hidden screws under rubber feet or stickers, so look carefully before applying pry force.
Once all screws are out, use a nylon pry tool or an old plastic card to gently work around the seam of the bottom panel. Start at a corner, work the tool along the edge, and release the clips holding the panel in place. Take your time; forcing it can snap clips or gouge the chassis.
Step 4: Disconnect the Battery Internally
Even with the laptop powered off, the battery maintains a live connection to the motherboard. Before touching any internal component, locate the battery connector on the motherboard (it looks like a small ribbon cable or plug) and gently disconnect it. As the YouTube guide above demonstrates, skipping this step risks shorting the motherboard during cleaning. Take a photo of the connector before removing it so you know exactly how it plugs back in.
Step 5: Photograph the Interior
Before touching anything else, take a clear photo of the entire interior. This gives you a reference for reassembly, helps you identify which cables connect where, and is genuinely useful if anything looks unfamiliar when you put it back together.
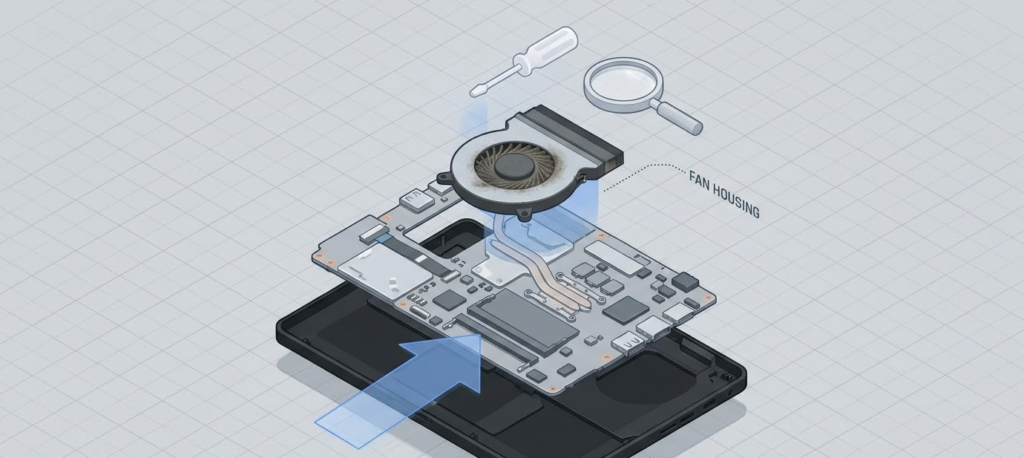
Step 6: Locate the Fan or Fans
Most laptops have one or two fans connected to a copper heatsink by heat pipes. The fans are typically in the rear corners of the chassis, each with a small connector cable running to the motherboard. The heatsink runs between the fans and the CPU and GPU, transferring heat away from the chips to the fan-cooled fins.
Step 7: Remove the Fan
Unscrew the small screws holding each fan in place and gently lift it out. The fan connector cable is fragile, so disconnect it carefully by gripping the connector itself, not the cable. Set the fan on a clean, flat surface.
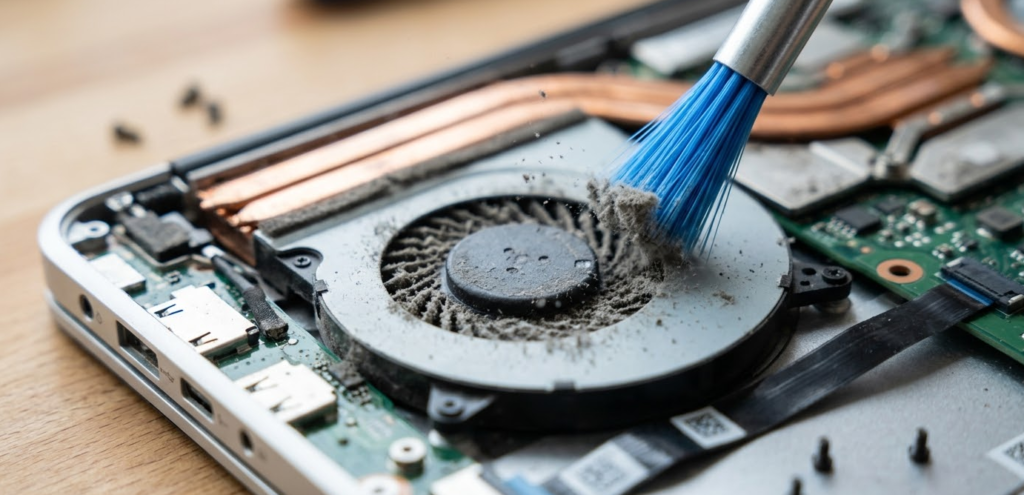
Step 8: Clean the Fan Blades Thoroughly
With the fan fully removed and in your hand, you can now clean it properly. Use your soft-bristled brush to sweep dust off each fan blade, working around the full circumference. For sticky or oily buildup on the blades (common in kitchens or workshops where airborne grease is present), dampen a cotton swab with 70% isopropyl alcohol and wipe each blade individually. Follow up with a dry pass. Let the fan sit for a few minutes to dry fully before reinstalling.
Step 9: Clean the Heatsink Fins
The heatsink fin stack is where the most performance-robbing dust accumulates. It looks like a series of thin metal plates stacked closely together, often packed solid with dust after 12 months of use. Hold the fin stack steady (do not let it move or bend the fins) and use short bursts of compressed air to blow through the fins from the clean side out. Work through the entire fin stack until the dust is fully expelled and airflow passes through cleanly. A soft brush can help with any remaining debris stuck between fins.
Step 10: Clean the Heatsink Contact Surface (If Reseating)
If you are removing the heatsink entirely to replace thermal paste (recommended every 2 to 3 years or when the laptop runs significantly hotter than it once did), use a cotton swab dampened with 70% isopropyl alcohol to remove all old thermal paste from both the heatsink contact plate and the CPU and GPU die surfaces. Clean until both surfaces are shiny and completely residue-free. Apply a fresh pea-sized bead of new thermal paste to the center of each chip die before reseating the heatsink. Thermal paste replacement is optional during a fan clean but is strongly worth doing if the heatsink is already off.
Step 11: Wipe Down Internal Surfaces
Use a dry soft brush or microfiber cloth to wipe dust off the interior of the bottom panel, the fan housing, and any visible surfaces near the vents. Do not touch the motherboard components with a cloth; use only a soft brush for any motherboard-adjacent areas.
Step 12: Reinstall the Fan
Reconnect the fan cable carefully, seat the fan back into its housing, and reinstall its screws. Do not overtighten; laptop screws are small and the threads strip easily. Snug is enough.
Step 13: Reconnect the Battery
Plug the battery connector back into the motherboard exactly as it was before. Refer to your earlier photo if needed.
Step 14: Replace the Bottom Panel
Align the bottom panel and press it into place along the clip line. Work around the full perimeter to ensure all clips are seated. Reinstall all the screws, starting from the corners and working inward.
Step 15: Power On and Verify
Turn the laptop on and listen. The fan should spin quietly and smoothly. Open a system monitoring tool like HWMonitor (Windows) or iStatMenus (macOS) and check CPU temperatures. You should see meaningfully lower temperatures compared to before the clean, particularly under load. If temperatures or fan behavior seem unchanged or worse, power off and recheck the internal connections.
Pro Tip: If you are doing a full internal clean, take the extra 15 minutes to replace the thermal paste while the heatsink is already off. Thermal paste dries out and loses its conductivity over time, typically becoming a real problem after 2 to 3 years of daily use. Fresh thermal paste on both the CPU and GPU combined with a clean fan and heatsink can drop temperatures by 10 to 20 degrees Celsius on an older laptop. That kind of temperature improvement translates directly into faster sustained performance and a significantly longer hardware lifespan. Arctic MX-6 and Thermal Grizzly Kryonaut are both excellent, widely available options at under $15.
External vs. Internal Cleaning: Which Should You Do?
| Factor | External (Compressed Air) | Internal (Full Disassembly) |
|---|---|---|
| Time Required | 10 to 15 minutes | 30 to 60 minutes |
| Tools Required | Compressed air, plastic toothpick | Screwdrivers, pry tool, full kit |
| Skill Level | Beginner friendly | Intermediate |
| Dust Removal | Partial (surface level) | Complete (full system) |
| Temperature Improvement | Moderate (3 to 8 degrees Celsius) | Significant (8 to 20 degrees Celsius) |
| Warranty Risk | None | Varies by manufacturer (usually none for back panel removal) |
| Best For | Routine maintenance, light buildup | Yearly deep clean, heavy buildup, older laptops |
| Frequency | Every 2 to 3 months | Every 12 months |
Warranty Considerations: Will Opening Your Laptop Void Warranty?
This is one of the most common concerns, and the honest answer is that it depends on your manufacturer and your region’s consumer protection laws.
In the United States, the Magnuson-Moss Warranty Act means a manufacturer cannot automatically void your warranty simply because you opened the back panel for routine maintenance. They would need to prove that your disassembly caused the specific damage being claimed. In practice, most major brands including Lenovo, HP, Dell, and ASUS do not void warranties for back panel removal, and many even provide official service manuals for user-level maintenance procedures.
Apple is the significant exception. Opening a MacBook yourself can impact your AppleCare+ coverage for repairs deemed related to the disassembly. For MacBooks specifically, the external compressed air method through the vents is the safest approach if your machine is under warranty. If your MacBook is out of warranty and running significantly hot, a professional cleaning at an Apple Authorized Service Provider is worth the cost.
When in doubt, look up your specific model’s user service manual on the manufacturer’s support site. Most include explicit guidance on what users can access themselves.
Step-by-Step Summary: Quick Reference Card
External Clean (10 Minutes):
- Shut down fully, unplug all cables, drain residual power
- Move to a low-wind environment
- Block fan blade through vent with plastic toothpick or nylon spudger
- Spray short compressed air bursts through intake and exhaust vents at an angle
- Brush the vent grilles with a soft brush
- Wipe down exterior and verify improved airflow on restart
Internal Deep Clean (30 to 60 Minutes):
- Shut down fully, unplug, drain residual power
- Ground yourself against static
- Remove bottom panel screws and panel
- Disconnect battery connector from motherboard
- Photograph the interior
- Remove fan, clean blades with brush and IPA
- Clean heatsink fins with compressed air
- Replace thermal paste if heatsink is removed (optional but recommended)
- Wipe down internal surfaces
- Reinstall fan and reconnect cable
- Reconnect battery
- Replace bottom panel and screws
- Power on and verify temperatures
Frequently Asked Questions
How do I know if my laptop fan needs cleaning?
The clearest signs are: fan running loud or constantly during light tasks, the chassis feeling unusually hot around the vents, CPU temperatures regularly above 85 degrees Celsius, and visible dust accumulation on the exterior vent grilles. Performance drops and unexpected shutdowns during demanding tasks are also strong indicators of thermal throttling caused by poor airflow.
Can I clean my laptop fan without opening it?
Yes, using the external compressed air method through the vents. This provides partial improvement and is the right approach for routine maintenance or for laptops still under manufacturer warranty. For serious dust buildup, the external method alone is not sufficient and the internal deep clean delivers significantly better results.
Why do I need to block the fan blade before using compressed air?
Because spinning a laptop fan with compressed air forces the DC motor to run in reverse, generating a reverse electrical current that feeds back into the motherboard. That voltage spike can instantly destroy components. Always block the fan blade with a plastic toothpick or nylon spudger through the vent grate before spraying any compressed air near the fan.
Will cleaning the laptop fan void my warranty?
In most cases, no. Brands like Lenovo, HP, Dell, and ASUS generally permit back panel removal for maintenance without voiding warranty, and US consumer protection law supports this. Apple is the notable exception; opening a MacBook can impact AppleCare+ coverage. Check your manufacturer’s support documentation for your specific model before opening it.
How often should I clean my laptop fan?
For most home or office users, a full internal clean once every 6 to 12 months and an external compressed air clean every 2 to 3 months is sufficient. Gaming laptops and machines used in dusty or pet-heavy environments need cleaning every 3 to 4 months internally. If you hear the fan getting louder over time, that is your signal to clean it sooner regardless of your last clean date.
Can I use a vacuum cleaner to clean my laptop fan?
No. Vacuum cleaners generate significant static electricity that can silently damage motherboard components. They also create unpredictable airflow pressure that can over-spin fan bearings or pull small connectors loose. Always use compressed air for the fan cleaning process.
What is thermal paste and do I need to replace it when I clean the fan?
Thermal paste is a heat-conducting compound applied between the CPU and GPU chips and the metal heatsink. It fills microscopic gaps in the surfaces to improve heat transfer. It dries out and loses conductivity over 2 to 3 years of use. Replacing it while the heatsink is already removed during a deep clean is the most cost-effective upgrade you can make to an older laptop’s thermal performance.
My laptop fan is making a grinding or clicking noise. Does cleaning fix that?
Grinding or clicking noises can indicate two different problems. If the fan blades are physically hitting accumulated debris, cleaning removes the obstruction and the noise stops. If the grinding comes from a worn or damaged fan bearing, cleaning will not fix it and the fan needs replacement. Cleaning first is always worth trying since it is free; if the noise persists after a thorough clean, the bearing is the likely culprit.
Can I clean a MacBook fan with compressed air?
Yes, using the external method with compressed air through the vents while blocking the fan blade. For MacBooks specifically, the internal deep clean is best left to an Apple Authorized Service Provider if the machine is under warranty. Out-of-warranty MacBooks can be opened for internal cleaning, but the process requires Pentalobe screwdrivers and careful handling of the proprietary connectors.
How much can cleaning the fan actually improve performance?
The improvement depends on how clogged the system was beforehand. Cleaning a heavily dust-loaded cooling system can reduce CPU temperatures by 8 to 15 degrees Celsius and restore full sustained clock speeds that thermal throttling was previously preventing. Users with gaming laptops in particular often report frame rate improvements after a clean simply because the GPU can now sustain its boost clock speeds without throttling back to protect itself from heat.
Bottom Line
Cleaning your laptop fan is the single most impactful hardware maintenance task you can perform on an aging machine. The external compressed air method is quick, safe, and appropriate for routine upkeep every 2 to 3 months. The full internal deep clean, done once a year with proper technique, genuinely restores performance, lowers temperatures, and extends the functional lifespan of your hardware in ways that no software optimization can replicate.
PCMag’s comprehensive laptop maintenance guide consistently recommends regular fan cleaning as a top maintenance priority, and after testing enough laptops before and after a proper cleaning, it is easy to see why. The difference in sustained performance and noise levels is real, measurable, and immediate. Set a reminder, gather the right tools, and give your laptop the clean it deserves.