Skip to content
To clean a laptop properly, power it off completely, use a dry microfiber cloth for the screen and surfaces first, follow up with a lightly dampened cloth using distilled water or a 70% isopropyl alcohol solution for the keyboard and chassis, and use short bursts of compressed air for the vents and ports. Never spray liquid directly onto any surface, never use paper towels or household glass cleaners, and always let everything dry fully before powering back on. Done right, a full laptop cleaning takes about 15 to 20 minutes and makes a noticeable difference in both performance and hygiene.
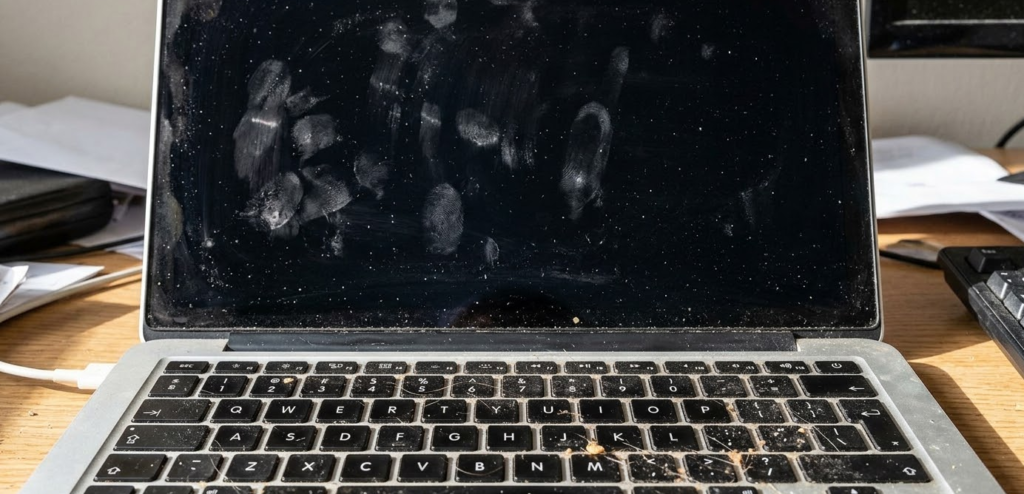
Most people clean their laptops the wrong way. They grab a paper towel, spray some glass cleaner directly onto the screen, and wipe it down. That approach can permanently damage anti-glare coatings, leave micro-scratches across your display, and push moisture into the edges of the panel where it does real harm. After years of reviewing, testing, and handling dozens of laptops, I can tell you that good laptop hygiene takes less than 20 minutes when you know what you are doing and have the right materials on hand.
Why Cleaning Your Laptop Matters More Than You Think
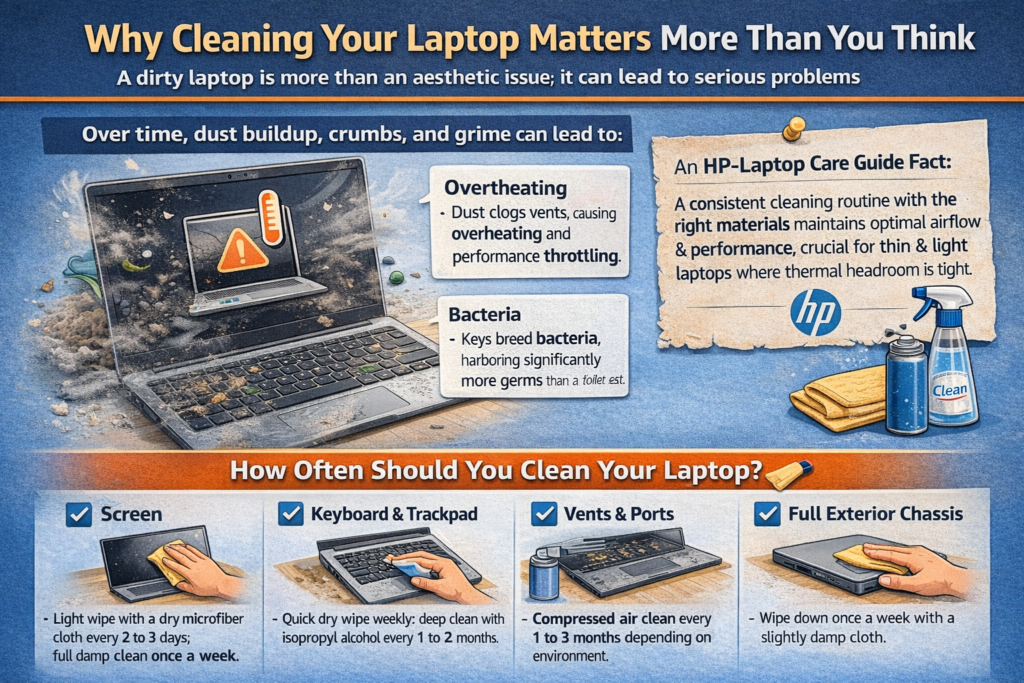
A dirty laptop is not just an aesthetic problem. Dust buildup inside the vents is one of the most common causes of laptop overheating, which throttles CPU and GPU performance, shortens component life, and in serious cases causes unexpected shutdowns. A keyboard packed with crumbs and debris is a breeding ground for bacteria, and studies have shown that the average keyboard carries more bacteria per square inch than a toilet seat.
On the display side, built-up oils and grime from fingerprints can, over time, become harder to remove without more aggressive cleaning that risks damaging the screen coating. Regular, gentle maintenance is far safer and easier than infrequent deep cleans.
According to HP’s official laptop care guide, a consistent cleaning routine using the right materials protects your investment and maintains optimal airflow, which directly impacts sustained performance. This is especially relevant for thin and light laptops where thermal headroom is already tight.
How Often Should You Clean Your Laptop?
- Screen: Light wipe with a dry microfiber cloth every 2 to 3 days; full damp clean once a week
- Keyboard and trackpad: Quick dry wipe weekly; deep clean with isopropyl alcohol every 1 to 2 months
- Vents and ports: Compressed air clean every 1 to 3 months depending on environment
- Full exterior chassis: Wipe down once a week with a slightly damp cloth
What You Need Before You Start
Getting your supplies together before you begin makes the whole process faster and ensures you do not reach for the wrong thing mid-clean.
The Right Materials:
- 2 to 3 microfiber cloths (one dry, one for damp cleaning, one for final buffing)
- Distilled water (not tap water, which contains minerals that can leave residue or damage coatings)
- 70% isopropyl alcohol solution (for keyboard, trackpad, chassis, and nano-texture glass; not for standard LCD screens)
- Compressed air can (held upright, with a thin straw nozzle for precision)
- Cotton swabs (for tight spaces around keys and in ports)
- Soft-bristled brush (a clean, unused makeup brush or paintbrush works perfectly)
- A plastic toothpick or nylon spudger (for safely blocking fan blades during vent cleaning)
- Optional: a dedicated LCD-safe screen cleaning spray for stubborn marks
What You Should Never Use:
| Item | Why to Avoid It |
|---|---|
| Paper towels or tissues | Abrasive enough to cause micro-scratches on screen coatings |
| Windex or ammonia-based glass cleaners | Strips anti-glare and anti-reflective coatings permanently |
| Bleach or hydrogen peroxide | Corrosive to plastics, rubber seals, and screen coatings |
| Rough cloths or old t-shirts | Inconsistent texture causes surface scratches |
| Tap water | Contains minerals and impurities that leave residue |
| Undiluted isopropyl alcohol (100%) | Too harsh; can damage coatings and plastics at full concentration |
| Vinegar or vinegar-based solutions | Acidic and can degrade anti-glare screen coatings over time |
| Spray bottles aimed directly at any surface | Risk of liquid seeping under the display bezel or between keys |
Consumer Reports strongly warns against paper towels specifically, noting that the fibers are abrasive enough to scratch display coatings even with gentle pressure. In my own experience, paper towel damage to matte anti-glare screens is essentially permanent and not recoverable.
Part 1: How to Clean a Laptop Screen
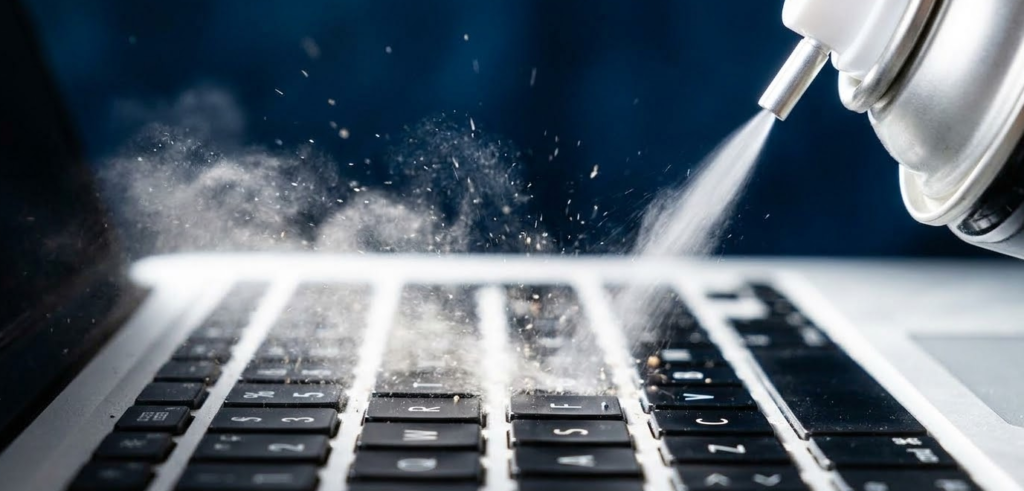
Cleaning laptop with compressed air
The screen is the most sensitive part of your laptop. Most modern laptop displays use an IPS, OLED, or AMOLED panel with multiple coating layers, including anti-glare, anti-reflective, and oleophobic treatments. All of these can be permanently damaged by the wrong cleaning materials or technique.
Step-by-Step: Cleaning Your Laptop Screen
Step 1: Power Off Completely and Unplug
This is not optional. Always shut down your laptop fully and disconnect it from power before cleaning the screen. A powered-on screen is warmer, which makes cleaning solutions evaporate faster and increases the risk of streaking. More importantly, cleaning a live screen risks pushing static charge or moisture into active circuitry.
Step 2: Start with a Dry Microfiber Cloth
Take your first clean, dry microfiber cloth and gently wipe the entire screen in slow, horizontal strokes from top to bottom. Use very light pressure. The goal here is to lift dust, loose particles, and light smudges. Do not scrub or use circular motions at this stage, as doing so while dust is still present can grind particles across the coating and cause micro-scratches.
Step 3: Assess What Remains
After the dry wipe, look at the screen at an angle in good light. If only light smudging or fingerprint haze remains, move to Step 4. If the screen looks clean enough, you may not need to go further.
Step 4: Dampen Your Second Cloth with Distilled Water
Take your second clean microfiber cloth and lightly dampen one corner with distilled water. The cloth should be barely damp. If you squeeze it and any drops fall, it is too wet. Wring it out until no moisture can be pressed out. Never spray water or any liquid directly onto the screen.
Step 5: Wipe the Screen with the Damp Cloth
Use the damp section of the cloth in gentle, wide horizontal sweeps across the screen. Work from the top down. For fingerprint smudges, use very light circular motions directly on the smudge only, then continue with horizontal strokes. Keep your pressure light throughout. There is no need to press hard; let the slightly damp cloth do the work.
Step 6: Immediately Follow with the Dry Section
Flip the cloth to its dry section (or use your third cloth) and do one more pass across the entire screen in the same top-to-bottom horizontal pattern. This picks up any remaining moisture and prevents streaking as the screen dries.
Step 7: Let It Air Dry Before Closing
Leave the laptop open for at least 3 to 5 minutes before closing the lid. Closing too soon traps moisture between the screen and keyboard, which can damage both surfaces over time.
For Stubborn Stains and Heavy Grease:
If distilled water alone does not remove a stubborn stain, use an LCD-safe screen cleaning spray (not Windex) applied to the microfiber cloth. For OLED screens specifically, a 70% ethanol solution applied to a microfiber cloth works well for tougher marks on OLED panels. Apply it to the cloth only, never directly to the screen, and follow up with a dry pass immediately.
Special Note for MacBook Users:
Apple’s official guidance varies depending on the screen type your MacBook has. For all standard Retina displays, Apple recommends a soft, slightly damp lint-free cloth with water only, and advises against isopropyl alcohol. However, for MacBook Pro models with nano-texture glass specifically, Apple’s official support documentation states the opposite for hard-to-remove smudges: you should moisten the Apple Polishing Cloth with a 70% isopropyl alcohol solution to clean nano-texture glass. Plain water is not sufficient for stubborn marks on nano-texture glass, and 70% IPA is the only Apple-approved liquid for that surface. Always identify your exact screen type before choosing your cleaning solution.
Part 2: How to Clean a Laptop Keyboard
The keyboard collects more debris than any other surface on your laptop. Skin oils, food crumbs, dust, hair, and bacteria accumulate between and under the keys over weeks of daily use. The good news is that a thorough keyboard clean is straightforward with the right approach.
Step-by-Step: Cleaning Your Laptop Keyboard
Step 1: Power Off and Unplug
Same as with the screen, always start with the laptop fully powered off and disconnected from all power sources. Cleaning a powered keyboard risks shorting out key switches if any liquid reaches below the keycaps.
Step 2: Flip and Tap
Hold the laptop upside down over a trash bin or towel and gently tap the back. You will be surprised how much falls out. Do not shake vigorously; a few firm taps are enough to dislodge crumbs and loose debris trapped between the keys without stressing the hinges or internal mounts.
Step 3: Use Compressed Air Between the Keys
Hold the compressed air can upright at all times. Tilting it inverted causes the propellant liquid to spray out, which can damage surfaces and leave residue. Position the straw nozzle about 1 to 2 inches from the keyboard and use short, controlled bursts at an angle between each row of keys. Work from one side of the keyboard to the other, systematically covering the full surface. The angle matters: you want to blow debris out from between the keys, not deeper under them.
Step 4: Brush Away Dislodged Debris
After the compressed air pass, use your soft-bristled brush to sweep along the key rows and collect any remaining debris that has been loosened but not ejected. Work in the same direction consistently to push particles toward one end of the keyboard where you can remove them.
Step 5: Wipe the Key Surfaces
Dampen a microfiber cloth very lightly with a 70% isopropyl alcohol solution. Wipe across the tops of all keys using light pressure and smooth strokes. Isopropyl alcohol at 70% concentration is safe for keyboard surfaces, evaporates quickly, and disinfects effectively. Do not use it on standard LCD screens, but it is appropriate and widely recommended for keyboards and hard plastic or aluminum chassis surfaces.
Step 6: Clean the Gaps Around Keys with Cotton Swabs
Dip a cotton swab in 70% isopropyl alcohol and squeeze off any excess so it is barely damp. Use the swab to clean along the edges of each key, in the gutters between key rows, and around the space bar. This reaches grime that a cloth cannot touch. Use a fresh swab for each section of the keyboard to avoid spreading debris.
Step 7: Let the Keyboard Dry Fully
Leave the laptop open and powered off for at least 5 to 10 minutes before turning it back on. Isopropyl alcohol at 70% concentration evaporates quickly, so this is rarely a long wait.
Part 3: How to Clean the Trackpad
The trackpad deserves its own step because it requires a slightly different approach than the keyboard. It is a glass or glass-coated surface with capacitive sensing, and too much moisture near its edges can affect tracking accuracy or cause ghost inputs.
Step 1: Dry Wipe First
Use a dry microfiber cloth to wipe the full trackpad surface in broad circular motions. This removes most fingerprint oil and light smudging.
Step 2: Damp Wipe with Distilled Water or Light IPA
For persistent grease or grime, use a microfiber cloth barely dampened with distilled water or 70% isopropyl alcohol. Wipe across the surface in slow, even strokes. Keep the cloth away from the edges of the trackpad where liquid could seep into the seam between the trackpad and the palm rest.
Step 3: Buff Dry
Use a dry section of the cloth to buff the trackpad surface. The goal is a clean, streak-free surface with no moisture residue along the edges.
Important: Never apply any liquid to the gap around the trackpad border. Moisture that seeps under the trackpad can reach the flex cable or the trackpad controller board, causing tracking issues or complete failure. This is a more common repair problem than most people realize.
Part 4: How to Clean the Laptop Chassis and Exterior
The outer surfaces of your laptop, including the lid, palm rests, and bottom panel, pick up oils, grime, and environmental dust constantly.
Step 1: Wipe Down with a Dry Microfiber Cloth
Start with a dry pass across all outer surfaces. This removes loose dust and prevents it from becoming a muddy smear when you introduce any moisture.
Step 2: Clean with a Slightly Damp Cloth
Use a microfiber cloth barely dampened with distilled water or a 70% isopropyl alcohol solution. Wipe across the lid, palm rests, and the bottom panel. For aluminum chassis laptops like MacBooks, the Beelink SER series, or premium Windows machines, isopropyl alcohol is safe and effective. For plastic chassis laptops, stick to distilled water to avoid any risk of discoloration.
Step 3: Address the Hinge Area
The hinge area collects grime in the crease between the screen and the body. Use a cotton swab dipped in 70% isopropyl alcohol to clean along the hinge line carefully. Use light pressure; do not push the swab into the hinge gap itself.
Part 5: How to Clean Laptop Vents and Ports
This is the step most people skip, and skipping it is exactly why laptops overheat. Dust buildup inside the vents acts as insulation, trapping heat inside the chassis and forcing the CPU and GPU to throttle their performance to avoid damage.
Step 1: Locate All Vents and Ports
Find the air intake and exhaust vents on your laptop. Most are on the bottom panel and sides, though some thin laptops exhaust through the hinge area. Identify all USB ports, the headphone jack, the charging port, and any SD card slot or Thunderbolt port openings.
Step 2: Clean the Vents with Compressed Air
Hold the compressed air can upright and use short, controlled bursts directed into the vents at an angle. Dell’s official guidance recommends holding the nozzle 6 to 8 inches away from the vent opening for exterior cleaning. Do not spray directly into the center of the vent at close range; angle the airflow to push dust out rather than deeper in. Clean from the outside only. If dust buildup is severe, an internal cleaning by opening the back panel is more effective, but that is a more advanced procedure.
Step 3: Block the Fan Blades Before Spraying (Non-Negotiable)
This step is critical and skipping it can literally destroy your laptop. Before you direct compressed air into any vent, you must stop the fan blades from spinning. Here is why: a laptop fan is a DC motor, and when you spin a DC motor manually, it runs in reverse and becomes a generator. That reversed electrical current feeds back directly into the motherboard, and the resulting voltage spike can instantly fry components, including the CPU, GPU, or the entire board. This is not a theoretical risk; it is a well-documented cause of motherboard failures during cleaning.
To prevent this safely, take a plastic toothpick or a nylon spudger and gently insert it through the vent grate just far enough to make contact with one fan blade and hold it still. You do not need to reach deep into the machine; just enough to stop the blade from rotating freely. Do not use anything metal, as a metal object touching internal components risks a short circuit. Once the blade is held still, spray your short bursts of compressed air through the vent. Remove the toothpick or spudger between bursts if needed to reposition it, but always re-block the fan before each new spray burst.
Step 4: Clean the Ports
Use very short, gentle bursts of compressed air into each port opening to dislodge dust. For sticky debris around port openings, a dry cotton swab or soft brush works well. Never insert anything metal into a port. Do not use compressed air at close range inside a port, as this can damage the connector pins.
Pro Tip: If you notice your laptop’s fan running louder or more frequently than it used to, that is almost always the first sign of dust buildup in the vents, not a failing fan. Before spending money on a repair, try a thorough vent cleaning with compressed air first. In my experience, about 70% of “noisy fan” complaints resolve completely after a proper vent clean. Set a calendar reminder every 2 to 3 months to repeat the compressed air treatment on the vents, and your laptop’s thermals and sustained performance will stay consistent for years longer than if you ignore it.
Screen Type Reference: What Cleaning Solution Is Safe?
Different laptop screens have different coatings, and what is safe for one can damage another. Use this table as your quick reference.
| Screen Type | Safe Cleaning Agent | What to Avoid |
|---|---|---|
| Standard IPS LCD | Distilled water, LCD-safe spray | Ammonia, bleach, vinegar, undiluted IPA |
| Matte Anti-Glare LCD | Distilled water only (very carefully) | Any alcohol, any spray cleaner |
| OLED / AMOLED | Distilled water or 70% ethanol on cloth | Ammonia, abrasive materials, direct liquid |
| Apple Retina (non-nano) | Distilled water on microfiber cloth | Isopropyl alcohol, any spray cleaner |
| Apple Nano-Texture Glass | 70% IPA on Apple Polishing Cloth only (Apple’s official recommendation for stubborn marks) | Any other liquid, any non-Apple cloth, direct spray |
| Glossy Glass Screen | Distilled water or 70% IPA on cloth | Paper towels, Windex, rough cloths |
| Touchscreen | Distilled water or 70% IPA on cloth | Direct spray, abrasive cloths |
Common Laptop Cleaning Mistakes to Avoid
These are the most frequent errors that cause actual damage. Knowing them is just as important as knowing the right technique.
- Spraying anything directly onto the screen rather than onto the cloth first
- Using paper towels, tissues, or rough cloths that scratch surface coatings
- Using tap water instead of distilled water, leaving mineral deposits
- Applying isopropyl alcohol to a standard MacBook Retina screen or any matte anti-glare display
- Closing the laptop lid immediately after cleaning before surfaces are fully dry
- Tilting compressed air cans upside down, releasing propellant liquid onto components
- Spinning fan blades freely with compressed air without blocking them first, which generates a reverse voltage that can kill the motherboard
- Blowing compressed air straight into vents at close range rather than at an angle
- Using too much liquid on the keyboard; even a small amount can damage key switches
- Forgetting to power off completely before cleaning any part of the laptop
- Cleaning the trackpad edges where liquid can seep into the trackpad seam
Laptop Cleaning Kit: What to Buy
You do not need to spend a lot to have everything on hand. Here is a practical, complete kit.
| Item | Recommended Type | Approximate Cost |
|---|---|---|
| Microfiber cloths | Pack of 6 to 12 lint-free cloths | $10 to $15 |
| Distilled water | 1 gallon jug from any supermarket | $1 to $2 |
| 70% isopropyl alcohol | Pharmacy-grade, spray bottle or swabs | $5 to $8 |
| Compressed air | 2 to 3 can multipack with straw nozzles | $10 to $15 |
| Cotton swabs | Standard cotton tip applicators | $3 to $5 |
| Soft-bristled brush | Clean makeup brush or soft paintbrush | $5 to $10 |
| Plastic toothpicks or nylon spudger | For safely blocking fan blades during vent cleaning | $3 to $8 |
| LCD-safe screen cleaner | Optional for stubborn screen marks | $8 to $15 |
| Total | Full kit | $45 to $78 |
Frequently Asked Questions
Can I use Windex to clean my laptop screen?
No. Windex contains ammonia, which permanently strips the anti-glare and anti-reflective coatings on laptop screens. Even a single cleaning with Windex can leave an irreversible haze or dull patch on the display. Always use distilled water or an LCD-safe cleaning spray on a microfiber cloth instead.
Is it safe to use isopropyl alcohol on a laptop screen?
It depends entirely on the screen type. For Apple nano-texture glass, 70% IPA on the Apple Polishing Cloth is actually the official Apple-recommended solution for stubborn marks. For OLED panels, 70% ethanol on a microfiber cloth is acceptable. For standard MacBook Retina displays and matte anti-glare panels, isopropyl alcohol should be avoided entirely as it can damage the coating. Always identify your screen type before choosing a cleaning solution.
Can I use a damp paper towel to clean my keyboard?
Technically you can, but it is not recommended. Paper towels can leave lint behind in the keyboard gaps, and they are abrasive enough to scratch key legends over time. A microfiber cloth is a significantly better option for both cleaning effectiveness and surface safety.
How do I clean sticky keys on a laptop keyboard?
Use a cotton swab barely dampened with 70% isopropyl alcohol and work it around the base of the sticky key. For seriously sticky keys where spilled liquid has dried, very carefully remove the keycap if your laptop model supports it and clean the switch and the underside of the key separately. Do not attempt this on butterfly-mechanism keyboards found in older MacBooks, as those are extremely fragile to remove.
How often should I clean my laptop?
A quick dry wipe of the screen and keyboard once a week prevents buildup from becoming a deep-clean problem. A full cleaning with damp cloths and isopropyl alcohol on the keyboard should happen every 1 to 2 months. Vent cleaning with compressed air every 2 to 3 months is sufficient for most home and office environments. If you work in a dusty environment, near pets, or eat at your desk regularly, increase all of those frequencies.
Can I use hand sanitizer to clean my laptop keys?
No. Most hand sanitizers contain gel carriers, fragrances, and additives beyond alcohol that can leave sticky residue on keys, damage plastic surfaces, and clog the gaps between keys. Use a clean 70% isopropyl alcohol solution instead, applied to a cloth or cotton swab.
What is the safest way to clean a MacBook screen?
It depends on your MacBook’s screen type. For all standard Retina displays, use a soft lint-free cloth barely dampened with distilled water only. For MacBook Pro models with nano-texture glass, Apple’s official documentation specifically instructs users to use 70% isopropyl alcohol applied to the Apple Polishing Cloth for stubborn marks. Plain water is not effective on nano-texture glass. Always check which screen type your specific MacBook model has before choosing your cleaning solution.
My laptop screen has a streak after cleaning. How do I fix it?
Streaks are usually caused by either using tap water (which contains minerals), using too much liquid, or not following up with a dry microfiber pass. To remove existing streaks, do a dry microfiber wipe first, then use a fresh cloth barely dampened with distilled water in long horizontal strokes, and immediately follow with a dry pass. Repeat once if needed.
Is compressed air safe for laptop keyboards?
Yes, when used correctly. Hold the can upright at all times, keep the nozzle 1 to 2 inches from the surface, and use short bursts rather than continuous spray. Tilting the can inverted releases propellant liquid that can damage components. Spraying too close or too forcefully can also push debris deeper under keys rather than removing it.
Why do I need to block the fan before using compressed air in the vents?
Because spinning a laptop fan with compressed air turns the DC motor into a generator. The reversed rotation generates a reverse voltage that feeds back into the motherboard, and the resulting electrical spike can instantly damage or destroy components including the CPU, GPU, or the main board entirely. Always block the fan blade with a plastic toothpick or nylon spudger through the vent grate before each burst of compressed air to prevent this from happening.
Can cleaning my laptop improve its performance?
Yes, in a meaningful way. Dust-clogged vents reduce airflow, which forces the CPU and GPU to throttle their clock speeds to prevent overheating. Cleaning the vents with compressed air restores proper airflow, which allows the processor to sustain higher performance for longer periods. This is one of the most impactful and overlooked maintenance steps for laptops that are more than 6 to 12 months old.
Bottom Line
Cleaning your laptop properly is a 15 to 20 minute task that protects a device you likely spent hundreds or thousands of dollars on. The key principles are simple: always power off first, never spray liquid directly onto any surface, use a microfiber cloth exclusively on screens, use distilled water or 70% isopropyl alcohol for the keyboard and chassis, block your fan blades before using compressed air on the vents, and clean those vents regularly to preserve thermal performance.
This clear video guide on cleaning a laptop fan safely at home is worth watching if you want a visual reference for the vent and fan cleaning steps specifically. Done consistently, a good cleaning routine extends your laptop’s functional lifespan, keeps performance strong, and makes the device simply more pleasant to use every single day.