To clean a mechanical keyboard, unplug it, remove all keycaps using a keycap puller, soak the keycaps in warm soapy water for 30 to 60 minutes, use compressed air and isopropyl alcohol (90%+) to clean the keyboard base and switches, let everything dry completely, then reassemble. For average users, a full deep clean like this should be done every 6 to 12 months, with lighter surface maintenance in between.
There’s a reason mechanical keyboard enthusiasts talk about cleaning almost as much as they talk about switches and keycaps. A dirty keyboard does not just look bad — it can cause sticky keys, reduced actuation accuracy, and over time, real damage to your switches. After years of testing and reviewing peripherals, I can tell you that a properly cleaned mechanical keyboard feels like a brand new board, and the process is simpler than most people expect.
This guide covers everything from a quick 5-minute surface clean to a full deep clean with keycap soaking, switch maintenance, and reassembly, including what tools you need, what to avoid, and a complete step-by-step walkthrough with pictures.
Why Cleaning Your Mechanical Keyboard Actually Matters
Mechanical keyboards are built to last. Most quality switches are rated for 50 to 80 million keypresses. But that longevity depends on proper maintenance. Dust, skin oils, food crumbs, and hair accumulate inside switch housings and between keycaps over time. This buildup causes switches to feel scratchy, keys to stick or misfire, and the whole board to develop that unmistakable grimy look.
Beyond feel and appearance, there is a real hygiene concern. Studies on office equipment have found keyboards can harbor significantly more bacteria than most household surfaces. If you eat at your desk, have pets, or type for long hours every day, your keyboard is collecting a lot more than just dust.
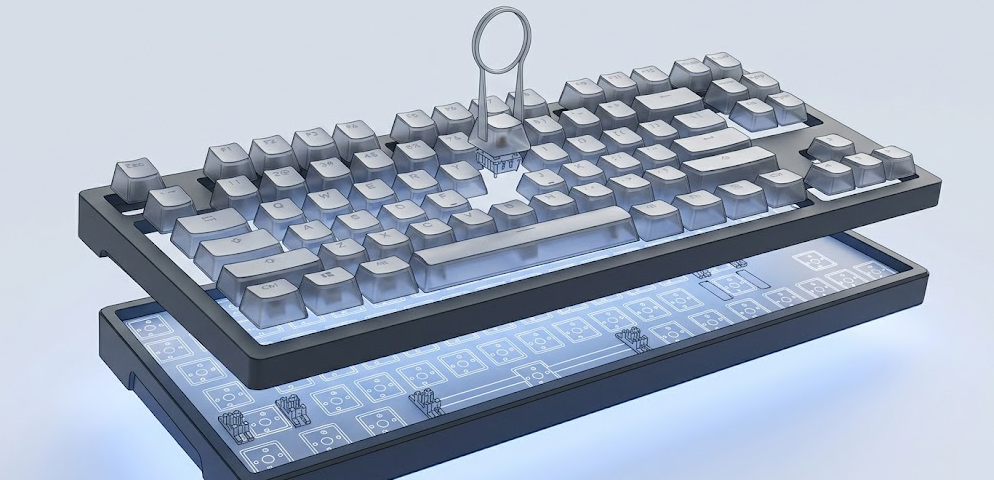
The good news is that mechanical keyboards are actually easier to deep clean than membrane boards, because the keycaps pop off cleanly and the switch plate is fully accessible. Regular cleaning protects your investment and keeps your typing experience exactly the way it should feel.
What You Need: The Complete Cleaning Toolkit
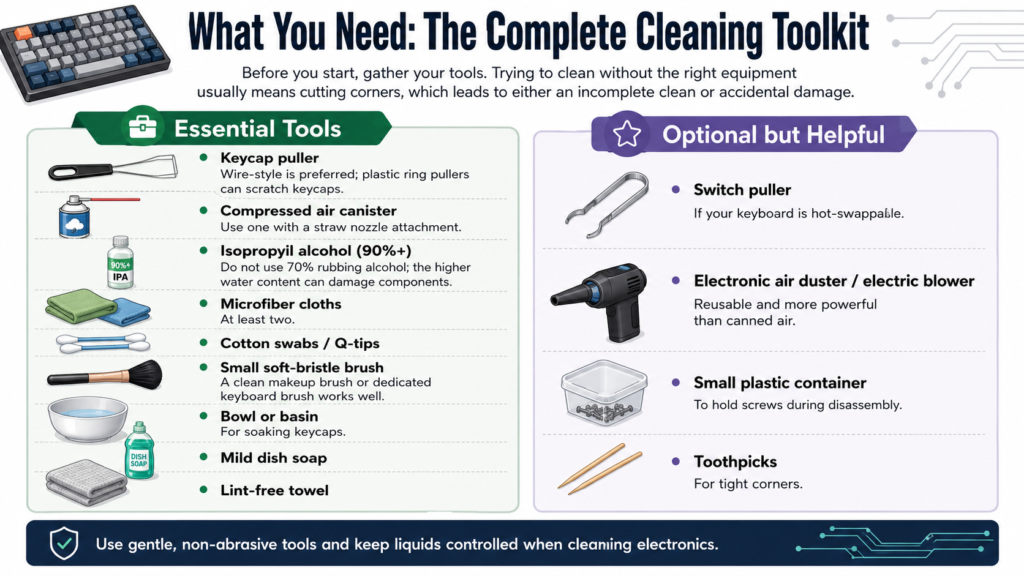
Before you start, gather your tools. Trying to clean without the right equipment usually means cutting corners, which leads to either an incomplete clean or accidental damage.
Essential Tools:
-
Keycap puller (wire-style is preferred; plastic ring pullers can scratch keycaps)
-
Compressed air canister with a straw nozzle attachment
-
Isopropyl alcohol, 90% concentration or higher (do not use 70% rubbing alcohol; the higher water content can damage components)
-
Microfiber cloths (at least two)
-
Cotton swabs / Q-tips
-
Small soft-bristle brush (a clean makeup brush or dedicated keyboard brush works well)
-
Bowl or basin for soaking keycaps
-
Mild dish soap
-
Lint-free towel
Optional but Helpful:
-
Switch puller (if your keyboard is hot-swappable)
-
A dedicated electronic air duster / electric blower (reusable and more powerful than canned air)
-
Small plastic container to hold screws during disassembly
-
Toothpicks for tight corners
As HP’s 2026 mechanical keyboard maintenance guide notes, using 90%+ isopropyl alcohol is non-negotiable. The 70% rubbing alcohol commonly found at drugstores has too much water content and risks seeping into switch housings and damaging the PCB.
The Three Levels of Mechanical Keyboard Cleaning
Not every situation calls for a full teardown. Knowing which level of cleaning to apply saves you time and reduces the risk of accidentally damaging something.
Both HP’s 2026 Tech Takes guide and Turtle Beach’s 2026 keyboard maintenance documentation recommend a full Level 3 deep clean every 6 to 12 months for average users. Pulling keycaps off every 60 days is generally considered overkill and carries a real risk of prematurely loosening the keycap stems over time. Reserve the more frequent 2 to 3 month schedule for the heaviest use cases, like desk eaters and pet owners, as noted in the table below.
Step-by-Step: How to Clean a Mechanical Keyboard (Full Deep Clean)
This is the complete process from start to finish. Follow each step in order.
Step 1: Take a Photo of Your Keyboard Layout
Before touching anything, snap a clear, well-lit photo of your full keyboard. This sounds like an obvious step but it is incredibly easy to forget where keys like the Print Screen, Pause, or function row keys go, especially on a custom or 65% or 75% layout. That photo will save you real frustration during reassembly.
Step 2: Unplug Your Keyboard and Power Down
Unplug the USB cable from your computer. If you have a wireless or Bluetooth mechanical keyboard, power it off completely and remove the batteries if accessible. This is non-negotiable. You are about to introduce moisture near electronic components, and having any power running is a risk you do not want to take.
Step 3: Flip It Over and Shake Out Loose Debris
Hold the keyboard upside down over a trash can or outside, and give it a firm but controlled shake. Tap the back gently as you do this. You will be surprised how much loose debris falls out. Large crumbs, dust clumps, and pet hair tend to come out easily at this stage. This also makes the next step significantly more effective.
Step 4: Remove All Keycaps Using Your Keycap Puller
Slide the wire keycap puller under a keycap until both hooks grip the sides, then pull straight up with steady, even pressure. Start with the smaller alphanumeric keys and save larger keys like the Spacebar, Enter, Left Shift, and Backspace for last. These larger keys often have stabilizer wires underneath that can bend if you yank carelessly. Wiggle them slightly side to side as you pull.
Place the keycaps into a bowl as you remove them. Do not pile them on a hard surface where they might scratch.
Step 5: Soak the Keycaps
Fill your bowl with warm water, not hot. Add a small drop of mild dish soap and swirl gently. Submerge all your keycaps and let them soak for 30 to 60 minutes. The soap acts as a degreaser, breaking down the oils, fingerprints, and grime that have built up over months of typing.
A note on keycap materials: ABS keycaps are more sensitive to heat and can warp if the water is too hot. PBT keycaps are more heat-resistant and handle this process better. Either way, warm water is perfectly safe. Hot or boiling water is not.
Pro Tip: While your keycaps are soaking, this is the perfect window to clean the keyboard base. You are not wasting any time waiting for keycaps to soak because you are using that time productively on the board itself.
Step 6: Clean the Keyboard Base with Compressed Air
With all keycaps removed, use compressed air to blast out the dust and debris from around the switches. Hold the can upright at all times. Never invert it, as this can spray a cold liquid propellant directly onto your switches, which can damage them. Use the straw nozzle for precision, and work row by row across the board. Angle the keyboard so debris is blowing outward rather than deeper in.
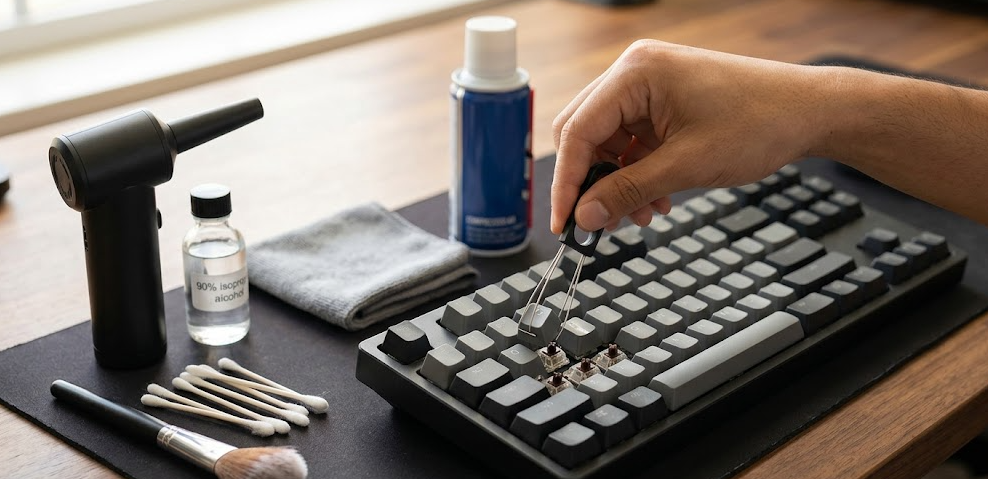
Step 7: Clean Between Switches with Cotton Swabs and Isopropyl Alcohol
Once the loose debris is gone, dampen a cotton swab with 90%+ isopropyl alcohol. Do not soak it; it should be moist but not dripping. Run the swab along the rows between each switch, applying gentle pressure. The alcohol cuts through built-up skin oils and sticky residue that compressed air cannot touch. Replace swabs frequently as they pick up grime. For tight corners, a toothpick can help dislodge compacted debris before you wipe.
Step 8: Wipe Down the Keyboard Plate and Case
Take a microfiber cloth lightly dampened with isopropyl alcohol and wipe down the top plate and keyboard case. Pay attention to the areas around the switches and edges of the board. For stubborn stains, apply a little more pressure with the cloth. Avoid getting alcohol directly into the USB port area or anywhere near the PCB.
Step 9: Address Sticky Switches (If Needed)
If you have specific keys that feel sticky or sluggish even before reassembly, Wirecutter’s keyboard cleaning guide recommends applying 1 to 2 drops of 90%+ isopropyl alcohol directly into the switch housing using a dropper or the tip of a cotton swab. Then actuate the switch stem 20 to 30 times rapidly. The alcohol works its way through the mechanism and dissolves residue inside. Let it evaporate fully before reassembling.
Important Note: While this method effectively dissolves sticky residue, the alcohol will also strip away any factory or aftermarket lubricant inside the switch. The switch will function perfectly again, but it may feel slightly scratchier or sound different than the surrounding keys until it is re-lubed. If you want the switch to feel exactly like the others afterward, a light re-lube with a proper switch lubricant like Krytox 205g0 is recommended once the alcohol has fully dried.
Step 10: Rinse and Dry the Keycaps
After soaking, drain the bowl and rinse the keycaps under lukewarm running water to remove all soap residue. Lay them out on a lint-free towel in a single layer. Use a second microfiber cloth to dry each one individually, then let them air dry completely for at least one to two hours. Do not rush this step. Any residual moisture trapped under a keycap can cause problems over time.
Step 11: Reassemble the Keyboard
Once everything is completely dry (including the keyboard base), it is time to put it all back together. Use the photo you took in Step 1 as your reference. Press each keycap straight down onto its switch stem until you hear and feel a firm snap. Start with the larger stabilized keys to make sure they seat properly before filling in the rest.
Step 12: Plug In and Test
Reconnect your keyboard and open a text editor or a key-testing tool. Type across all keys to confirm they register correctly with no stickiness, missed presses, or double inputs. If any key feels off, remove it and reseat it. If a switch still feels sticky, repeat the isopropyl alcohol treatment from Step 9.
Level 1: Quick Surface Clean (No Disassembly)
When you do not have time for a full clean, this method takes about 5 minutes and is great for weekly maintenance.
-
Unplug the keyboard
-
Flip it upside down and shake out loose debris
-
Use compressed air in short bursts between keys, row by row
-
Wipe keycap surfaces with a microfiber cloth slightly dampened with water or isopropyl alcohol
-
Plug back in and test
This will not address the buildup inside the switch housing or underneath the keycaps, but it is an effective way to prevent major grime accumulation between deep cleans.
What NOT to Do: Common Mistakes to Avoid
These are mistakes I have seen (and in a couple of cases, personally made) that can damage a keyboard or make the cleaning less effective.
-
Do not use 70% rubbing alcohol. The higher water content is risky near electronics. Always use 90% or above.
-
Do not use hot or boiling water on keycaps. Warm water only. Heat can warp ABS plastic.
-
Do not spray compressed air in an inverted can. It releases liquid propellant that can freeze and damage switches.
-
Do not vacuum directly over switches. Vacuums generate static electricity which can damage the PCB.
-
Do not use paper towels on keycaps. They leave behind small white fibers. Microfiber cloths only.
-
Do not spray cleaning products directly onto the keyboard. Always apply to a cloth first.
-
Do not reassemble while anything is still damp. Patience here protects your hardware.
How Often Should You Clean Your Mechanical Keyboard?
It is worth noting that pulling keycaps off too frequently carries its own small risk. Repeated removal and reinsertion gradually loosens the fit between the keycap stem and the switch, especially on older or lower-quality keycaps. Consistency with quick weekly surface cleans is far better for long-term keyboard health than doing unnecessary full teardowns.
2026 Trends: What Has Changed in Keyboard Maintenance
The mechanical keyboard hobby has grown significantly, and so has the knowledge base around maintenance. A few things worth noting for 2026:
Electric air blowers have largely replaced canned compressed air in the enthusiast community. Devices like the MetroVac DataVac and similar electronic dusters are more powerful, reusable, and do not carry the risk of propellant spray. They are a worthwhile investment for anyone who cleans their gear regularly.
Hot-swappable keyboards have made cleaning considerably easier. Since switches can be removed without soldering, you can pull individual switches for cleaning, replace a sticky one instantly, or clean the PCB more thoroughly. If you are in the market for a new board, hot-swap support is one feature that genuinely makes long-term ownership easier.
PBT keycaps have become the standard on most mid-range and premium boards. PBT is more durable, more heat-resistant, and retains its texture longer than ABS. They also respond better to soaking and clean up more thoroughly.
For a practical visual walkthrough of the full deep cleaning process, This step-by-step YouTube tutorial covers keycap removal, soaking, base cleaning, and reassembly in detail and is one of the clearest demonstrations available.
Frequently Asked Questions
How often should I clean my mechanical keyboard?
For most users, a quick surface clean every one to two weeks is ideal. A full deep clean with keycap removal and soaking should be done every 6 to 12 months for average users. Only the heaviest users, like those who eat at their desks or have pets, should consider doing a full teardown as frequently as every 2 to 3 months.
Can I wash my keycaps with water?
Yes. Warm soapy water is perfectly safe for both ABS and PBT keycaps. Avoid hot or boiling water, which can cause ABS keycaps to warp. Always ensure keycaps are completely dry before putting them back on the board.
What kind of alcohol should I use to clean a mechanical keyboard?
Use isopropyl alcohol at 90% concentration or higher. The 70% rubbing alcohol commonly sold at pharmacies contains too much water and poses a risk to the PCB and switch internals. Apply it to a cloth or cotton swab, never directly onto the board.
Can I use a vacuum cleaner to clean my keyboard?
It is best to avoid vacuum cleaners directly on the board. They generate static electricity which can damage the PCB. Use compressed air or an electric air blower instead, and angle the board so debris blows away from the switches.
What is the best way to remove stubborn sticky keys?
Remove the keycap from the affected switch, apply 1 to 2 drops of 90%+ isopropyl alcohol directly into the switch housing, then actuate the stem 20 to 30 times firmly to work the alcohol through the mechanism. Let it dry fully before replacing the keycap. Keep in mind that the alcohol will strip factory lubricant from the switch, so it may feel slightly scratchier than before until re-lubed.
Is it safe to deep clean a wireless mechanical keyboard?
Yes, as long as you power it off completely and remove the batteries before cleaning. Avoid any moisture near the battery compartment and charging port. Allow extra drying time before powering back on.
How do I clean a mechanical keyboard without a keycap puller?
In a pinch, you can use two bent paperclips to fashion a crude puller. Slip one under each side of the keycap and pull upward evenly. That said, a proper wire keycap puller costs about $5 and is far safer for your keycaps and switch stems. It is worth owning one.
Will cleaning my keyboard damage the switches?
Not if you follow the steps correctly. The key rules are: always unplug before cleaning, never submerge the keyboard board itself, use only 90%+ isopropyl alcohol near switches (not water), and ensure everything is fully dry before powering back on.
Cleaning Mechanical Keyboard vs. Membrane Keyboard: Key Differences
Mechanical keyboards are genuinely easier to maintain thoroughly. The individual switch and keycap design means every part of the board is accessible, which is one of the practical advantages of the format that does not always get discussed alongside switch feel and durability.
Bottom Line
Cleaning a mechanical keyboard is not complicated, but it does require patience and the right tools. The basic principle is simple: remove the keycaps, soak them, clean the base with compressed air and alcohol, dry everything completely, and reassemble. For most users, doing this once or twice a year is plenty. Keep on top of quick weekly surface cleans, and your switches will stay smooth, your keycaps will stay vibrant, and that satisfying, crisp typing feel will last for years.