Skip to content
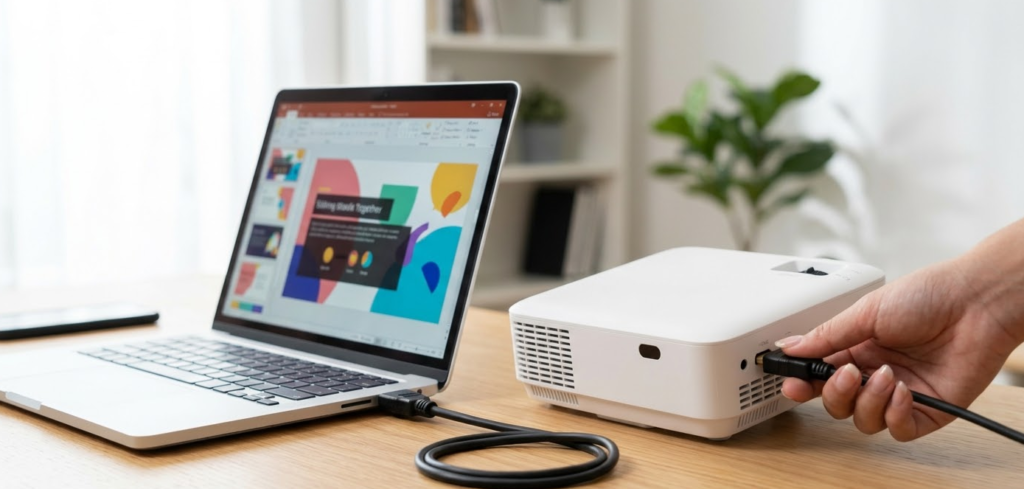
To connect a projector to a laptop, identify the video output port on your laptop (HDMI, USB-C, DisplayPort, or VGA), connect the matching cable to the projector’s input, power on the projector, select the correct input source on the projector, and then configure your display settings on Windows using Windows key + P or on macOS using System Settings, then Displays. The whole process takes 2 to 5 minutes with the right cable. Wireless options using Miracast or AirPlay are available on modern projectors and require no cable at all.
Connecting a laptop to a projector is one of those tasks that looks completely straightforward until you are standing in front of a conference room full of people and nothing is displaying on the wall. The cable is plugged in, the projector is on, and the screen is blank. Every presenter has been there at least once.
The reason it goes wrong so often is that there are multiple connection types, multiple display mode settings, multiple input sources on the projector side, and a dozen ways the laptop can fail to detect the display automatically. This guide covers every connection method, every display setting, and every common failure point in complete detail, for both Windows laptops and MacBooks, so that the next time you connect a projector it works on the first attempt.
Step Zero: Identify Your Ports Before You Touch a Cable
The single most common reason a projector connection fails is using the wrong cable or the wrong adapter for the ports available. Before buying a cable or attempting to connect anything, spend 60 seconds identifying exactly what ports your laptop and projector each have.
Laptop Video Output Ports (What to Look For):
| Port Name | What It Looks Like | Typical Laptop Generation |
|---|---|---|
| HDMI (full size) | Trapezoidal, 19 pins | Most Windows laptops 2012 to present |
| Mini HDMI | Smaller trapezoidal, 19 pins | Smaller Windows laptops and some older MacBooks |
| USB-C / Thunderbolt | Small oval, reversible | MacBooks 2016 to present; modern ultrabooks |
| DisplayPort | Similar to HDMI but with one angled corner | Gaming laptops, business laptops |
| Mini DisplayPort | Smaller version of DisplayPort | Older MacBooks, some Windows ultrabooks |
| VGA | Wide trapezoid, 15 pins, usually blue | Older laptops (pre-2015 era) |
Projector Input Ports (What to Look For):
| Port Name | Common On |
|---|---|
| HDMI | Most projectors made after 2012 |
| VGA | Older and institutional projectors, classrooms |
| USB-A | Some projectors for direct file playback |
| USB-C | Modern compact projectors |
| DisplayPort | Professional and high-end projectors |
| Wireless (Wi-Fi built in) | Smart projectors, portable projectors 2020 to present |
Once you know both sides, you can determine exactly what cable or adapter you need. The most common combinations are: HDMI to HDMI (the easiest, no adapter needed), USB-C to HDMI (requires a USB-C to HDMI cable or adapter), and USB-C or Mini DisplayPort to VGA (for older institutional projectors).
Connection Type Comparison: Which Is Best for Your Setup?
Before walking through each method in detail, this table gives you an honest overview of what each connection type delivers so you can choose the right one for your situation.
| Connection | Signal Type | Max Resolution | Carries Audio | Adapter Needed (Modern Laptop) | Best For |
|---|---|---|---|---|---|
| HDMI | Digital | 4K @ 60Hz (HDMI 2.0) | Yes | Rarely | General use, presentations, home cinema |
| USB-C / Thunderbolt | Digital | 4K @ 120Hz+ | Yes | Sometimes | Modern laptops, clean single-cable setup |
| DisplayPort | Digital | 4K @ 144Hz | Yes | Sometimes | High-resolution and high-refresh setups |
| VGA | Analog | 1080p max (often softer) | No (audio cable needed separately) | Usually | Legacy projectors in schools and offices |
| Wireless (Miracast) | Digital (Wi-Fi) | 1080p typically | Yes | No (software only) | Meetings, classrooms, cable-free setup |
| Wireless (AirPlay) | Digital (Wi-Fi) | Up to 4K on supported hardware | Yes | No (software only) | MacBook to Apple TV or AirPlay projector |
Method 1: HDMI Cable Connection (The Most Common Method)
HDMI is the standard for most laptop-to-projector connections in 2026. It carries both video and audio in a single cable, supports up to 4K resolution, and is plug-and-play on both Windows and macOS without any driver installation. According to AWOL Vision’s comprehensive connection guide, HDMI is the gold standard for modern laptop-to-projector connections for exactly this reason.
What You Need:
- An HDMI cable (standard full-size HDMI to HDMI in most cases)
- If your laptop only has USB-C: a USB-C to HDMI cable or adapter
- If your laptop only has Mini HDMI: a Mini HDMI to HDMI cable
Step-by-Step: Windows Laptop via HDMI
Step 1: Gather Your Cable and Check Both Ports
Confirm your laptop has a full-size HDMI port (the trapezoidal port, typically on the left or right side of the chassis). Confirm the projector has an HDMI input, and note which input it is labeled (HDMI 1, HDMI 2, etc.). Use an HDMI cable long enough to reach from your laptop’s position to the projector without tension on the connectors.
Step 2: Connect the Cable While Both Devices Are On or Off
Unlike VGA, HDMI is hot-pluggable and can be connected while both devices are powered on. However, for first-time connections with older projectors, connecting the cable before powering on the projector can improve detection reliability. Either way, plug one end of the HDMI cable into your laptop’s HDMI port and the other end firmly into the projector’s HDMI input.
Step 3: Power On the Projector
Turn on the projector using its power button or remote. Wait for it to complete its startup sequence, which typically takes 20 to 45 seconds for lamp-based projectors and 5 to 15 seconds for LED projectors.
Step 4: Select the Correct Input Source on the Projector
This is the most commonly missed step. Projectors do not always auto-detect the active input. Using the projector’s remote or the buttons on the projector body, press the Input or Source button and select the HDMI input that your cable is connected to. If the cable is in HDMI 1, select HDMI 1. If you are unsure, cycle through all available inputs until the laptop screen appears.
Step 5: Configure Display Settings on Windows
Press Windows key + P to open the Project panel on the right side of the screen. Choose your display mode:
- PC screen only: Laptop display only, projector gets no signal
- Duplicate: Shows the same image on both laptop and projector (best for presentations)
- Extend: Adds the projector as a second screen (best for slideshows where you see your notes on the laptop while the audience sees the slides on the projector)
- Second screen only: Turns off the laptop display and shows everything on the projector only
For most presentations, Duplicate is the right choice. For PowerPoint or Keynote with speaker notes, Extend is the professional choice.
Step 6: Adjust Resolution if the Image Looks Wrong
If the projected image appears stretched, blurry, or cut off, right-click the desktop, select Display Settings, and look at the resolution for the projector display. Set it to match the projector’s native resolution, which is typically 1920×1080 (Full HD) for most modern projectors. If you do not know the native resolution, check the projector’s label or manual.
Method 2: USB-C or Thunderbolt Connection
Most laptops made after 2018, and all MacBooks made after 2016, have USB-C ports rather than a dedicated HDMI port. Whether a USB-C port supports video output depends on whether it includes DisplayPort Alt Mode or Thunderbolt, and not every USB-C port on every laptop does.
How to Check if Your USB-C Port Supports Video Output:
Look for a small lightning bolt symbol (Thunderbolt) or a DisplayPort symbol next to the USB-C port. If either symbol is present, that port supports video output. If the port has no symbol or only a USB symbol, it likely does not support display output and you will need to use a different port or method.
What You Need:
- If your projector has USB-C input: a USB-C to USB-C cable
- If your projector has HDMI input (most common): a USB-C to HDMI cable or adapter
- If your projector has VGA input: a USB-C to VGA adapter
Step-by-Step: USB-C to HDMI Projector Connection
Step 1: Confirm your USB-C port supports video output using the method above.
Step 2: Connect the USB-C end of your adapter or cable to your laptop’s USB-C or Thunderbolt port.
Step 3: Connect the HDMI end of the adapter to the projector’s HDMI input.
Step 4: Power on the projector and select the correct HDMI input source using the remote or input button.
Step 5: Configure display settings using Windows key + P on Windows or System Settings, then Displays on macOS.
Step 6: If the projector is not detected automatically after selecting the input, right-click the Windows desktop, select Display Settings, and click Detect to force Windows to search for the new display.
MacBook-Specific Note:
All current MacBooks (Air and Pro) use USB-C with Thunderbolt exclusively and have no native HDMI port. A USB-C to HDMI adapter is required for any HDMI projector. Apple sells its own USB-C Digital AV Multiport Adapter, which is reliable and recommended for critical presentations. Third-party USB-C to HDMI adapters work well in most cases but can occasionally cause resolution or handshake issues with older projectors. If you experience problems with a third-party adapter, try Apple’s official adapter before assuming the projector is at fault.
Method 3: VGA Cable Connection (For Older Projectors)
VGA remains the most common connection type in school classrooms, older conference rooms, and institutional settings worldwide. If you are presenting in a location that has not updated its projector hardware in the past 8 to 10 years, VGA is likely what you will encounter. As VCOM’s cable compatibility guide notes, VGA is still deeply entrenched in institutional environments despite its age.
Important Limitation: VGA carries video only, not audio. If you need sound from your laptop to play through the projector’s speakers, you need a separate 3.5mm audio cable connected from your laptop’s headphone jack to the projector’s audio input.
What You Need:
- VGA cable (if your laptop still has a VGA port, rare on laptops made after 2015)
- USB-C to VGA adapter or Mini DisplayPort to VGA adapter (for modern laptops)
- Separate 3.5mm audio cable if audio output through the projector is needed
Step-by-Step: VGA Connection
Step 1: Connect the VGA Cable with Both Devices Powered Off
Unlike HDMI, VGA connectors have thumbscrews on each side of the plug that secure it in place and prevent signal wobble. For a stable VGA connection, both devices should ideally be powered off before connecting. Plug the VGA cable into the laptop’s VGA port (or adapter) and into the projector’s VGA input, and tighten the thumbscrews finger-tight on both ends.
Step 2: Connect the Audio Cable Separately (If Needed)
Plug a 3.5mm stereo cable from your laptop’s headphone jack to the projector’s audio in port. This is the only way to get audio through the projector when using VGA.
Step 3: Power On Both Devices
Turn on the projector first, then the laptop. This order can improve detection reliability on older VGA equipment.
Step 4: Select VGA Input on the Projector
Use the projector’s remote or input button to select the VGA or Computer input source.
Step 5: Configure Display Settings
Press Windows key + P and select Duplicate for presentations. If the image appears with wrong proportions, go to Display Settings and set the resolution to match the projector’s native resolution, typically 1024×768 (XGA) for older projectors or 1280×800 (WXGA) for widescreen models.
VGA Image Quality Note: VGA transmits an analog signal. Even at 1080p, VGA output can appear softer and less sharp than the same image over HDMI, particularly on longer cable runs. If you are in an environment that only has VGA available but image sharpness matters, request an HDMI-capable projector or bring your own HDMI to USB-C adapter as a backup. Keep a HDMI-to-VGA adapter in your bag as well for the opposite situation.
Method 4: Wireless Connection (Miracast on Windows)
Modern projectors and nearly all smart projectors support wireless screen mirroring without any cable at all. On Windows, the native wireless display standard is Miracast. Windows 10 and Windows 11 both support casting to any Miracast-enabled display using the built-in wireless display stack.
What You Need:
- A projector with built-in Miracast support or Wi-Fi, OR a Miracast dongle (such as a Microsoft Wireless Display Adapter or Amazon Fire Stick) plugged into the projector’s HDMI port
- Both the laptop and the Miracast dongle must be connected to the same Wi-Fi network, or the dongle creates its own direct Wi-Fi connection
Step-by-Step: Wireless Connection on Windows via Miracast
Step 1: Confirm Your Projector or Dongle Supports Miracast
Check the projector’s packaging or settings menu for Miracast, Screen Mirroring, or Wi-Fi Display. If the projector does not have built-in wireless capability, plug a Miracast-compatible dongle (such as a Microsoft Wireless Display Adapter or a compatible streaming device) into the projector’s HDMI port and USB power port.
Step 2: Enable Miracast on the Projector or Dongle
On smart projectors, navigate to the wireless or screen mirroring menu and enable it. On a Miracast dongle, simply plug it in and it will display its connection name and instructions on screen.
Step 3: Cast from Windows
Press Windows key + K to open the Cast panel in Windows 10 and Windows 11. Windows will scan for nearby Miracast-enabled displays. Your projector or dongle should appear in the list within a few seconds. Click it to begin the connection.
Step 4: Select Your Display Mode
After connecting, press Windows key + P to choose between Duplicate and Extend for your wireless display, identical to a wired connection.
Step 5: Adjust for Latency if Needed
Wireless connections introduce a small amount of latency (typically 50 to 150ms depending on the dongle and Wi-Fi environment). For static slide presentations, this is imperceptible. For video playback or anything with synchronized audio, the slight lag may be noticeable. For those situations, a wired HDMI connection is preferable.
Method 5: Wireless Connection (AirPlay on MacBook)
On MacBooks, the native wireless display protocol is AirPlay. Any projector with built-in AirPlay support, or any projector connected to an Apple TV, supports wireless mirroring from a MacBook with no cable.
Step-by-Step: AirPlay from MacBook to Projector
Step 1: Confirm AirPlay Support
Check that your projector supports AirPlay natively, or ensure an Apple TV (3rd generation or later) is connected to the projector’s HDMI port and powered on.
Step 2: Connect MacBook and Apple TV or AirPlay Projector to the Same Wi-Fi Network
Both devices must be on the same Wi-Fi network. This is a hard requirement for AirPlay. If the venue uses a guest Wi-Fi network that isolates devices from each other, AirPlay will not work. In that case, use a wired HDMI connection instead.
Step 3: Open Display Settings on MacBook
Click the Apple menu, then select System Settings, then Displays. Look for the AirPlay Display dropdown at the bottom of the Displays pane. Your AirPlay-compatible projector or Apple TV should appear in the list.
Step 4: Select the Projector
Click the projector or Apple TV in the AirPlay Display menu. The MacBook screen will appear on the projector within 3 to 5 seconds.
Step 5: Choose Mirror or Extended Display
In the same Displays menu, you can toggle between Mirror Displays (shows the same content on both screens) and using the projector as an extended display. For presentations, Mirror Displays is the most common and practical choice.
Configuring Display Settings: Windows vs. macOS
Regardless of connection method, these are the display setting locations you need to know on both platforms.
On Windows 10 and Windows 11:
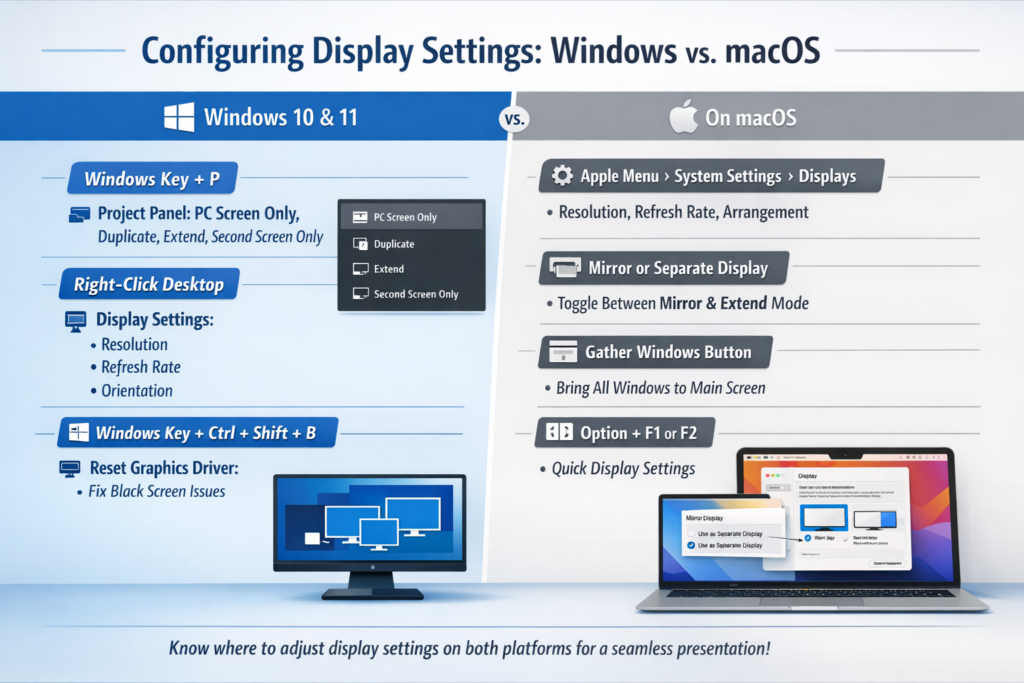
- Windows key + P: Opens the Project panel with four display mode options (PC screen only, Duplicate, Extend, Second screen only). This is the fastest way to change display mode during a live presentation.
- Right-click Desktop, then Display Settings: Full display configuration including resolution, refresh rate, arrangement, and orientation for each connected display.
- Windows key + Ctrl + Shift + B: Forces a graphics driver reset if the projector is connected but showing a black screen. Useful when the connection is established but nothing appears.
On macOS:
- Apple menu, then System Settings, then Displays: Primary display configuration hub. Shows all connected displays and lets you adjust resolution, refresh rate, and arrangement.
- Mirror or Use as Separate Display: The toggle in Displays settings that switches between Duplicate and Extend modes.
- Gather Windows: A button in the Displays panel that pulls all open windows back to the primary MacBook display, useful when windows have drifted to the projector display and you cannot see them.
- Option + F1 or F2: Opens display settings directly via keyboard shortcut on most MacBooks.
Step-by-Step: Pre-Presentation Checklist
Use this checklist every time you present with a projector to prevent any last-minute failures.
30 Minutes Before:
- Confirm which input type the projector has (HDMI, VGA, or wireless)
- Confirm which output your laptop has and identify any adapters needed
- Pack both the primary cable and a backup adapter (e.g., both HDMI and a USB-C to HDMI adapter)
- Confirm your presentation file is locally saved, not only in the cloud
5 Minutes Before:
- Connect the cable to the projector and laptop
- Power on the projector and wait for its startup sequence to complete
- Select the correct input source on the projector using the remote or input button
- Press Windows key + P and select Duplicate (or Extend if using speaker notes)
- Walk to the back of the room and verify the image is sharp and properly filled on the screen
- Test audio if your presentation uses sound
- Confirm font sizes and slide elements are legible from the back row
On the Day:
- If anything goes wrong, refer to the troubleshooting section below before assuming hardware failure
Adapter Reference: What to Buy for Every Laptop Type
If your laptop does not have a native HDMI port, this table tells you exactly what adapter to carry.
| Your Laptop Port | Projector Input | Adapter Needed | Notes |
|---|---|---|---|
| USB-C / Thunderbolt | HDMI | USB-C to HDMI cable or adapter | Confirm USB-C port supports video output |
| USB-C / Thunderbolt | VGA | USB-C to VGA adapter | VGA carries no audio |
| Mini DisplayPort | HDMI | Mini DisplayPort to HDMI adapter | Common on older MacBooks |
| Mini DisplayPort | VGA | Mini DisplayPort to VGA adapter | No audio via VGA |
| Mini HDMI | HDMI | Mini HDMI to HDMI cable | Straightforward, no signal loss |
| HDMI (full size) | VGA | HDMI to VGA adapter (active) | Must be active adapter, not passive |
| No video port (tablet mode) | Any | USB display adapter or wireless | Check USB-C video support first |
Pro Tip for Frequent Presenters: Carry a USB-C to HDMI + VGA combination adapter in your laptop bag at all times. Products like the VCOM USB-C to HDMI VGA Adapter give you both outputs in one compact device, covering both modern HDMI projectors and legacy VGA projectors from a single adapter. This eliminates the most common presentation failure point: arriving at a venue with the wrong cable for the projector available.
Troubleshooting: Projector Not Displaying from Laptop
These are the most common failure scenarios and their proven fixes, in order of likelihood.
Problem: The projector is on and the cable is connected but the screen shows “No Signal.”
This is the most common issue and almost always has one of three causes:
- Wrong input source selected on the projector. Press the Input or Source button on the projector remote or body and cycle through every available input until the laptop screen appears. This fixes the problem the vast majority of the time.
- Windows has not sent a signal to the projector. Press Windows key + P and select Duplicate or Extend to instruct Windows to output to the external display.
- The cable is not fully seated. Unplug and firmly reconnect both ends of the cable. With VGA, tighten the thumbscrews.
Problem: The laptop detects the projector but the projected image is black.
Press Windows key + Ctrl + Shift + B to force a graphics driver reset. This often resolves black screen issues when the display is detected but no image appears. On macOS, disconnect and reconnect the cable, then go to System Settings, then Displays, and click Detect Displays.
Problem: The image is detected but appears at the wrong resolution (stretched, letterboxed, or blurry).
Go to Display Settings on Windows (right-click the desktop) or System Settings, then Displays on macOS. Find the projector display and manually set its resolution to match the projector’s native resolution. For most modern projectors, this is 1920×1080. For older institutional projectors, try 1024×768 or 1280×800.
Problem: The projector is detected and the image looks correct on the laptop screen but nothing appears on the projector.
Press Windows key + P and confirm the mode is set to Duplicate or Second screen only, not PC screen only. This setting is the most common silent failure during presentations.
Problem: Audio is not coming out of the projector’s speakers.
Windows routes audio to the default audio device, which may still be your laptop’s speakers after connecting to the projector. Right-click the speaker icon in the Windows taskbar, select Sound Settings or Open Sound Settings, and under the Output section, change the output device to the projector (it will appear as an HDMI or display audio device). On macOS, go to System Settings, then Sound, then Output, and select the projector.
Note: If you are using a VGA connection, audio cannot travel through VGA at all. You need a separate 3.5mm audio cable from the laptop headphone jack to the projector’s audio in port, or use Bluetooth speakers instead.
Problem: The connection works but drops out intermittently.
For wired connections, this is almost always a loose cable. Check that both ends of the cable are fully and firmly inserted, and for VGA, that the thumbscrews are tight. For wireless connections, signal interference or distance from the Wi-Fi router can cause drops. Move the laptop closer to the projector or use a wired connection for mission-critical presentations.
Problem: MacBook connects but the projected image has color distortion or green tint.
This is typically a cable or adapter quality issue. Third-party USB-C to HDMI adapters vary significantly in quality. Try Apple’s official USB-C Digital AV Multiport Adapter. If using a hidden HDMI-to-VGA converter in the venue’s cabling, note that MacBooks sometimes have handshake issues with passive HDMI-to-VGA converters. Request a direct HDMI connection or use a USB-C to VGA adapter that bypasses the converter.
Problem: The wireless Miracast connection keeps dropping during the presentation.
Corporate or venue Wi-Fi networks often use AP isolation, which prevents devices from communicating with each other on the same network. This breaks Miracast and AirPlay connections. Use a wired HDMI cable for any venue with managed Wi-Fi. Alternatively, use a Miracast dongle that creates its own direct Wi-Fi connection between the laptop and the dongle without relying on the venue’s network.
Problem: The projected image is sharp on the laptop but blurry or soft on the projector screen.
This is usually a projector focus issue, not a resolution issue. Most projectors have a manual focus ring around the lens. Rotate it until the projected text appears sharp. If the image is in focus at the center but blurry at the edges, the projector may need physical repositioning relative to the screen surface.
Pro Tip: Always carry your own HDMI cable when presenting externally. Most conference rooms, classrooms, and event venues have projector cables, but those cables are often damaged, too short, or the wrong type for your laptop. A high-quality 6-foot HDMI cable costs around $8 to $12, weighs almost nothing, and has saved more presentations than any other single piece of equipment you can carry. Add a USB-C to HDMI adapter alongside it and you are prepared for virtually every projection scenario you will encounter.
macOS vs. Windows: Key Differences at a Glance
| Task | Windows | macOS |
|---|---|---|
| Quick display mode switch | Windows key + P | Apple menu, System Settings, Displays |
| Detect a new display manually | Display Settings, then Detect | System Settings, Displays, then Detect Displays |
| Mirror vs. extend display | Windows key + P | Mirror Displays toggle in Displays settings |
| Wireless display | Windows key + K (Miracast) | AirPlay Display menu in Displays settings |
| Fix black screen (driver reset) | Windows key + Ctrl + Shift + B | Disconnect and reconnect cable; check Displays |
| Change audio output to projector | Sound Settings, Output device | System Settings, Sound, Output |
Frequently Asked Questions
How do I connect a laptop to a projector without HDMI?
If your laptop has no HDMI port, use a USB-C to HDMI adapter if your USB-C port supports video output (look for a Thunderbolt symbol next to the port). If the projector only has VGA, use a USB-C to VGA adapter. For cable-free connection, use Miracast on Windows (Windows key + K) or AirPlay on MacBooks (System Settings, then Displays, then AirPlay Display).
Why is my projector not detecting my laptop?
The most common cause is the wrong input source selected on the projector. Press the Input or Source button and cycle through all inputs. The second most common cause is that Windows has not been instructed to output to the projector: press Windows key + P and select Duplicate. If neither fixes it, unplug and firmly reconnect both ends of the cable.
Do I need an adapter to connect a MacBook to a projector?
Almost always yes. All MacBooks since 2016 use USB-C only and have no native HDMI port. You need a USB-C to HDMI adapter for any HDMI projector, or a USB-C to VGA adapter for VGA projectors. Apple’s USB-C Digital AV Multiport Adapter is the most reliable option for critical presentations, though quality third-party adapters work well in most cases.
Does VGA carry audio?
No. VGA is a video-only standard and does not transmit audio signals. If you are using a VGA connection and need audio through the projector’s speakers, connect a separate 3.5mm stereo audio cable from your laptop’s headphone jack to the projector’s audio input port.
How do I connect a laptop to a projector wirelessly?
On Windows, press Windows key + K to open the Cast panel and select your Miracast-enabled projector or wireless display adapter. On macOS, go to System Settings, then Displays, and use the AirPlay Display dropdown to select your AirPlay-compatible projector or Apple TV. Both methods require the projector or a connected dongle to support the respective wireless standard.
Why is there no sound from the projector after connecting via HDMI?
Windows keeps the default audio output on the laptop’s speakers after connecting to an external display. Right-click the speaker icon in the taskbar, open Sound Settings, and under Output, switch the device to the projector (listed as HDMI Audio or the projector’s brand name). On macOS, go to System Settings, then Sound, then Output, and select the projector display.
Can I use a USB port to connect a laptop to a projector?
Most standard USB-A ports do not support video output and cannot be used to connect a projector. However, USB-C ports on modern laptops often support DisplayPort Alt Mode, which enables video output. If your USB-C port has a Thunderbolt or DisplayPort symbol next to it, it supports video and can connect to a projector via a USB-C to HDMI or USB-C to VGA adapter. Some projectors also accept a USB-A drive for direct file playback, but this does not mirror the laptop screen.
My laptop says it detects the projector but the projected image is black. How do I fix it?
On Windows, press Windows key + Ctrl + Shift + B to force a graphics driver reset, which resolves most black-screen-on-connected-display issues. Also confirm Windows key + P is set to Duplicate or Extend, not PC screen only. On macOS, disconnect and reconnect the cable, then click Detect Displays in System Settings, then Displays.
What resolution should I set for a projector?
Set the resolution to match the projector’s native resolution for the sharpest image. Most modern projectors are 1920×1080 (Full HD). Older institutional projectors are commonly 1024×768 (XGA) or 1280×800 (WXGA). Setting a resolution higher than the projector’s native resolution can cause display problems; setting it lower works but reduces sharpness. Check the projector’s label or manual for its native resolution.
Does using a USB-C to HDMI adapter reduce video quality compared to a native HDMI connection?
No, not with a quality adapter. Both USB-C with DisplayPort Alt Mode and native HDMI transmit digital signals, and a quality USB-C to HDMI adapter introduces no perceptible quality difference at standard resolutions and refresh rates. Cheap adapters can cause signal issues at 4K or high refresh rates, so for critical work, use a reputable adapter from a known brand.
How do I present in PowerPoint with speaker notes on the laptop while the slides show on the projector?
Press Windows key + P and select Extend to use the projector as a second separate screen. Open your PowerPoint presentation and go to the Slide Show tab. Under the Monitors section, set the display to the projector screen and enable “Use Presenter View.” PowerPoint will then show your slides on the projector and your speaker notes, timer, and upcoming slide preview on your laptop display. On macOS in Keynote, this works identically through Keynote’s Presenter Display settings.
Bottom Line
Connecting a laptop to a projector is a straightforward process when you know the port types on both devices and have the right cable or adapter. HDMI is the most reliable wired method for modern equipment and should be your default. USB-C to HDMI is the standard path for MacBooks and modern ultrabooks. VGA remains necessary for older institutional projectors and is simple to use once you account for the separate audio requirement. Wireless via Miracast or AirPlay works well for presentations in equipped rooms but should never be your only plan in an unfamiliar venue.
This step-by-step YouTube guide on connecting a laptop to a projector via HDMI and Wi-Fi covers the most common scenarios with clear visual demonstrations that complement the written steps above. Pack a USB-C to HDMI adapter, a standard HDMI cable, and know where your Windows key + P shortcut is, and you will be ready for any projection setup you encounter.