OpenClaw can control your browser using three distinct modes: Extension Relay, OpenClaw Managed, and Remote CDP, all powered by the Chrome DevTools Protocol (CDP). The right setup depends on whether you need access to an existing logged-in session, an isolated automation environment, or a cloud-based browser pipeline. But before you pick a mode and hit go, there are a few things you should know that could save you hours of frustration down the line.
In my experience testing various AI automation tools, OpenClaw stands out as one of the most technically sophisticated options available right now. It does not rely on screenshots or guesswork, and that alone makes it more reliable than most of its competitors.
What Is OpenClaw Browser Control?
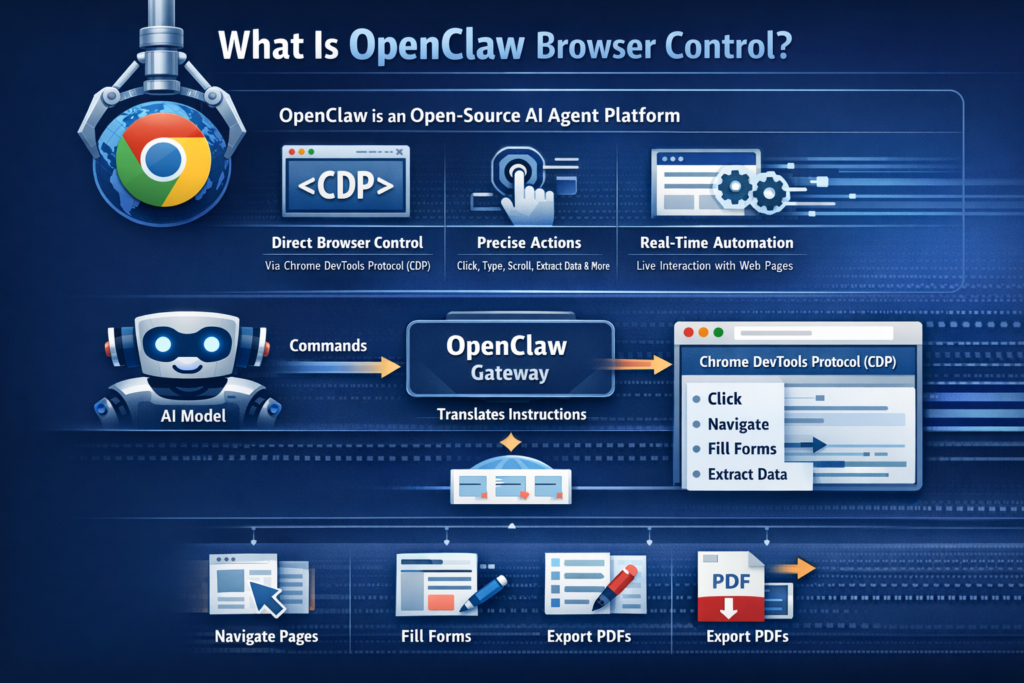
OpenClaw is an open-source AI agent platform (with over 68,000 GitHub stars as of early 2026) that lets AI models directly control a browser in real time. Rather than simulating mouse clicks over a screenshot, it communicates with Chrome and other Chromium-based browsers through the Chrome DevTools Protocol (CDP), which is the same low-level protocol that powers Chrome’s own developer tools.
This means OpenClaw can click buttons, type into forms, scroll, navigate between pages, extract data, fill fields, export PDFs, and much more, all with deterministic precision. The agent sends instructions to the OpenClaw gateway, which translates them into CDP operations executed directly on the browser.
The 3 Browser Control Modes Explained
Understanding which mode to use is the single most important decision you will make when setting up OpenClaw browser control. Each mode exists for a different scenario.
Extension Relay Mode runs on port 18792 and works by installing a small Chrome extension that creates a local CDP relay. OpenClaw then connects to that relay to control any open tab in your existing Chrome browser. The massive advantage here is that it preserves your logged-in sessions, so you can automate tasks inside Gmail, Notion, Shopify, or any app that uses SSO without having to log in again programmatically.
OpenClaw Managed Mode (ports 18800 to 18899) launches a completely isolated Chromium instance that has nothing to do with your personal browser. No shared cookies, no shared history, no risk of cross-contamination. This is the recommended default for most automation workflows including scraping, testing, and batch processing. You can run multiple profiles simultaneously, each on its own port.
Remote CDP Mode connects OpenClaw to a cloud-hosted Chromium browser using a remote CDP URL. This mode is designed for production pipelines where browser infrastructure is managed separately, such as a fleet of headless browsers running on a cloud service like Browserless or Browserbase.
Browser Control Mode Comparison Table
How to Set Up OpenClaw Browser Control: Step-by-Step

Step 1: Install OpenClaw and Start the Gateway
Before anything else, make sure OpenClaw is installed on your system. It supports macOS, Windows, and Linux (including WSL2). The easiest way to get started is through Claw Launcher, a desktop app that handles starting, stopping, installing, and version management with a simple double-click, rather than juggling terminal commands.
Once installed, start the OpenClaw gateway. The gateway runs on port 18791 by default and acts as the central orchestration layer for all browser control operations.
Step 2: Choose Your Browser Control Mode
Open your OpenClaw config file at ~/.openclaw/config.json and set your browser preferences. For most users starting out, the Managed mode default is the safest and simplest path:
{

"browser": {

"enabled": true,

"defaultProfile": "openclaw",

"headless": false

}

}
If you want Extension Relay instead, install the OpenClaw browser extension from the Chrome Web Store, open a new dedicated Chrome profile (not your personal one), and activate the extension in that profile.
Step 3: Start the Browser and Open a Page
Once your config is saved, restart the gateway so changes take effect. Then use the CLI to start the browser and navigate to a URL:
openclaw browser start

openclaw browser open https://example.com

openclaw browser snapshot
The snapshot command scans the entire page and assigns numeric reference IDs (refs) to every interactive element. These refs are what the AI agent uses to click, type, or interact with specific elements on the page.
Step 4: Interact With the Page Using Refs
After running a snapshot, you will see output listing all interactive elements with their ref numbers. Use those refs to interact:
openclaw browser click 12

openclaw browser type 15 "search query" --submit

openclaw browser navigate https://example.com/results
Important: Refs expire after every navigation. Any time the page changes or you navigate to a new URL, you must take a fresh snapshot before interacting with elements again. This is not a bug, it is by design. Stale refs pointing to vanished elements would silently cause errors or interact with the wrong element.
Step 5: Debug Using Snapshots and the Doctor Command
If something goes wrong, run openclaw doctor first. This built-in diagnostic command checks gateway connectivity, browser availability, Playwright installation, extension status, and port bindings all in one go. It is the fastest way to get a complete picture of what is and is not working.
How the Snapshot and Reference System Works
The snapshot system is one of OpenClaw’s most powerful and least understood features. When you run a snapshot, OpenClaw scans the page’s accessibility tree and assigns a unique reference ID to every interactive element, including buttons, inputs, links, dropdowns, and more.
There are two snapshot types. AI-mode snapshots (the default when Playwright is installed) produce numeric refs like 12 or 34 and use Playwright’s internal aria-ref resolution for reliable, semantically-aware element matching. Role-mode snapshots produce refs with an “e” prefix like e12 and work without Playwright installed, making them a useful fallback for simpler setups.
The reason the snapshot approach beats CSS selectors is stability. Button labels and accessibility roles rarely change when a website redesigns, but CSS class names change constantly. An automation built on refs stays reliable much longer than one built on div.btn-primary-v2.
5 Lifesaving Tips for OpenClaw Browser Control

These are the tips that will save you the most time and headache, based on patterns that come up again and again when using OpenClaw in real workflows.
Tip 1: Always Use a Dedicated Chrome Profile for Extension Relay
Never attach OpenClaw’s browser extension to your personal Chrome profile. The extension has access to every tab and cookie in that profile, including your email, banking, and admin panels. Create a separate Chrome profile specifically for automation and only log into the accounts your workflow actually needs. This keeps the blast radius small if something goes wrong.
Tip 2: Re-Snapshot After Every Navigation
This is the single biggest source of “ref not found” errors. Any time the page changes, whether from clicking a link, submitting a form, or a JavaScript redirect, your refs are stale. Build the habit of always running openclaw browser snapshot at the start of every new page state. Think of it as taking a fresh map before exploring new territory.
Tip 3: Be Specific in Your Instructions
Vague instructions cause the AI agent to explore and retry, which burns tokens and slows everything down. As Hostinger’s OpenClaw automation guide correctly points out, instead of saying “find the pricing info,” tell the agent exactly what to do: “go to example.com/pricing and extract the monthly plan prices from the comparison table.” The more specific you are, the faster and more reliably the agent performs.
Tip 4: Check for Proxy Environment Variables When Connections Fail
One of the most common and confusing failure modes is when HTTP_PROXY, HTTPS_PROXY, or ALL_PROXY environment variables are set in your shell. These can silently route OpenClaw’s CDP connections through the proxy, causing timeouts that look like port or gateway issues. The fix is simple: add localhost and 127.0.0.1 to your NO_PROXY variable.
export NO_PROXY="localhost,127.0.0.1,::1"Tip 5: Use Managed Mode for Scale, Extension Relay for Authenticated Sessions
A mistake I see often is people defaulting to Extension Relay for everything because it is easier to set up. But for high-volume or parallel workflows, Managed mode is far more efficient. You can spin up multiple browser profiles simultaneously, each on a separate port (18800, 18801, 18802, and so on), and run them in headless mode to reduce CPU and memory usage. Extension Relay, on the other hand, is the right choice when you genuinely need to reuse an existing authenticated session that would be painful to recreate programmatically.
Pro Tip: Use
openclaw browser wait --text "Done"combined with--load networkidleto make sure dynamic content has fully loaded before you take a snapshot. Pages with heavy JavaScript or AJAX calls often look loaded visually but are still rendering elements in the background. Waiting for network idle before snapshotting is one of the most underused reliability tricks in OpenClaw’s toolkit.
Troubleshooting Common OpenClaw Browser Control Errors
Even when your setup is correct, you will eventually run into errors. Here is how to resolve the most common ones quickly.
“Can’t reach the OpenClaw browser control service (timed out after 20000ms)”
Start by checking if the gateway is running with openclaw gateway status. If it is running, check whether port 18791 is occupied by another process using lsof -i:18791 on macOS/Linux or netstat -ano | findstr 18791 on Windows. Kill any conflicting process and restart the gateway.
WSL2 Users: Windows Firewall Blocking Gateway Access
If you are running OpenClaw inside WSL2 and browser control is not connecting from Windows, the Windows firewall is likely blocking the WSL2 virtual network. Run this command from a Windows terminal with admin rights:
netsh interface portproxy add v4tov4 listenport=18791 listenaddress=0.0.0.0 connectport=18791 connectaddress=$(wsl hostname -I)“Browser tool unavailable” After an Upgrade
This usually happens when you have a restrictive plugins.allow list that does not include browser. Open your ~/.openclaw/config.json file and add browser to the allowlist:
{

"plugins": {

"allow": ["telegram", "browser"]

}

}
Playwright Not Found Errors
If AI-mode snapshots fail with a message about Playwright not being installed, run:
npm install playwright

npx playwright install chromium
If you want to skip Playwright entirely, use role-mode snapshots with openclaw browser snapshot --interactive. It is less powerful but works without any additional dependencies.
OpenClaw Browser Control in 2026: What Is New
The browser control feature has seen significant evolution in early 2026. The Live Chrome Browser Session Linking introduced in version 2026.3.13 allows agents to attach directly to active Chrome sessions without requiring any additional browser plugins, a major upgrade for users who found the extension setup cumbersome.
As laozhang.ai’s in-depth technical breakdown explains, OpenClaw now supports multiple existing-session profiles beyond just the default user profile, allowing teams to manage Brave, Edge, and custom Chrome profiles with separate color-coded identifiers. The color-tinted browser UI feature was also added to help users quickly identify which profile is active at a glance.
The Playwright dependency was also restructured into a plugin architecture, meaning the core gateway no longer requires Playwright for basic operations. This reduces installation size and startup time for users who only need ARIA-based snapshots rather than full AI-mode interaction.
For teams and power users, the addition of nodeHost.browserProxy.allowProfiles gives a least-privilege boundary for browser access through connected node hosts, an important enterprise security feature that was not available in 2025 releases.
OpenClaw Browser Control: FAQ
Does OpenClaw work with Firefox or Safari?
No. OpenClaw’s browser control is built on the Chrome DevTools Protocol (CDP), which is only supported by Chromium-based browsers including Chrome, Brave, Edge, and Chromium itself. Firefox and Safari use different protocols and are not compatible.
Is it safe to let OpenClaw control my browser?
It is safe when configured correctly. The key rules are: always use a dedicated browser profile for Extension Relay, never expose the gateway ports to external networks, and enable SSRF policy restrictions to prevent the browser from being used to access internal network resources. The browser control service binds to loopback (127.0.0.1) by default, so it is not exposed to your local network unless you explicitly configure it to be.
Can OpenClaw bypass CAPTCHAs?
Not natively. Standard OpenClaw browser control does not include CAPTCHA-solving capabilities. If you need CAPTCHA handling, you can configure Remote CDP mode with a cloud browser provider like Browserbase, which includes built-in CAPTCHA solving as part of their service.
How much RAM does OpenClaw browser automation need?
For basic automation, a minimum of 4GB RAM is recommended. Each additional parallel browser profile adds roughly 200 to 400MB of RAM overhead depending on the pages being loaded. For heavy parallel workflows, 8GB or more is advisable.
What happens if the page changes mid-automation?
OpenClaw’s refs are invalidated by page changes or significant DOM mutations. The agent will receive a “ref not found” error if it tries to interact with an element that no longer exists. The solution is to take a fresh snapshot after any navigation or major page state change.
Can I run OpenClaw browser automation on a server without a display?
Yes. OpenClaw Managed Mode supports headless operation, which runs the browser without any visible window or display requirement. This is the recommended mode for server deployments and cloud environments.
Does OpenClaw work with password managers or auto-fill?
Extension Relay mode inherits the existing browser session, so any extensions including password managers that are already running in that Chrome profile will continue to work. OpenClaw Managed Mode uses a fresh isolated profile that does not have password manager extensions by default.
Bottom Line
OpenClaw browser control is genuinely one of the most capable browser automation tools available in 2026, precisely because it operates at the protocol level rather than relying on visual matching. The Full setup walkthrough on YouTube is a great starting point if you are a visual learner who wants to see the extension, connection, and first automation in action before diving into config files. Pick Managed mode if you are starting fresh, use Extension Relay only when authenticated sessions are essential, and run openclaw doctor any time something breaks before digging into logs manually.