Changing your computer’s power supply is a simple enough process that anyone can do, once you know how. This guide will teach you how to replace/change the power supply unit in your computer, step by step.
We’ll also look at the main reasons why you would need to change or upgrade your computer’s power supply, and things to look out for when choosing a replacement unit so that you can get one that’s going to last.
How To Replace A Power Supply Unit In A Computer
These steps apply to tower and desktop computers. The entire process can be done within around 5-20 minutes, depending on how familiar you are with the task.
Tools required: Screwdriver to remove power supply unit and open computer case (usually Phillips head)

Optional: Anti-static wrist strap (if not using a strap, just discharge yourself by touching any exposed metal part of your computer case before you begin the job).
Overview
Once you’ve identified that you need to replace the power supply unit in your tower or desktop computer, follow the steps below.
The replacement is simple enough, first you’ll need to remove the old power supply, and then install the new one in its place.
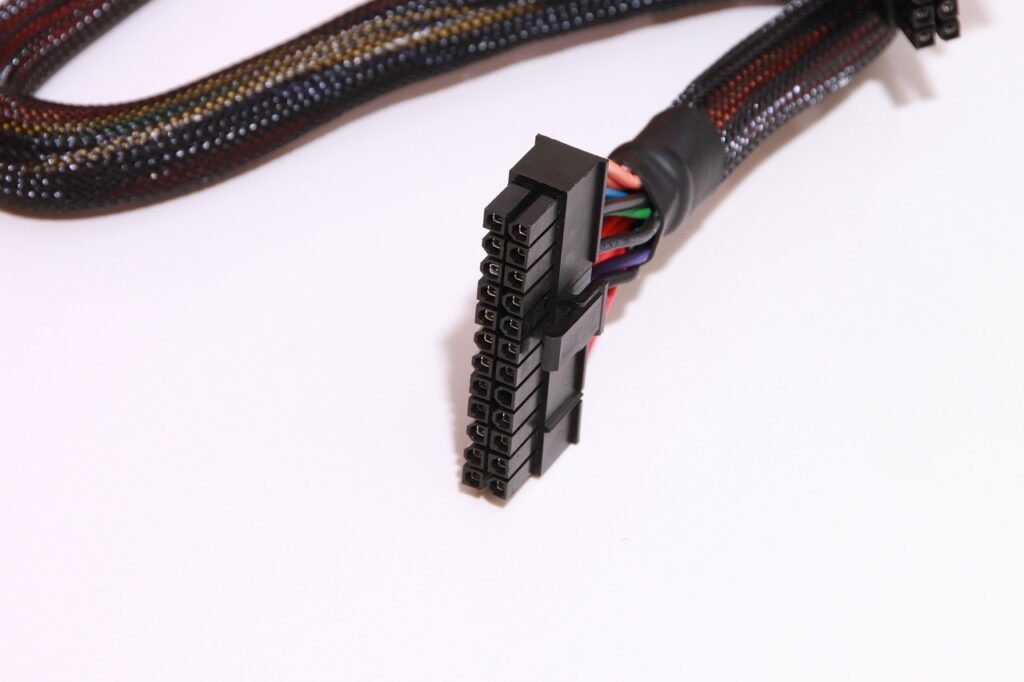
Disconnecting and connecting the power supply is straightforward – you just need to make sure that you plug/unplug it in to all the right connection points inside your computer (if you’re not sure about this, refer to the checklist and pictures later in this article).
Remember, the power supply’s main function is to provide power to all of the different hardware components in your PC, so you just need to make sure that it is plugged into each one correctly.
The good news is that if you are replacing an existing power supply, you can just follow the same cabling connections that you just unplugged from the old power supply as a guide. This makes it easy to know what plugs in to where, as you’re simply replicating what was already there.
Stage 1: Removing the Old Power Supply Unit
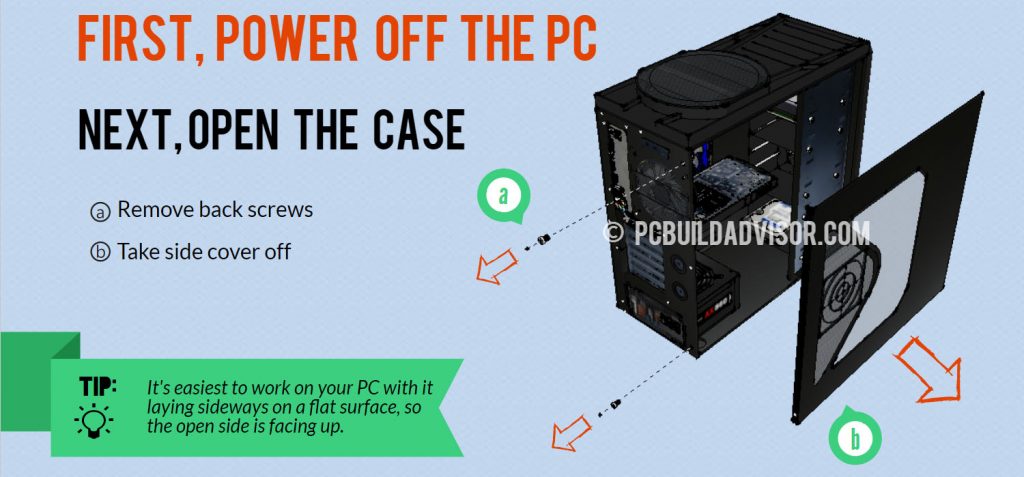
Before you begin anything, make sure that your computer is powered off and unplugged from the wall socket.
Removing the power supply from your computer is fairly simple, and you can follow the steps below.
If you’re unsure, it can help to take a photo of the power supply arrangement before your unplug anything – this way you can make sure that you re-connect everything you’re supposed to later on.
How To Remove An Existing Power Supply
- Power off the computer and unplug the power cable from the wall socket and power supply unit. If your PSU has one, flick its power switch to the off position.
- Open up your computer case – usually the inside of the case is accessed by unscrewing the fastening screws on the back edge of the case, and sliding the side panel off. It’s usually easiest to work with the computer laying flat on its side, with the components facing up at you.
- Note down the existing internal connections from the power supply to the components in your computer (it can help to take a photo, or count the number of connections that are plugged in). You’ll need to reconnect these to the new supply later.
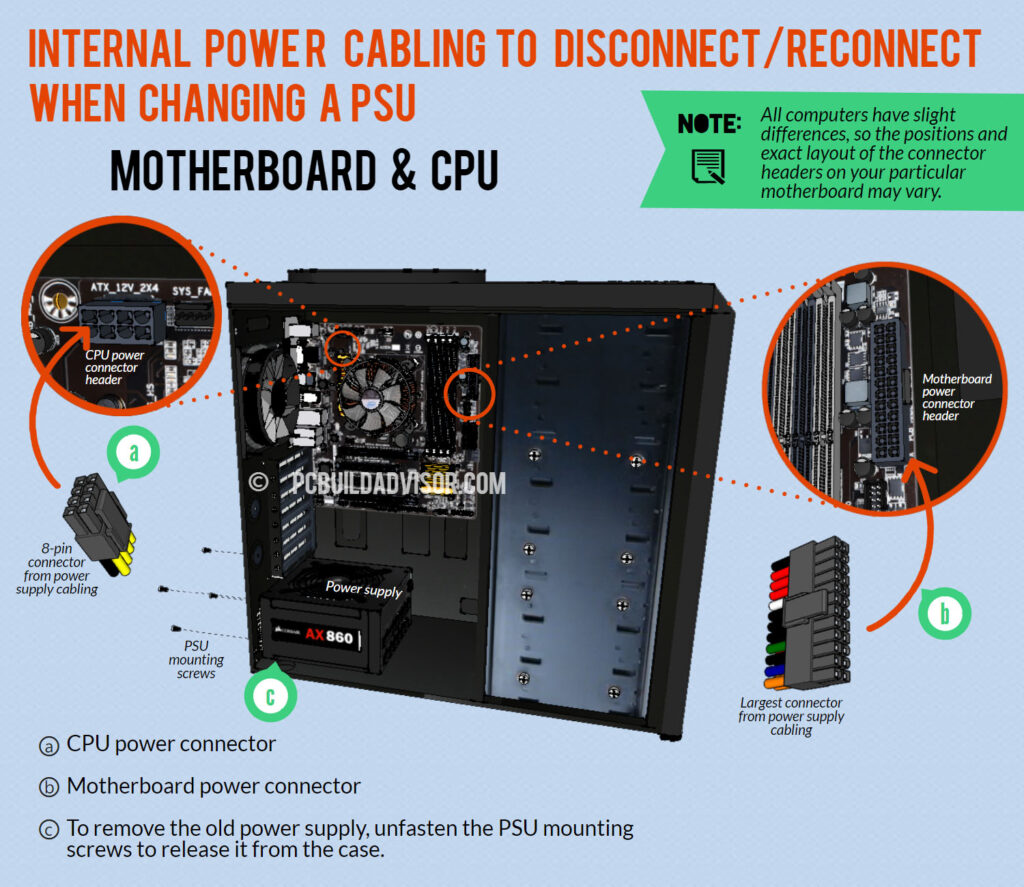
- Unplug any hardware connectors that are attached to the power supply wiring. Pull each cable clear out of the case as you unplug it – this will help prevent cables snagging on things when removing the unit later and also acts as a visual check so you can check that everything is unplugged.
Checklist for disconnection:
a) Motherboard
b) CPU
c) Any Storage Drive(s) and/0r Optical Disc Drive(s)
d) Graphics card (if applicable)
e) Fans (if applicable) - The power supply is held into the computer case by mounting screws. Locate and unscrew these.
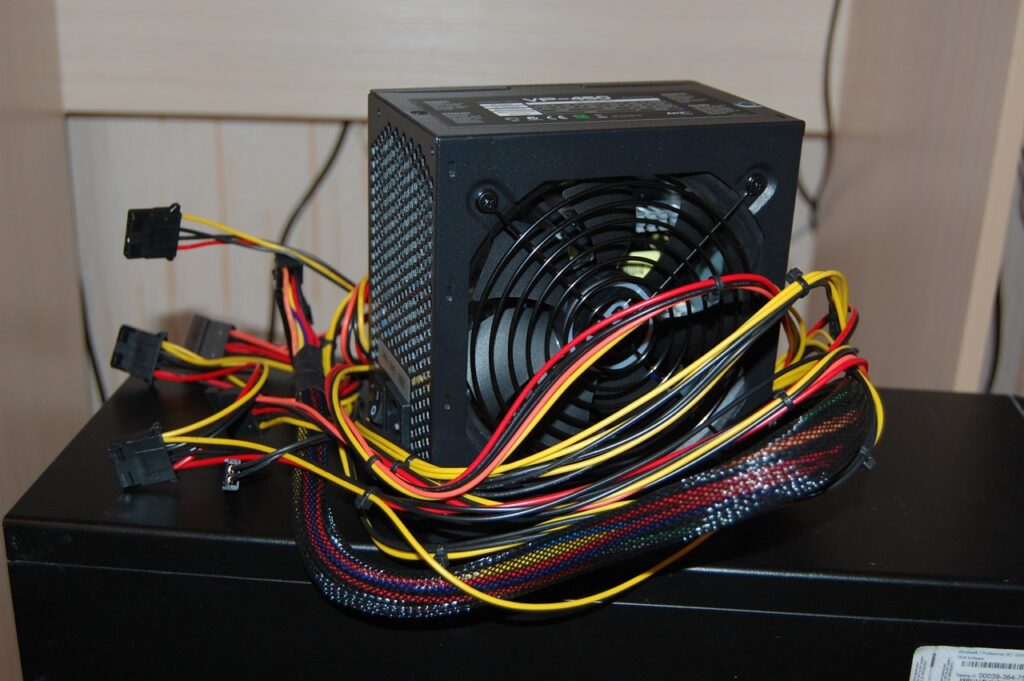
- Remove the old power supply unit and cabling.


Stage 2: Changing to the New Power Supply Unit
Installing the replacement power supply unit is basically the reverse of the steps you did to remove the old PSU. If you haven’t changed any of the hardware in your computer, simply plug the cables from the new PSU back in to each component, replicating how it was before.
If you have changed some hardware components (like a new graphics card, for example), you’ll just need to make sure that you follow the manufacturer’s instructions for supplying it with power via the appropriate header connector.
How To Install A New Power Supply
- Mount the new power supply unit into the computer case by using the case mounting screws.
- Reconnect the internal wiring from the output of the power supply unit to the hardware components inside your computer case. Be sure to refer to the notes/photos that you took in the removal stage to make sure that all the components are reconnected.
Checklist for reconnection:
a) Motherboard
b) CPU power connector
c) Hard drives, Solid state drives, Optical drives
d) Any power connections needed by your graphics card – if required (not all graphics cards models require power from the PSU)
e) Fans (if applicable)
f) Refer to your notes/photos of what was previously connected, and do a final check on all connectors to make sure they’re secure - Close up the computer case.
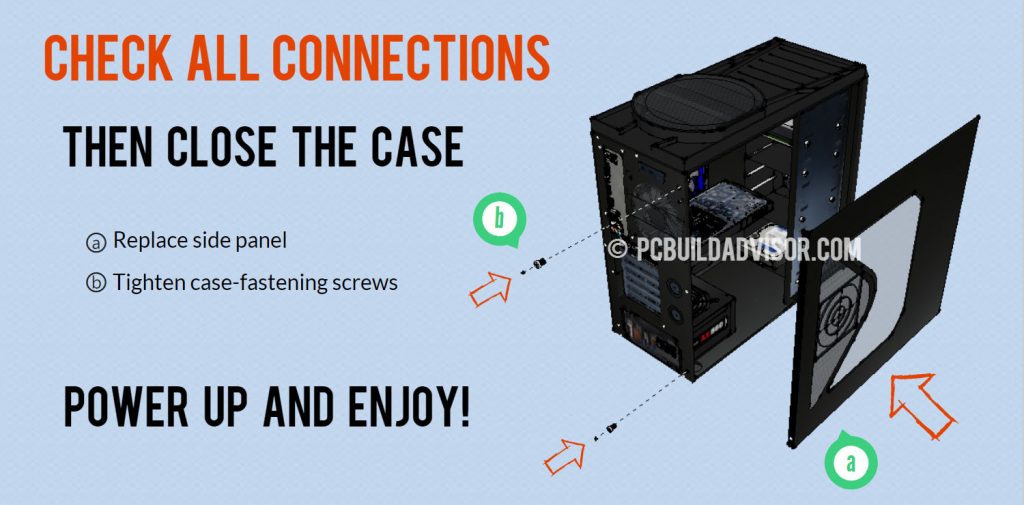
- Plug in the input cable to the power supply. (Connects the wall socket to the power supply). If your new PSU has a power switch, don’t forget to flick it to the on position.
- Power up the computer and test.

Reasons To Change a Power Supply Unit
There are only really two main reasons why you would need to replace the power supply unit in your computer, and if neither of these concerns you then the good news is that you can probably leave it alone.
- Reason 1: The PSU is dead (won’t power on) or faulty
- Reason 2: The PSU is not fit for purpose
What do we mean by ‘not fit for purpose’?
Basically, this means that the power supply won’t reliably do what its intended to do – power your computer components safely and reliably.
PSUs that are not fit for purpose generally fall into two categories:
- The rated power output capacity of the PSU is too low
Usually, this can happen if you are upgrading components in your computer that require more power. The rated power output of a PSU is measured in Watts, and must be high enough to supply all the components within your computer.
A classic example of when the power output of your PSU may suddenly become too low is if you are upgrading other components in your computer. For example, installing a new graphics card that requires more power consumption can in many cases trigger the need to replace the existing power supply to a unit with a higher output capacity. - The PSU is a cheap brand or of low quality
The power supply might be cheap and you don’t trust it. Unfortunately this can be the case with many pre-built computers, as cutting the budget spending on the PSU is very common. We recommend doing a little bit of research online on your particular brand/model of power supply to make sure it doesn’t have a reputation for blowing up or failing.
How Do I Know What Size Power Supply I Should Have?
Power supply ‘size’ can mean two things, but usually refers to the output capacity of the unit (measured in Watts).
Output Capacity
The output capacity of your computer’s power supply needs to be high enough to supply enough power to all of the components inside your computer case at the same time.
Prebuilt Computers
If you have a prebuilt computer, the designers would have calculated the maximum power requirements at any one time, and sized the PSU according to that – so you shouldn’t need to worry about the size of the PSU in your computer in this case.
One thing you may have to worry about with prebuilt computers though, is the quality of the power supply. If it is a cheap/no-name brand, it may cause issues.
DIY Computer Builds
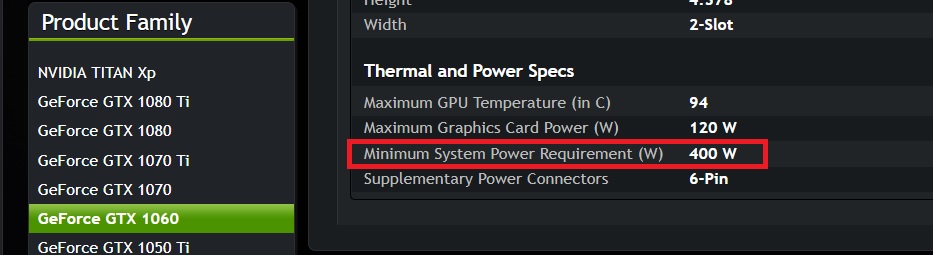
If you are building your own computer, then you need to work out the maximum power draw on your own in order to size your PSU. You can use calculators like this one to help you figure it out.
Usually, the largest power-sucking component is your graphics card if you have a dedicated one. Many graphics card manufacturers have a ‘minimum total system power’ recommendation in their graphics card specifications that can be used as a guideline to the total power supply size you’ll need if you want to build a computer with this graphics card.
Form Factor
However, be aware that ‘Size’ can also refer to the physical size dimensions of the power supply unit (this can also be referred to as ‘form factor’, which is the shape and general physical layout of a component). Not all power supply units are the same physical size, so you’ll definitely want to be aware of this before trying to swap out one unit for another – as the worst thing that can happen is to find out that the new one won’t physically fit where you want it to!
Why You Should Care About What Power Supply Unit Is In Your Computer
Remember that the power supply unit is responsible for supplying power to every hardware component that makes up your computer system.
When it comes to power, there’s such a thing as quality too – when we talk about power quality, it means that the power being supplied is clean, constant, and within the expected operating limits.
If you have a low-quality power supply, it may not supply a good quality power to the hardware components in your computer – which can cause performance issues, or at the extreme end of the scale, even damage or reduce the lifespan of your hardware.
Unfortunately, many manufacturers of prebuilt computers tend to spend a lot of their budget on fitting in high spec’d items like a processor and graphics card – but then skimping on the power supply. The end result can be disastrous, just google something like ‘power supply blew up’ to get an idea of what can happen…
Caution: Output Ratings Can Sometimes Be Misleading
Cheaper brands can even tend to exaggerate their PSU’s output capacity rating (example: We’ve seen units to be a 300W power supply, but if you take a closer look, the rating is a 300W peak rating and the continuous rating may be less than this).
If you’re planning on installing a new graphics card and still using your existing power supply unit, make sure to check the output rating first. Be especially careful to check for any trick ratings on no-name brand PSUs if you are pushing the upper limits of your existing rated power supply unit. (It’s usually safer to oversize your PSU, just to be sure!).
It’s really important to make sure your power supply is decent in order to protect your other hardware components and ensure they have a long life.
80 Plus Certification
One certification to look out for is the 80+ certification, which means that the power supply is at least efficient and has less than 20% losses. While this is not specifically related to overall quality of a PSU, the fact that the PSU you’re considering buying has a certification of some sort is an indication that the manufacturers have considered quality at some level.
What Brands To Use
One of our favorite recommended brands of power supplies is EVGA because we like their warranty (on some of their products its up to 10 years!), but there are plenty of reputable brands out there.
Top-of-the-line/premium brands are ones like Seasonic and Superflower.
If you’re looking for something a little more budget-friendly, then brands like SilverStone, Cooler Master, Corsair, Thermaltake and EVGA are all decent as well. Again – don’t forget to look for the 80 Plus ratings!
Deending on the brand and Watt rating, prices can vary.
Summary
Changing the power supply unit in your computer is a relatively easy task that anyone can do – just follow the steps outlined in this post.
You only need to replace your computer’s PSU if it is faulty or damaged, or if it’s not fit for purpose (either a cheap/unreputable brand, or no longer large enough for your needs). If you’re upgrading other components within your computer – particularly graphics cards – this can trigger the need to replace your existing power supply unit for a larger one.
Output capacity of a PSU is measured in Watts and should be calculated based on your other computer hardware – you can use online calculators or manufacturer’s specifications to help you find the required PSU size that you need.
Make sure to stay safe when switching out hardware components in your PC, by turning off mains power before you access any internal parts of your computer.
Have you replaced the PSU in your computer before and did you find it easy enough? Do you have any other questions about how to swap out the power supply in your computer? Let us know in the comments below!