To install RAM in a laptop, confirm the laptop has upgradeable memory (SO-DIMM slots or a LPCAMM2 socket), buy compatible RAM matching your laptop’s DDR generation and maximum speed, power off and unplug the laptop completely, open the bottom panel, remove the old module, insert the new one until it clicks or is screwed into place, reassemble, and verify the new RAM is recognized in Task Manager or System Information. The process takes 10 to 20 minutes and is one of the most impactful and affordable upgrades you can make to an aging laptop.
If your laptop has been slowing down, freezing during multitasking, or maxing out memory usage in Task Manager, adding more RAM is almost always the fastest and most affordable fix available. A RAM upgrade typically costs $25 to $80 for SO-DIMM modules, takes under 20 minutes to install, and can make a laptop that felt sluggish and ready to replace feel genuinely responsive again.
Step Zero: Is Your Laptop’s RAM Actually Upgradeable?
This is the most important section in the entire guide. Skipping it and buying RAM before checking is the most common and most expensive mistake people make.
The Three Memory Situations You Will Encounter in 2026:
In 2026, laptop memory comes in three distinct physical forms, and knowing which one you have determines everything about the upgrade path available to you.
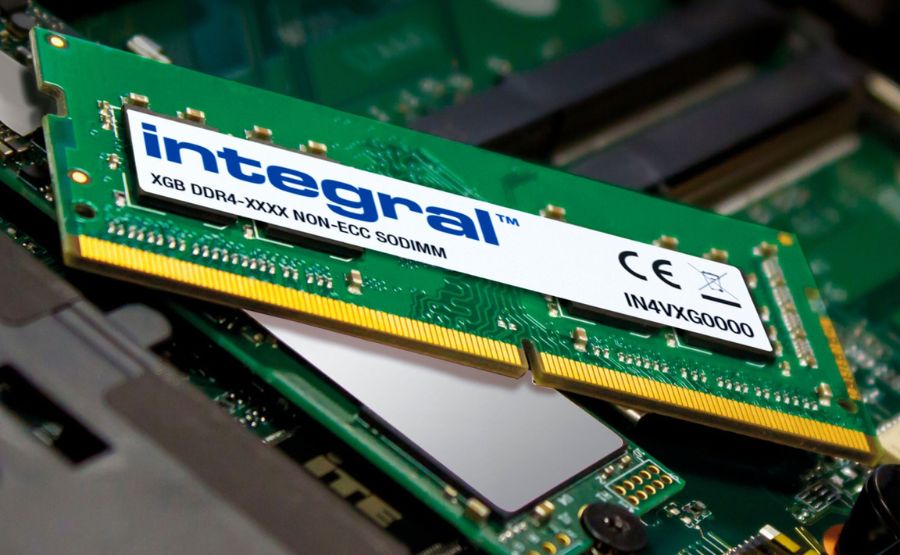
1. SO-DIMM (Small Outline Dual Inline Memory Module)
The traditional removable RAM format that has been standard in upgradeable laptops for decades. SO-DIMM sticks sit in dedicated slots at an angle, secured by two small metal retaining clips on each side. If your laptop uses SO-DIMM slots, the upgrade process is well-established and straightforward.
2. Soldered RAM (Non-Upgradeable)
Memory chips permanently fused to the motherboard during manufacturing. They cannot be removed, replaced, or supplemented under any circumstances. This is common in thin and light laptops, all Apple Silicon MacBooks, and budget entry-level machines. If you open the back panel and see small flat memory chips soldered directly onto the motherboard surface with no slots or clips anywhere nearby, the RAM cannot be upgraded.
3. LPCAMM2 (The New Standard in Premium Windows Laptops)
This is the biggest change in laptop memory in the past 25 years, and most guides have not caught up to it yet. LPCAMM2 (Low Power Compression Attached Memory Module 2) is a new memory format that first appeared in premium laptops in 2023 and has become the standard module type in high-end thin Windows laptops and mobile workstations by 2025 and 2026. It solves a longstanding problem: LPDDR5x memory, which offers significantly better power efficiency and performance than standard DDR5, was previously only available as soldered memory. LPCAMM2 packages LPDDR5x into a flat, removable rectangular board that screws directly into the motherboard using three or four small screws rather than clipping into a slot.
If you open a modern premium Windows laptop such as a Dell Precision 13, a Lenovo ThinkPad X1 Carbon (2025 or 2026 model), or similar mobile workstations, and you see a flat rectangular module board screwed down with small screws rather than SO-DIMM sticks sitting in angled clips, that flat board is your RAM, and it is fully upgradeable. You remove it by unscrewing those screws, lifting it straight off its connector, and replacing it with a compatible LPCAMM2 module of higher capacity or speed. LPCAMM2 modules are currently available in 16GB, 32GB, and 64GB configurations, with 128GB modules on the horizon.
Key advantages of LPCAMM2 over SO-DIMM:
- Uses LPDDR5x memory (up to 68.3 GB/s bandwidth versus DDR5 SO-DIMM’s 64 GB/s)
- Lower power consumption than standard DDR5, extending battery life
- Single module replaces a dual-slot SO-DIMM setup, saving physical space
- Upgradeable despite using low-power LPDDR5x (previously only possible as soldered)
- Faster installation: three or four screws versus the clip mechanism of SO-DIMM
The practical implication for buyers: If you own or are buying a Dell Precision, Lenovo ThinkPad, HP ZBook, or similar premium 2025 to 2026 laptop, check whether it uses LPCAMM2 before assuming you need SO-DIMM modules. The upgrade procedure is slightly different but equally accessible.
Laptops Commonly Known to Have Soldered RAM (Cannot Be Upgraded):
- All Apple MacBooks with Apple Silicon (M1, M2, M3, M4, M5)
- Microsoft Surface laptops (most models)
- Many HP Spectre and Envy x360 thin models
- Dell XPS 13 (most configurations)
- Most ultrabooks with fanless or extremely thin chassis
Laptops Commonly Known to Have Upgradeable RAM (SO-DIMM or LPCAMM2):
- Most gaming laptops (ASUS ROG, Lenovo Legion, MSI, Razer Blade 15 and 16) — SO-DIMM
- Most Lenovo ThinkPad business laptops — SO-DIMM or LPCAMM2 depending on model year
- Dell Precision mobile workstations (2024 and later) — LPCAMM2
- HP EliteBook and ProBook series — SO-DIMM
- Dell Latitude and Precision workstation laptops — SO-DIMM or LPCAMM2
- Most mid-range and budget Windows laptops with removable back panels — SO-DIMM
How to Check If Your RAM Is Upgradeable (And What Type It Is)
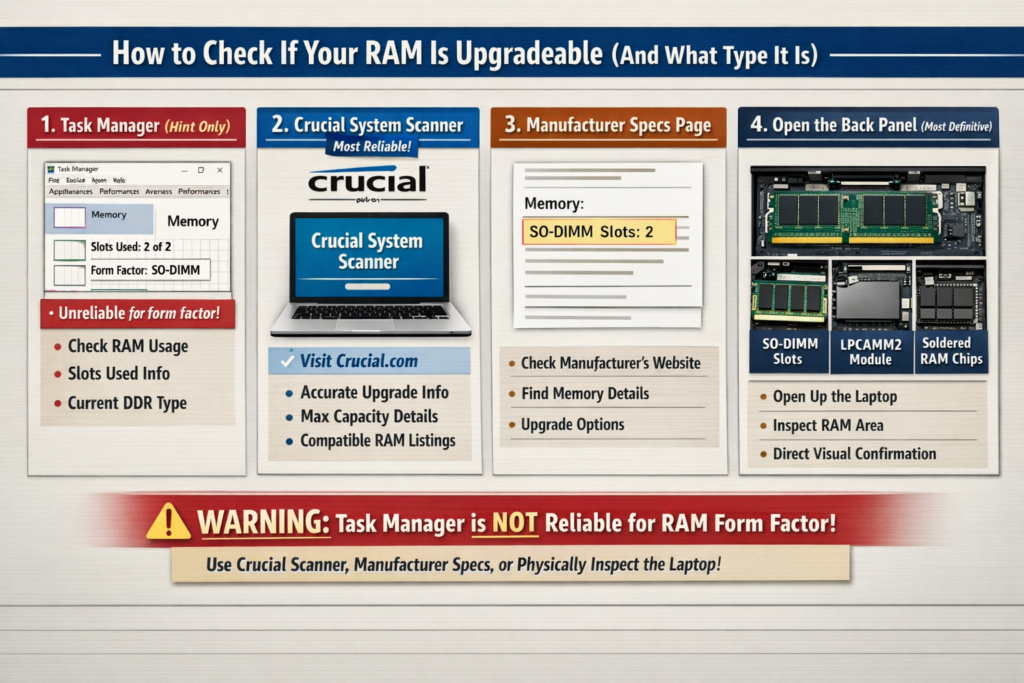
Method 1: Task Manager — Use as a Hint Only, Not Proof
Press Ctrl + Shift + Esc to open Task Manager. Click the Performance tab, then click Memory in the left panel. The bottom right area may show a form factor such as SO-DIMM or Row of chips.
Critical Warning: Task Manager is notoriously unreliable at reporting laptop memory form factors. Windows simply reads the SMBIOS data that the laptop manufacturer has programmed into the BIOS, and many manufacturers hardcode “SO-DIMM” into their firmware profiles even on machines where the RAM is permanently soldered to the board. Relying on Task Manager alone has caused countless users to purchase RAM for laptops that cannot accept it. Task Manager’s memory form factor field should be treated as a rough hint only. Never make a purchasing decision based on it alone. The only fully reliable methods are the Crucial System Scanner or physically opening the back panel and looking.
What Task Manager is reliably useful for: checking current RAM usage, seeing how many slots are in use (Slots used field), confirming the current RAM speed, and determining the DDR generation currently installed. Use it for those purposes and verify upgradeability through the methods below.
Method 2: Crucial System Scanner (Most Reliable, Easiest)
Go to Crucial.com and use the free System Scanner tool or the Compatibility Checker. Enter your laptop’s exact model number and Crucial’s database will tell you definitively whether the RAM is upgradeable, what type it uses (SO-DIMM, LPCAMM2, or soldered), what the maximum supported capacity is, and which specific modules are compatible. This is the single most reliable method for most users and takes under 2 minutes.
Method 3: Manufacturer Specifications Page
Search your laptop’s exact model number on the manufacturer’s support site. Find the specifications sheet and look at the Memory section. If it says “soldered,” “onboard,” or “integrated,” the RAM cannot be upgraded. If it lists “SO-DIMM slots: 2,” “1x SO-DIMM,” or “1x LPCAMM2 slot,” the memory is removable and upgradeable. This is the second most reliable method and works for both SO-DIMM and LPCAMM2 laptops.
Method 4: Physically Open the Back Panel (Most Definitive)
With the laptop powered off, remove the bottom panel and look directly at the memory area. This is the definitive check. You will see one of three things:
- SO-DIMM slots with sticks installed: Rectangular modules sitting at a slight angle in slots, with small metal clips on each side. RAM is removable and upgradeable.
- Flat rectangular board screwed down: A flat module attached to the motherboard with three or four screws and a connector underneath. This is LPCAMM2, and it is removable and upgradeable.
- Flat chips soldered directly onto the motherboard: Small chips integrated directly onto the board surface with no slots, clips, or screws anywhere near them. RAM is soldered and cannot be upgraded.
Signs You Need More RAM
If you are not sure whether a RAM upgrade is what you actually need, look for these specific indicators before spending any money.
Check Task Manager Memory Usage (Windows):
Press Ctrl + Shift + Esc, click Performance, then Memory. If your RAM usage consistently sits above 80% during normal daily use (browsing, email, documents), you will benefit noticeably from more RAM. If usage regularly hits 90 to 100%, RAM is almost certainly the primary bottleneck causing your slowdowns.
Behavioral Signs That Point to Low RAM:
- Laptop slows down noticeably when more than 5 to 7 browser tabs are open
- Applications take unusually long to load or switch to
- Frequent freezing during multitasking or when switching between programs
- Disk usage spikes to 100% in Task Manager even when you are not saving or loading large files (this happens because Windows uses the SSD as virtual memory when RAM runs out)
- Fan noise increases suddenly during light tasks as the system strains to compensate
- Programs crash or show out-of-memory errors
- General performance degrades over the course of a session as more applications accumulate in memory
How Much RAM Do You Actually Need in 2026?
PCMag’s 2026 RAM analysis places 16GB as the current recommended minimum for mainstream users, with 8GB being an acceptable baseline only for very light use. ZDNet’s 2026 RAM guide recommends 32GB for gamers, creative professionals, and anyone running local AI workloads.
| Use Case | Recommended RAM (2026) |
|---|---|
| Basic browsing, email, documents only | 8GB minimum, 16GB preferred |
| General everyday use with multitasking | 16GB (current sweet spot) |
| Light photo editing, Zoom calls, coding | 16GB |
| Gaming (mainstream) | 16GB minimum, 32GB preferred |
| Video editing, graphic design | 32GB |
| Virtualization, local AI models, 8K editing | 48GB to 64GB |
| Professional workstation tasks | 64GB or more |
Understanding RAM Types: What to Buy
Buying the wrong RAM type is the second most common mistake after skipping the upgradeability check. DDR4, DDR5, and LPCAMM2 are not interchangeable in any combination. The physical connectors are entirely different, the voltages differ, and there are no adapters or workarounds. You must match exactly what your laptop’s motherboard supports.
The Three Memory Standards You Will Encounter in 2026:
DDR4 SO-DIMM: Found in laptops made roughly between 2017 and 2022. Well-established, widely available, and very affordable in 2026 due to market maturity.
DDR5 SO-DIMM: The current mainstream standard in upgradeable Windows laptops from 2022 onward. Higher bandwidth, lower voltage, and higher capacity per module than DDR4.
LPCAMM2 (LPDDR5x): The emerging premium standard in high-end thin Windows laptops and mobile workstations from 2024 onward. Uses LPDDR5x memory in a removable flat module. Offers the best power efficiency of any laptop memory format and higher bandwidth than standard DDR5 SO-DIMM. Modules are currently more expensive and less widely available than SO-DIMM options, but the market is growing rapidly.
According to the DDR4 vs DDR5 comparison published in early 2026, DDR5 offers significantly higher bandwidth and higher maximum capacity per module than DDR4. LPCAMM2 pushes performance and efficiency further still for the premium segment.
| Specification | DDR4 SO-DIMM | DDR5 SO-DIMM | LPCAMM2 (LPDDR5x) |
|---|---|---|---|
| Typical Speed | 2133 to 3200 MT/s | 4800 to 8000+ MT/s | 7500 to 9600+ MT/s |
| Max Bandwidth | 25.6 GB/s | 64 GB/s | 68.3 GB/s |
| Voltage | 1.2V | 1.1V | 0.9V |
| Max Capacity per Module | 64GB | 128GB | 128GB (growing) |
| Physical Format | 260-pin angled slot | 262-pin angled slot | Flat screwed module |
| Interchangeable? | No | No | No |
| Common In | Laptops 2017 to 2022 | Laptops 2022 to present | Premium laptops 2024 to present |
How to Find Out Which Type Your Laptop Needs:
- Use the Crucial Compatibility Checker with your exact laptop model number (most reliable)
- Check your laptop’s specification sheet on the manufacturer’s support site
- Use CPU-Z (free utility) which displays full memory specifications accurately
- Physically open the back panel and identify the memory format by its physical appearance
Understanding RAM Speed Ratings:
RAM speed is rated in MHz or MT/s (megatransfers per second). Common DDR4 speeds for laptops are 2400, 2666, and 3200 MHz. Common DDR5 speeds start at 4800 MT/s and go up. If you install RAM rated faster than your laptop’s maximum supported speed, it will work but will automatically downclock to the maximum your system supports. There is no damage from this, but you gain no benefit from paying for higher speed than your system can use. Check your laptop’s maximum supported RAM speed before buying.
Dual-Channel Memory: Why Two Sticks Are Better Than One:
If your laptop has two SO-DIMM slots and you currently have one stick installed, upgrading to two matched sticks (same brand, same speed, same capacity per stick) enables dual-channel mode. Running in dual-channel is like doubling the bandwidth between the CPU and RAM. Research consistently shows that dual-channel configuration improves performance by 20 to 30% in real-world tasks and can double frame rates in games compared to a single-channel setup with the same total RAM capacity. Note that LPCAMM2 laptops use a single module that provides full bandwidth without requiring two slots, as dual-channel is handled internally within the module itself.
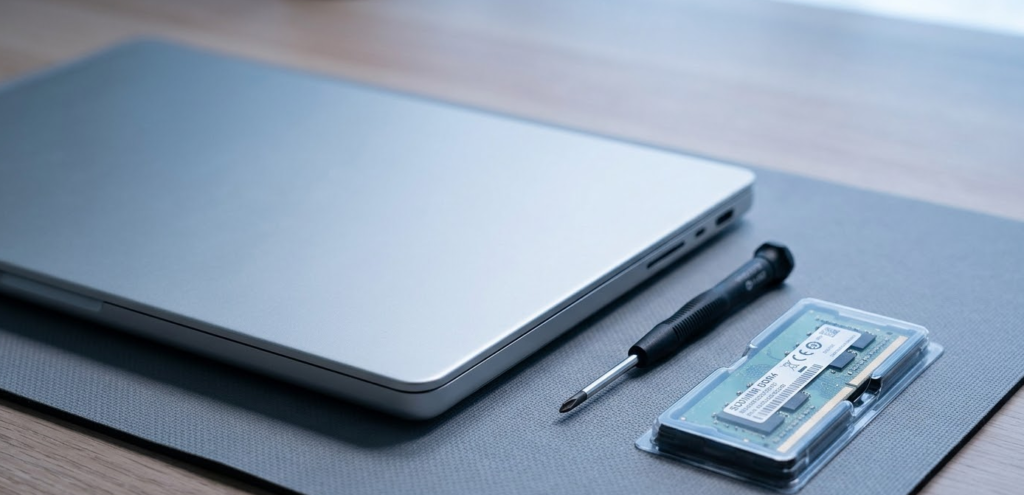
What You Need Before You Start
Tools:
- Phillips head screwdriver (size 0 or 1, depending on your laptop model)
- Nylon pry tool or old plastic card for panel removal
- Anti-static wrist strap (recommended, especially on carpeted floors or in dry climates)
- A small container or magnetic mat to hold screws
- Good lighting
What to Buy:
- Compatible memory module matching your laptop’s exact memory standard (SO-DIMM DDR4, SO-DIMM DDR5, or LPCAMM2) and speed
- Two matched SO-DIMM sticks of the same size and speed if upgrading to dual-channel on a two-slot SO-DIMM laptop
What Not to Touch:
- Do not touch the gold connector edge at the bottom of any RAM module
- Do not touch capacitors or chips on the motherboard
- Do not force any connectors or screws
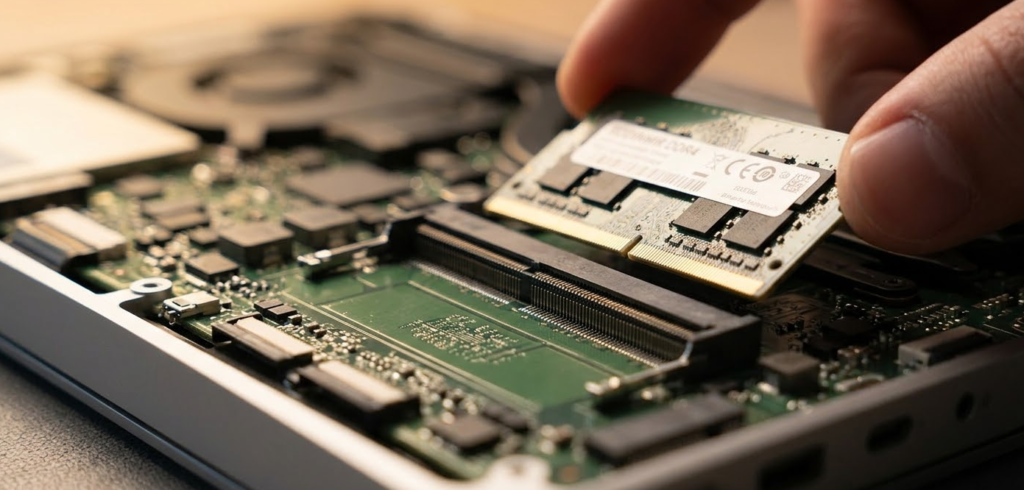
Part A: Step-by-Step Installation for SO-DIMM Laptops
Step 1: Buy the Correct RAM
Before anything else, confirm the exact RAM type, speed, and maximum capacity your laptop supports using the Crucial System Scanner or your laptop’s specification sheet. Purchase SO-DIMM modules that match your DDR generation. For dual-channel performance, buy two identical sticks rather than one larger stick.
Step 2: Back Up Your Data
While installing RAM is a non-destructive process that does not affect stored data, it is good practice to ensure your data is backed up before opening any laptop. If something goes wrong during reassembly, you want your files protected.
Step 3: Completely Power Down the Laptop
Shut down the laptop fully through the operating system. Do not simply close the lid or put it to sleep. After shutdown, hold the power button for 5 seconds to drain any residual electrical charge from the board. Unplug the power adapter and all USB devices. If your laptop has a removable external battery, remove it now.
Step 4: Ground Yourself Against Static
Put on an anti-static wrist strap connected to a grounded metal object, or touch a grounded metal surface (like a door hinge or radiator) before touching any internal components. Static discharge from your hands is invisible but can silently damage RAM modules or motherboard components. This is especially important on dry days, in carpeted rooms, or if you have been walking around before sitting down.
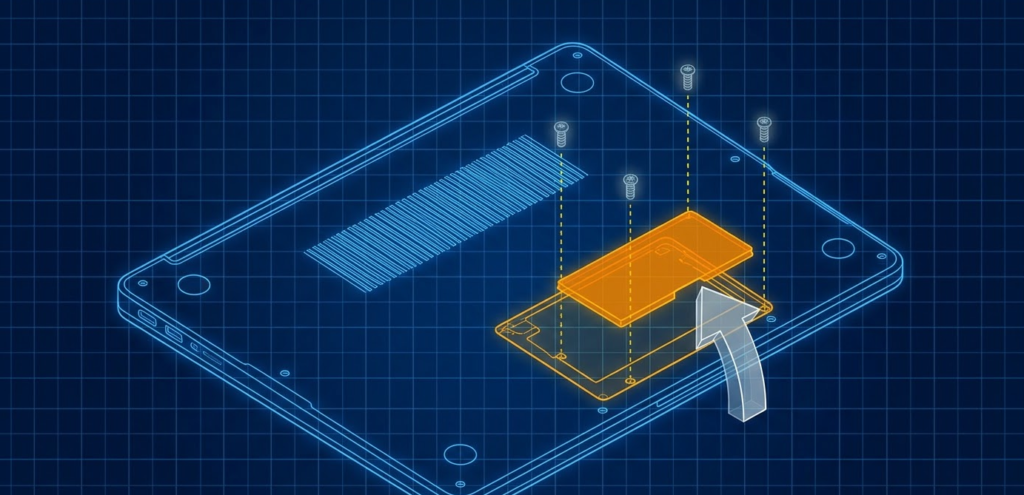
Step 5: Remove the Bottom Panel
Flip the laptop upside down on a clean, flat, well-lit surface. Locate and remove all screws on the bottom panel. Keep the screws organized in a small container or on a magnetic mat. Note that some laptops have screws hidden under rubber feet or warranty stickers. If a panel area feels stuck after all visible screws are removed, look carefully for a hidden screw before applying pry force.
Once all screws are out, use a nylon pry tool or old plastic card to gently work around the seam of the panel, releasing the clips one by one. Work patiently around the full perimeter. Forcing it can snap clips permanently.
Step 6: Disconnect the Battery Internally
Even with the laptop shut down, the battery maintains a live electrical connection to the motherboard. Before touching any internal component, locate the battery connector (a small cable plugged into the motherboard) and gently disconnect it. This eliminates any risk of accidental shorts during the installation. Take a photo before disconnecting so you know exactly how it reconnects.
Step 7: Locate the RAM Slots
Look for the RAM modules inside the chassis. They are thin, flat sticks sitting in angled slots, typically in the upper or center portion of the motherboard. Most laptops have one or two SO-DIMM slots. The RAM sticks may be covered by a small metal shield or thermal pad; if so, carefully lift or peel it back to access the modules.
Step 8: Remove the Existing RAM Module (If Replacing)
If you are replacing an existing module rather than adding to an empty slot, remove it first. Locate the two small metal retaining clips on each side of the RAM slot. Gently push both clips simultaneously outward, away from the RAM module. The module will spring upward to a 30-degree angle automatically. Hold it by the edges only (never by the gold connector or the chips) and slide it straight out of the slot.
Step 9: Install the New RAM Module
Pick up your new SO-DIMM module by its edges. Look at the gold connector edge at the bottom. You will notice a small notch cut into the connector, offset to one side. This notch aligns with a corresponding ridge inside the RAM slot, ensuring the module can only be inserted in one direction.
Hold the module at approximately a 30-degree angle, matching the angle of the slot. Align the notch with the ridge in the slot. Gently slide the gold connector edge fully into the slot until seated completely with no gap visible. Then press the module down firmly and evenly toward the motherboard until both retaining clips on the sides snap up and click into the notches on the module’s edges. That click confirms the module is fully and correctly seated.
If you do not hear or feel the click, the module is not fully seated. Gently press down again with even pressure on both sides. Do not force it; if it is not seating smoothly, recheck the notch alignment.
Step 10: Install the Second Module (If Adding Dual-Channel)
If installing a second module into the second slot, repeat Step 9 for the second slot. For dual-channel operation, both slots must be populated with matched modules of identical capacity and speed. Consult your laptop’s manual or the Crucial compatibility tool to confirm which slot order your specific laptop requires for dual-channel mode.
Step 11: Replace Any Thermal Pad or Metal Shield
If the RAM area was covered by a metal EMI shield or thermal pad before you opened it, carefully replace it over the installed modules.
Step 12: Reconnect the Battery Connector
Plug the internal battery connector back into its port on the motherboard exactly as it was before. Ensure it clicks fully into place.
Step 13: Replace the Bottom Panel
Align the bottom panel and press it firmly into place around the full perimeter, engaging all the clips. Reinstall all screws, working from the corners inward. Do not overtighten; snug is correct.
Step 14: Power On and Verify
Turn the laptop on. It may take slightly longer than usual to POST on the first boot after a RAM change as the system detects and configures the new memory. This is normal.
Once Windows loads, press Ctrl + Shift + Esc to open Task Manager and click the Performance tab, then Memory. Confirm that the total RAM shown matches what you installed. You can also press Windows key + R, type msinfo32, and press Enter to check total installed physical memory in the System Information window.
Step 15: Run a Memory Test (Recommended)
Press Windows key + R, type mdsched.exe, and press Enter. Select “Restart now and check for problems.” Windows will restart, run a memory diagnostic, and report any errors. A clean result confirms your installation is successful.
Part B: Step-by-Step Installation for LPCAMM2 Laptops
If you opened your back panel and found a flat rectangular board screwed down with three or four small screws rather than SO-DIMM sticks in angled slots, your laptop uses LPCAMM2 memory. The process is slightly different but equally accessible.
Step 1: Confirm Your Replacement Module
LPCAMM2 modules are not yet interchangeable across all brands. Dell’s LPCAMM2 format and Lenovo’s implementation use the same JEDEC-standardized connector, but always verify compatibility with your specific laptop model before purchasing. Use the Crucial Compatibility Checker or your manufacturer’s upgrade guide.
Step 2: Complete Steps 1 Through 6 from Part A
Power down, ground yourself, remove the back panel, and disconnect the internal battery connector exactly as described in Part A.
Step 3: Locate the LPCAMM2 Module
The LPCAMM2 module looks like a flat rectangular circuit board, slightly larger than a SO-DIMM stick, lying flat against the motherboard and secured by three or four small Phillips head screws arranged around its edges.
Step 4: Remove the Screws Securing the Module
Using a size 0 Phillips screwdriver, carefully remove all screws holding the LPCAMM2 module to the motherboard. Keep these screws separate from the back panel screws, as they are typically a different size. Place them in a clearly labeled section of your parts container.
Step 5: Lift the Module Straight Up
With all screws removed, gently lift the LPCAMM2 module straight upward from the connector. Unlike SO-DIMM, there is no angle involved. The module pulls directly up and off its connector. Handle it by the edges only and set it on a clean, non-conductive surface.
Step 6: Install the New LPCAMM2 Module
Align the new module over the connector on the motherboard, matching the orientation indicated by the notch or alignment markers on the module and the board. Lower the module straight down onto the connector, pressing evenly across the module’s surface until it is fully seated and lies flat against the motherboard.
Step 7: Reinstall the Screws
Reinstall all screws in the correct positions, tightening them in a cross pattern (opposite corners alternating) to ensure even pressure across the module. Snug is correct; do not overtighten.
Step 8: Complete Reassembly and Verification
Follow Steps 11 through 15 from Part A: replace any shields, reconnect the battery, replace the bottom panel, power on, and verify the new RAM capacity in Task Manager or System Information.
Pro Tip: If your SO-DIMM laptop has two RAM slots but currently has only one stick installed (check Task Manager’s Slots used field as a rough indicator, then confirm by opening the panel), upgrading to two matched sticks is almost always more valuable than simply doubling capacity with one larger stick. Moving from 1x8GB single-channel to 2x8GB dual-channel gives you the same 16GB total but with 20 to 30% better real-world performance and significantly better integrated graphics performance, because the iGPU shares the same memory bandwidth as the CPU. On LPCAMM2 laptops, dual-channel is handled internally within the single module itself, so this consideration does not apply.
What to Do If the Laptop Does Not Boot After Installation
If the laptop does not turn on or shows a blank screen after installing new RAM, work through these steps before assuming the RAM is defective.
Step 1: Reseat the RAM
Power off, open the back panel, and firmly reseat the RAM module. The most common cause of post-installation failure is a module that is not fully clicked into its slot (SO-DIMM) or fully seated on its connector (LPCAMM2). Remove and reinstall deliberately, listening and feeling for the click on SO-DIMM, or confirming flat even contact on LPCAMM2.
Step 2: Test One Stick at a Time (SO-DIMM Only)
If you installed two SO-DIMM sticks, remove one and try booting with only the other. Then swap. This identifies whether one specific module is causing the issue.
Step 3: Test Each Stick in Each Slot (SO-DIMM Only)
Try the working stick in the other slot. If the laptop only boots with RAM in one specific slot, the other slot may be damaged or the module may be incompatible with that slot configuration.
Step 4: Verify Compatibility
Double-check that the RAM you purchased is the correct standard for your laptop. DDR4, DDR5, and LPCAMM2 are mutually incompatible. Confirm the module is a SO-DIMM form factor and not a full-size desktop DIMM.
Step 5: Clear CMOS (If Available)
On some laptops, particularly gaming models, a CMOS reset can resolve POST failures after hardware changes. Check your laptop’s manual for the CMOS reset procedure, as it varies by model.
Step 6: Contact the Seller
If none of the above resolves the issue and the RAM is confirmed correct for your laptop, the module itself may be defective. Contact the seller or manufacturer for a replacement. Crucial, Kingston, and Corsair all offer warranties on their memory products.
Recommended RAM Brands and Modules for 2026
For DDR5 SO-DIMM Laptops:
| Module | Speed | Capacity Options | Notes |
|---|---|---|---|
| Crucial Pro DDR5-5600 SO-DIMM | 5600 MT/s | 16GB, 32GB, 64GB | Best overall value, widely compatible |
| Kingston FURY Impact DDR5 | 4800 to 6400 MT/s | 16GB, 32GB | Excellent performance, competitive price |
| Corsair Vengeance DDR5 SO-DIMM | 4800 MT/s | 16GB, 32GB | Reliable, widely available, lifetime warranty |
| G.Skill Ripjaws DDR5 SO-DIMM | 4800 MT/s | 16GB, 32GB | Performance-focused option |
For DDR4 SO-DIMM Laptops:
| Module | Speed | Capacity Options | Notes |
|---|---|---|---|
| Crucial 16GB DDR4-3200 SO-DIMM | 3200 MHz | 8GB, 16GB, 32GB | Best value, highly compatible |
| Kingston ValueRAM DDR4-3200 | 3200 MHz | 8GB, 16GB, 32GB | Budget-friendly, reliable |
| Corsair Vengeance DDR4-2666 | 2666 MHz | 8GB, 16GB | Widely supported in older platforms |
| G.Skill Ripjaws DDR4-3200 | 3200 MHz | 8GB, 16GB, 32GB | Performance-oriented, good for gaming laptops |
For LPCAMM2 Laptops:
The LPCAMM2 market is still maturing in 2026 and module availability is more limited than SO-DIMM. Crucial and Kingston both offer LPCAMM2 modules for supported platforms. Always use your manufacturer’s official compatibility list or the Crucial Compatibility Checker to confirm the exact module required for your specific laptop model before purchasing, as cross-brand compatibility varies.
Common Mistakes to Avoid
- Buying RAM before confirming your laptop’s RAM is removable and not soldered
- Relying on Task Manager’s form factor field as proof of upgradeability, rather than using the Crucial Scanner or physically checking
- Buying the wrong memory standard (DDR4 vs DDR5 vs LPCAMM2)
- Buying full-size desktop DIMMs instead of SO-DIMM laptop modules
- Touching the gold connector edge of the RAM module
- Not fully seating a SO-DIMM module until both clips click
- Not screwing down an LPCAMM2 module evenly using a cross-pattern tightening sequence
- Skipping the internal battery disconnect before touching components
- Overtightening screws during reassembly
- Not grounding yourself against static before handling components
- Installing one high-capacity SO-DIMM stick when two matched smaller sticks would enable dual-channel
- Buying RAM rated faster than the laptop’s maximum supported speed
Frequently Asked Questions
How do I know if my laptop RAM is upgradeable?
The most reliable methods are the Crucial System Scanner at crucial.com (enter your exact model number) or physically opening the back panel and looking. Task Manager can suggest a form factor but is unreliable because many manufacturers hardcode incorrect form factor data into their BIOS. Never make a purchase based on Task Manager alone. If the Crucial tool confirms upgradeability, you can proceed confidently.
What is LPCAMM2 and does my laptop have it?
LPCAMM2 is a new removable memory module format used in premium thin Windows laptops and mobile workstations from 2024 onward. Unlike SO-DIMM, it is a flat board that screws onto the motherboard rather than clipping into an angled slot. If you open your laptop’s back panel and see a flat rectangular board held down with small screws where the RAM should be, that is LPCAMM2. It is upgradeable by unscrewing, removing, and replacing the module with a compatible LPCAMM2 unit.
What type of RAM does my laptop use?
Use the Crucial Compatibility Checker at crucial.com with your laptop’s model number for the definitive answer. CPU-Z (free utility) also reports memory type accurately. Your laptop’s official specifications page lists the memory type as well. Task Manager shows memory type but its form factor information is sometimes inaccurate on laptops.
Can I mix different RAM sticks in my laptop?
Technically yes, but it is not recommended. Mixing different speeds, capacities, or brands can cause instability, prevent dual-channel mode from activating, or force both sticks to run at the slower speed. For best results, use two identical matched sticks from the same kit.
Does adding RAM void my laptop’s warranty?
In most cases, no. Many manufacturers explicitly permit user RAM upgrades as authorized maintenance. In the United States, the Magnuson-Moss Warranty Act prevents a manufacturer from voiding your warranty simply because you opened the back panel for a memory upgrade. However, Apple and Microsoft Surface are notable exceptions where opening the device can affect warranty terms. Check your specific manufacturer’s documentation before proceeding if your laptop is under warranty.
How much RAM do I need in 2026?
For everyday use including browsing, email, and documents, 16GB is the current recommended standard. 8GB is an acceptable minimum for very light tasks only. Gaming and creative work benefit significantly from 32GB. Virtualization, local AI models, and professional rendering workflows may require 48GB to 64GB or more.
Can I upgrade RAM on a MacBook?
No. All MacBooks using Apple Silicon (M1, M2, M3, M4, and M5 chips) have unified memory that is soldered directly to the chip package and physically cannot be removed, replaced, or supplemented. The RAM capacity you choose at purchase is permanent. This is one of the most important buying considerations for MacBook users.
What is dual-channel RAM and does it matter?
Dual-channel mode activates when two matched SO-DIMM sticks are installed in both slots. It effectively doubles the memory bandwidth available to the CPU, improving real-world multitasking performance by 20 to 30% and significantly boosting integrated graphics performance. LPCAMM2 modules provide full dual-channel bandwidth from a single module internally, so this consideration only applies to SO-DIMM laptops with two slots.
Will adding RAM make my laptop faster?
It depends on whether RAM is the current bottleneck. If your RAM usage regularly exceeds 80 to 90% during normal use, adding more RAM will produce a very noticeable improvement. If RAM usage sits comfortably below 60%, adding more will produce little improvement and a different upgrade such as an SSD would be more impactful.
What happens if RAM is not fully seated?
The laptop will fail to boot, show a black screen, or emit beep codes on startup. For SO-DIMM, open the panel, remove the module, and firmly reinsert it until both retaining clips click into place. For LPCAMM2, confirm the module is lying completely flat on its connector and all screws are tightened evenly. Incomplete seating is the most common cause of post-installation boot failures.
Bottom Line
Installing RAM in a laptop is one of the most accessible hardware upgrades available, takes under 20 minutes, and consistently delivers one of the best performance improvements per dollar of any upgrade you can make. In 2026 the process encompasses three possible memory scenarios: traditional SO-DIMM slots, the new LPCAMM2 flat module format in premium Windows laptops, and permanently soldered memory that cannot be upgraded at all. The most important step in the entire process is confirming which situation your laptop falls into before spending a single dollar, and doing so through the Crucial System Scanner or physical inspection rather than Task Manager, which cannot be trusted to accurately report laptop memory form factors.
This step-by-step laptop RAM and SSD upgrade guide on YouTube provides an excellent visual companion to the written instructions above for anyone who wants to see the process demonstrated on a real laptop before opening their own. If your laptop has available SO-DIMM slots or an LPCAMM2 socket and RAM usage is consistently high, this upgrade is almost always worth doing.