Welcome to the first edition of PC Build Advisor’s How To guides.
Today, we’ll be covering how to install a SATA hard drive. This is an easy task that anyone can do, with a little know-how.
Overview: How To Install A SATA Hard Drive
This guide will teach you how to:
Install a new SATA hard drive in your desktop computer
We’ll be talking about desktop computers from here on in, not laptops (as most laptops don’t really have the space to fit a second or additional hard drive).
After you finish your installation, you’ll need to configure your hard drive. We’ll cover how to do that in a separate guide.
Who Will Benefit From This Guide
If you are looking to install an additional SATA hard drive, this guide will teach you all you need to know.
If you want to find out more about how to install a new hard drive (as in, replace your current hard drive), you can still use this guide, however you’ll need to first remove your existing hard drive before installing the new one. Simply unplug it and then use the same cables to plug in your new hard drive.
Tools You Will Need
You’ll need to open up your computer case to install your new SATA hard drive, so you may require the following tools:
- Small phillips head screwdriver
A #1 or #2 sized screwdriver like this one is all you need for most computer building activities. The magnetic tip is a huge help for holding screws while you work.

Optional extras are:
- Anti-static wrist strap

Job Preparation
When working with computers, always consider safety first. Turn off and unplug your computer before opening the case. Also, take a print out of these instructions or have a separate device (phone or laptop) to view them on for easy reference while you are working.
You may need to confirm that you have enough space inside your computer tower to physically mount the new hard drive. (You don’t need to do this if you are replacing your existing hard drive)
You should also check to see if you have an available SATA port on your motherboard where you can plug in the new hard drive.
You can do this by either a visual check by turning off your computer and opening up the case to have a look, or if you know what model motherboard you have, you may be able to look up it’s specifications to see how many SATA ports it has. Keep in mind that some pf the SATA ports may already be in use by existing hardware, like your existing main hard drive, and your optical (DVD/CD) drive. Ensure you have a spare port to connect your new hard drive into. (Again, you can skip this check if you are simply replacing your existing hard drive)
Installing a New Hard Drive
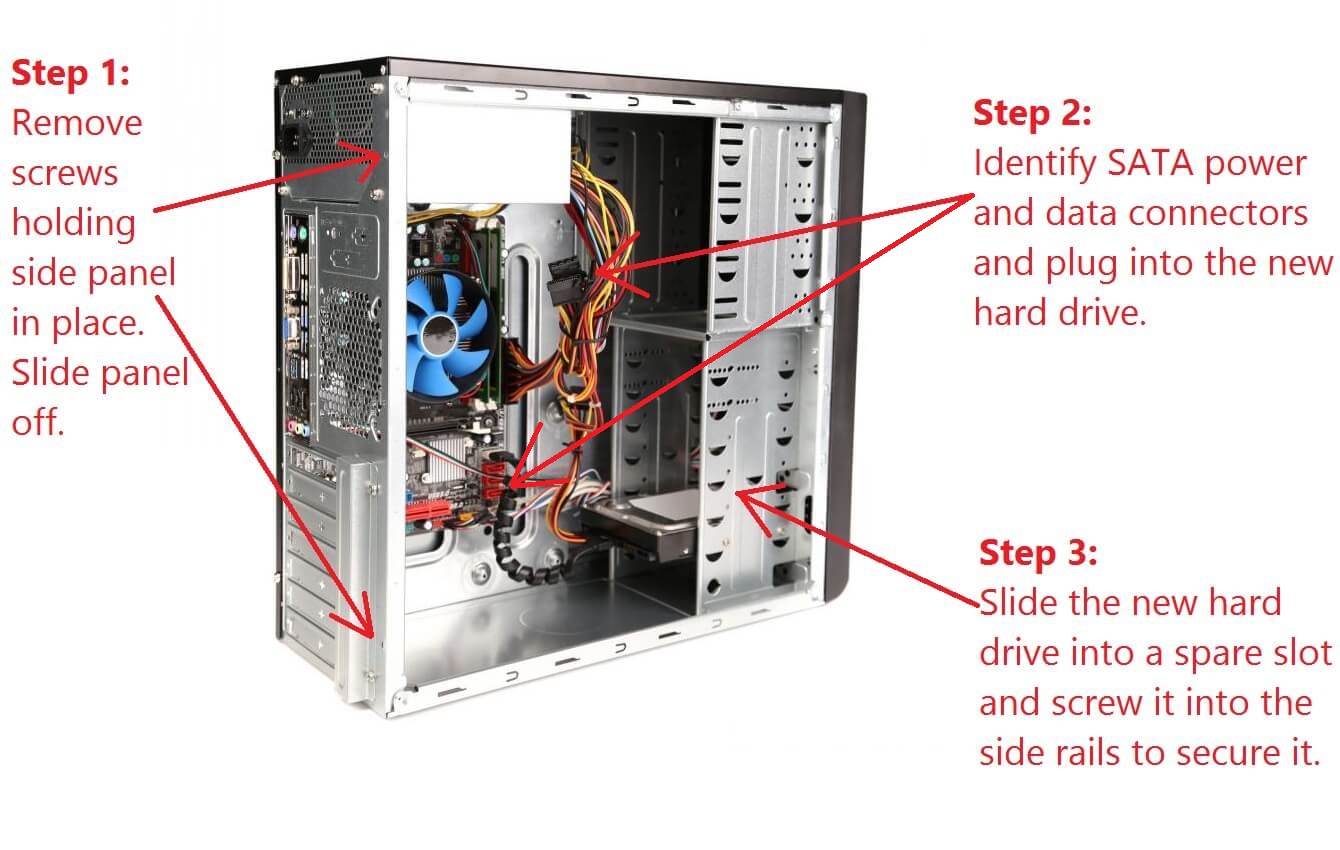
Step 1 : Open Up Your Computer Case
Turn off your computer and and unplug it from mains power before you begin.
Once unplugged, you can open your computer tower by unscrewing the screws which hold the side panel in place. These may be thumbscrews or you may need to use your screwdriver.
Be sure to ground yourself by touching some exposed metal on the computer case. This will prevent the risk of static from damaging your internal components.
It’s fine to turn your computer case over onto it’s side on a bench or desk so that the side you are opening is facing up towards you and easily accessible. Or, you may prefer to work with the computer standing in it’s normal upright position.
Slide off the side cover of your computer and put the side panel aside.
Step 2: Identify SATA Cables and Plug In Hard Drive
You’ll need to plug your new hard drive in to both power and data.
Your hard drive should look something like this once it’s all connected up:
The power cable connects your new hard drive to the computer’s power supply. It will usually be a SATA cable, shown below:
If you have an older power supply it might only have a ‘molex’ style power connector and not the SATA one shown above. Look for a spare SATA power connector coming from your power supply first, but if you can’t find one then see if you’re dealing with a molex connector instead. Most hard drives will have the option for both Molex or SATA power connections, and you can use one or the other as you like. The two different types together look like this:
Once you’ve connected up power, it’s time to connect the data side of things. You’ll need a SATA cable to connect your new hard drive to your motherboard.
One end of the SATA cable will plug into your new hard drive, and the other needs to go to a SATA port on your motherboard.
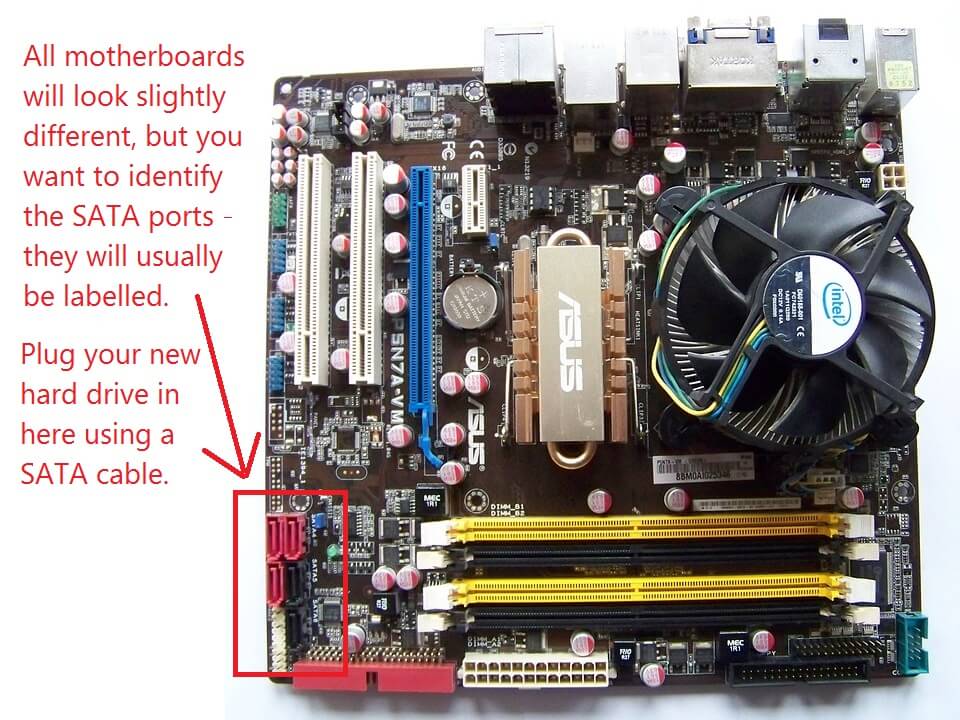
Here’s what a SATA port on a motherboard looks like up close and personal:
Step 3: Secure New Hard Drive In Place
Slide the hard drive into a spare slot in your computer’s drive mounting section, as shown in the image below.
You can then secure it in place using screws installed through the outside of the mounting rack into the side of the hard drive.
Step 4: Close The Computer Case
You’re pretty much done with the hard drive installation! Time to close up your case, power on, and get to configuring your new SATA hard drive for use. Refer to our next guide in this series for a walk through of configuring your new hard drive. How To: Configure SATA Hard Drive.
Summary
In this guide we’ve covered how to physically install a new SATA hard drive into a tower/desktop computer. You now know how to plug a SATA hard drive into both your motherboard and power supply so that it is ready to be used.
The next step is to configure the new hard drive in your operating system so that you can actually use it. This involves powering your computer on, and clicking a few buttons in software. We’ll cover exactly how to do this in another guide, so stay tuned!
Update: Part 2, How To: Configure SATA Hard Drive.
Have you replaced or installed a SATA hard drive before? If you found this guide helpful, or have any questions, feel free to drop us a comment below. We’d love to hear your feedback!