Yes, you can mount a mini PC under your desk using VESA-compatible mounting brackets, adjustable clamps, or adhesive solutions designed specifically for mini PCs. Most mini PCs weigh 1-4 lbs (0.5-2 kg), well within the 5-11 lb (2.3-5 kg) capacity of standard mounting brackets, making under-desk installation both safe and practical. Popular mounting solutions include universal VESA mounts ($20-40) that attach to standard 75×75mm or 100×100mm patterns, adjustable clamp brackets ($25-50) that secure directly to desk surfaces without drilling, and brand-specific mounts from manufacturers like ASUS NUC, Beelink, and GEEKOM. Installation takes 10-20 minutes with basic tools, and under-desk mounting offers significant advantages: reclaimed desk space, improved cable management, reduced dust exposure, and better aesthetics. However, you must consider airflow requirements—mini PCs need at least 2-3 inches of clearance on ventilation sides to prevent thermal throttling. Solid desktops can trap heat if the PC is mounted flush against the underside, so positioning at the edge or using standoff brackets is recommended. Most 2025-2026 mini PCs from Beelink, GEEKOM, Minisforum, and other major brands either include VESA mounting brackets in the box or offer them as $15-30 accessories.
Why Mount a Mini PC Under Your Desk?
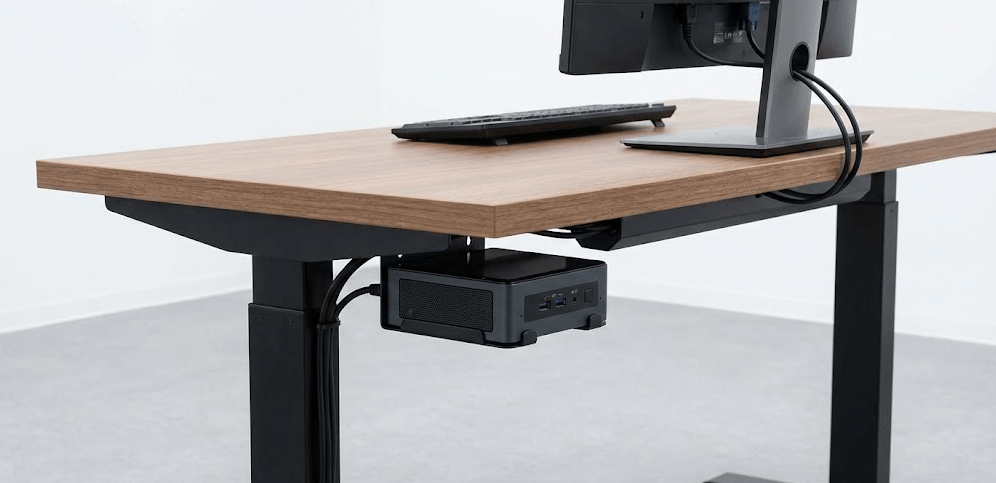
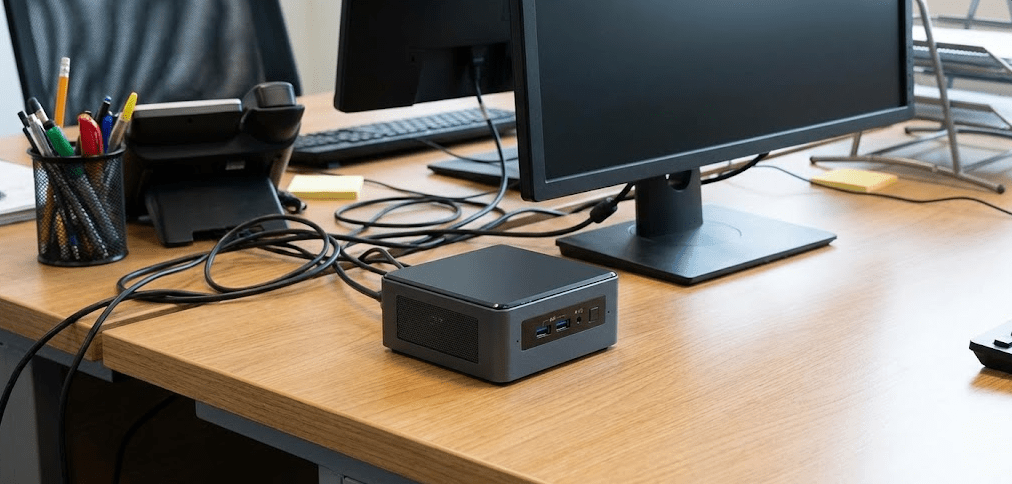
Under-desk mounting transforms mini PCs from desktop clutter into invisible computing solutions while offering practical benefits.
Space optimization: The average desk mini PC footprint measures 4-6 inches square, consuming 16-36 square inches of prime workspace. Mounting underneath reclaims this space for monitors, keyboards, notepads, or simply a cleaner aesthetic. For small desks or multi-monitor setups where every inch matters, under-desk mounting makes a measurable difference.
Improved cable management: When mounted under the desk near the rear edge, mini PCs keep power cables, display cables, and USB connections routed out of sight. Cable routing becomes simpler—everything drops straight down behind the desk rather than snaking across the surface. Combined with cable raceways or under-desk cable trays, the result is a professional, tidy workspace.
Dust reduction: Floor-level computers accumulate dust rapidly from carpet fibers, pet hair, and general debris. Mounting beneath the desk elevates the mini PC away from ground-level dust accumulation, reducing how often you need to clean intake vents and potentially extending component lifespan.
Physical protection: Desk-mounted mini PCs avoid accidental kicks, drink spills, vacuum cleaner collisions, and pet interference. This matters especially in shared workspaces, home offices with children, or areas where floor-level hazards are common.
Better ergonomics and accessibility: Quality mounts position mini PCs for easy access to front ports and power buttons without crawling under the desk. Adjustable brackets let you orient the PC for optimal port accessibility while keeping cables organized.
Aesthetic benefits: A clutter-free desk simply looks better. For remote workers on video calls or content creators filming workspace footage, the clean appearance of an under-desk-mounted PC eliminates visual distractions.
Pro Tip: “Before mounting your mini PC under your desk, spend 5 minutes identifying which sides have intake and exhaust vents. Use a flashlight to look at all six sides of the case—most mini PCs have intake vents on sides or bottom and exhaust out the back. When mounting, ensure at least 2-3 inches of clearance on ventilated sides. If your desk has a solid wood or MDF bottom with no airflow, mount the PC at the front or side edge where hot air can escape freely rather than trapped against the desk surface.”
Types of Under-Desk Mini PC Mounts
Several mounting solutions accommodate different desk types, mini PC sizes, and installation preferences.
VESA mounting brackets ($20-$40)
What they are: Metal brackets that attach to standard VESA mounting holes (75×75mm or 100×100mm patterns) on the back of mini PCs. The bracket then screws directly into the underside of your desk.
Pros: Most secure mounting method, supports heavy loads (5-11 lbs), professional appearance, permanent installation
Cons: Requires drilling into desk, less flexible for repositioning, only works if your mini PC has VESA mounting holes
Best for: Permanent installations where you want maximum security and don’t plan to move the PC frequently
Popular models: HumanCentric Thin Client Mount ($30-45), HIDEit Uni-M VESA Mount ($25-40), Mount-It! MI-7157 ($35-50)
Adjustable clamp brackets ($25-$50)
What they are: Spring-loaded or screw-tightened brackets that grip mini PCs between adjustable arms. The entire assembly screws into the desk or uses clamp mechanisms to attach without drilling.
Pros: No drilling required (clamp versions), adjustable width fits various mini PC sizes, easy to reposition or remove
Cons: Less secure than VESA mounts for heavier devices, may not fit unusually shaped mini PCs, clamp pressure can scratch cases without padding
Best for: Renters who can’t drill into furniture, users who frequently change setups, or those with multiple mini PCs to swap
Popular models: Ergotron Mini PC Mount ($40-60), VIVO adjustable mounts ($25-35), generic adjustable brackets on Amazon ($20-30)
Adhesive mounts ($15-$30)
What they are: Platforms with industrial-strength adhesive backing (3M VHB tape) that stick to both the desk underside and mini PC bottom. Some use magnetic attachment for easy removal.
Pros: Zero drilling or tools required, completely reversible with adhesive remover, works on any desk surface, ultra-clean installation
Cons: Weight capacity limited (typically 2-4 lbs), adhesive degrades over time or with temperature changes, not suitable for textured desk surfaces, Prone to failure under stress
Best for: Ultra-lightweight “stick PC” models only (under 2 lbs), temporary installations, desks where drilling is impossible
Important 2026 note: Modern performance mini PCs with high-wattage processors (Core Ultra 9, Ryzen 9) use dense copper heatsinks that significantly increase weight. Even compact units like the GEEKOM IT15 or Beelink SER9 weigh 3-5 lbs, exceeding most adhesive mount capacities. Adhesive mounting is rarely recommended for 2026 performance models—reserve it only for ultra-light compute sticks or legacy low-power mini PCs.
Popular models: Various no-name brands on Amazon/Etsy, magnetic mounting plates with adhesive backing
Brand-specific mounts ($15-$40)
What they are: Mounting brackets designed by mini PC manufacturers specifically for their models, ensuring perfect fit and port accessibility.
Pros: Guaranteed compatibility, optimized port access, often included free with mini PC purchase, designed with proper ventilation spacing
Cons: Only works with specific mini PC models, limited availability as aftermarket accessories, may not offer under-desk mounting (some designed for monitor-back mounting only)
Best for: Users who already own supported mini PCs from ASUS NUC, Beelink, or other brands that include or sell matching brackets
Popular models: ASUS NUC VESA mounting kit ($20-30), ASUS MKT02 mounting kit ($25-35), Beelink-specific VESA adapters on Etsy ($20-30)
Step-by-Step: Mounting Your Mini PC Under Your Desk
The installation process varies slightly by mount type, but follows these general steps.
Part 1: Planning and Preparation
Step 1: Choose mounting location
Consider these factors when selecting where under your desk to mount the PC:
Proximity to power outlets: Position the mount within reach of your desk’s power strip or wall outlet without requiring extension cords across the floor.
Airflow access: Ensure exhaust vents aren’t blocked by solid desk surfaces. Mount at the edge or front of the desk rather than center if your desk has a solid bottom.
Cable routing: Place the mount near your monitor stand or cable management raceway for clean cable runs.
Accessibility: You should be able to reach the power button and front ports without excessive bending or crawling under the desk.
Structural support: Choose a desk area with solid construction—avoid mounting over drawer spaces or thin panels.
Step 2: Gather tools and materials
For VESA/screw mounts:
- Phillips head screwdriver
- Power drill with appropriate bit (if drilling pilot holes)
- Pencil for marking
- Measuring tape
- Level (optional, ensures straight mounting)
For clamp mounts:
- Adjustable wrench or socket set
- Screwdriver
- Rubber pads (often included)
For adhesive mounts:
- Isopropyl alcohol and cloth (surface cleaning)
- Adhesive backing (usually pre-installed)
All mounts:
- Cable ties or Velcro straps for cable management
- Optional: rubber spacers or foam padding to dampen vibration
Step 3: Test fit before installation
Place the mount bracket in your chosen location without attaching it. Position the mini PC on/in the bracket to verify:
- Port access is comfortable
- Cables reach their destinations without tension
- Ventilation clearances are adequate (2-3 inches minimum)
- The position doesn’t interfere with sitting or leg movement
Part 2: Installing VESA/Screw Mounts
Step 1: Mark mounting holes
Hold the bracket against the underside of your desk in the chosen position. Use a pencil to mark each screw hole location through the bracket. Double-check measurements before drilling.
Step 2: Drill pilot holes (if necessary)
For solid wood desks, drill pilot holes slightly smaller than your screw diameter to prevent splitting. For MDF or particle board desks, use wood screws with sparse threads and consider filling holes with wood epoxy before installing screws for better hold.
Step 3: Attach bracket to desk
Align the bracket with pilot holes and drive screws through the bracket into the desk. Tighten securely but don’t overtighten—MDF and particle board can strip easily.
Step 4: Attach mini PC to bracket
If using VESA mounting, align the mini PC’s VESA holes with the bracket posts or holes and secure with provided screws. If using an adjustable bracket, position the mini PC and tighten the clamping mechanism.
Step 5: Test stability
Gently try to move the mounted mini PC. It should be completely secure with no wobbling or shifting.
Part 3: Installing Clamp Mounts
Step 1: Position clamp
Place the clamp mechanism on the desk edge or underside in your chosen location.
Step 2: Tighten clamp
Turn the tightening mechanism (usually a screw knob or lever) until the clamp grips the desk firmly. Place rubber pads between the clamp and desk surface to prevent scratches.
Step 3: Attach mini PC
Slide the mini PC into the bracket arms and adjust the width to grip the PC securely. Tighten adjustment screws to lock the position.
Step 4: Verify stability
Test that both the clamp and the mini PC are secure with gentle pressure.
Part 4: Installing Adhesive Mounts
Step 1: Clean surfaces thoroughly
Use isopropyl alcohol to clean both the desk underside and mini PC bottom. Remove all dust, oils, and residue. Let dry completely (5-10 minutes).
Step 2: Position adhesive mount
Peel backing from adhesive and carefully position the mount on the desk underside. Press firmly for 30 seconds to ensure full contact.
Step 3: Let adhesive cure
Wait 24 hours before attaching the mini PC. Adhesive reaches full strength after this curing period.
Step 4: Attach mini PC
After curing, attach the mini PC to the mount (either by peeling and sticking if using dual-sided tape, or connecting if using magnetic attachment).
Important: Adhesive mounts have weight limits (typically 2-4 lbs). Modern performance mini PCs with high-wattage processors and copper heatsinks often exceed this capacity. Verify your mini PC weight before choosing adhesive mounting—most 2026 performance models require screw-mounted or clamp-style brackets instead.
Part 5: Cable Management
Step 1: Route power cable
Run the power cable from the mini PC to your power strip or outlet. Use cable clips or raceways to keep it flush against the desk underside or leg.
Step 2: Route display and peripheral cables
Connect monitor cables, USB peripherals, and network cables. Bundle them together with cable ties or Velcro straps for neatness.
Step 3: Secure excess cable length
Use adhesive cable clips under the desk to secure slack cable. This prevents cables from hanging loose or getting caught on chair wheels or legs.
Step 4: Label cables (optional)
Use cable labels to identify which cable goes to which device. This saves time during future maintenance or troubleshooting.
Airflow and Cooling Considerations
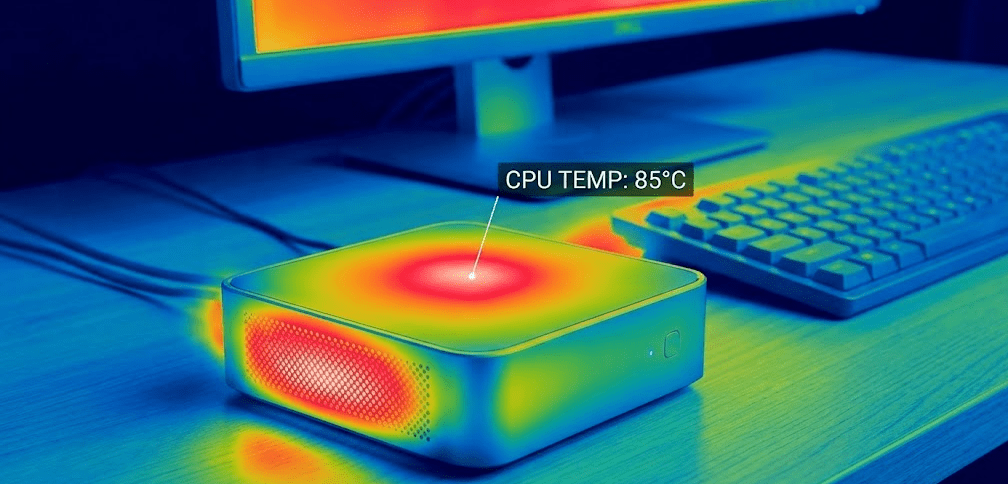
Proper ventilation is critical for under-desk-mounted mini PCs to avoid thermal throttling and shortened component life.
Identify ventilation sides: Mini PCs typically intake cool air from sides or bottom and exhaust hot air out the back. Check your specific model’s vent locations before mounting.
Maintain clearance: Leave at least 2-3 inches of open space around intake and exhaust vents. Mounting flush against a solid desk bottom can trap hot exhaust air and recirculate it into the intake.
Edge mounting advantage: Mounting at the front or side edge of the desk allows hot exhaust air to escape freely into open air rather than being trapped against the desk surface.
Temperature monitoring: After installation, monitor system temperatures under load for the first week. Use HWMonitor (Windows) or lm-sensors (Linux) to check CPU and GPU temps. If temperatures rise 10°C+ compared to desktop placement, adjust the mounting position for better airflow.
Avoid enclosed spaces: Don’t mount mini PCs inside enclosed desk cubbies or cabinets without active ventilation. Static air in enclosed spaces causes heat buildup regardless of clearance.
Fan orientation matters: Some mini PCs allow you to adjust fan curves in BIOS. If under-desk mounting causes slightly higher temperatures, increasing fan speed by 10-15% can compensate without excessive noise.
Mini PC Under-Desk Mounting Compatibility by Brand
Not all mini PCs ship with mounting brackets, but most support aftermarket solutions.
Beelink mini PCs (SER8, SER9, EQ series)
VESA mounting: Most models include VESA mounting brackets in the box. The EQ series requires specific adapters available on Etsy ($20-30).
Alternative mounts: Universal adjustable brackets work well due to consistent sizing across Beelink models.
Airflow: Beelink typically uses side and rear ventilation. Mount with sides and rear facing open space.
GEEKOM mini PCs (A8, IT15, GT1 Mega)
VESA mounting: Higher-end models (A8, GT1 Mega) include VESA brackets. Mid-range models (A7, IT15) sometimes require purchasing brackets separately ($20-30).
Alternative mounts: Standard VESA mounts compatible with 75×75mm or 100×100mm patterns work universally.
Airflow: GEEKOM exhausts out the rear with side intakes. Ensure rear clearance for heat dissipation.
Minisforum mini PCs (UM890, UM990, MS-01)
VESA mounting: Most models include VESA mounting hardware in the retail package.
Alternative mounts: Adjustable brackets work but verify thickness—some Minisforum models are slightly thicker than standard mini PCs.
Airflow: Rear and side ventilation design. Avoid mounting flush against solid surfaces.
ASUS NUC (14 Pro, 15 Pro+, ROG NUC 2025)
VESA mounting: ASUS NUC systems include VESA mounting kits in the box with brackets compatible with 75×75mm or 100×100mm patterns. ASUS took over the NUC product line from Intel in October 2023, and current 2025-2026 models are manufactured and sold under the ASUS NUC brand.
Alternative mounts: Universal VESA mounts work with ASUS NUC’s standardized mounting hole patterns.
Airflow: Most ASUS NUC models use bottom intake and rear exhaust. Ensure bottom clearance for airflow.
ASUS mini PCs (PN series)
VESA mounting: ASUS MKT02 mounting kit ($25-35) supports VESA 100×100mm patterns and includes cable management features.
Alternative mounts: Standard VESA mounts compatible.
Airflow: Model-dependent. Check specific model’s vent locations before mounting.
HP/Dell business mini PCs (EliteDesk, OptiPlex Micro)
VESA mounting: Business models typically include VESA mounting brackets as standard equipment.
Alternative mounts: Due to standardized business PC form factors, most universal mounts fit perfectly.
Airflow: Front intake, rear exhaust design common. Mount with rear facing open space.
Under-Desk Mini PC Mounting Solutions Comparison Table
| Mount Type | Price Range | Installation | Weight Capacity | Desk Damage | Best For |
|---|---|---|---|---|---|
| VESA Bracket (Screw) | $20-$40 | 15-20 min | 5-11 lbs | Requires drilling | Permanent installations, maximum security |
| Adjustable Clamp | $25-$50 | 10-15 min | 3-8 lbs | Clamp pressure (minimal) | Renters, frequent changes, no drilling |
| Adhesive Mount | $15-$30 | 5 min + 24hr cure | 2-4 lbs | Adhesive residue | Ultra-light “stick PCs” only (<2 lbs) |
| Brand-Specific VESA | $15-$40 | 10-15 min | Model-specific | Requires drilling | Perfect fit for supported models |
| Universal Bracket | $20-$35 | 15-20 min | 5-10 lbs | Requires drilling | Multiple mini PC compatibility |
| Magnetic Mount | $25-$40 | 5 min | 2-4 lbs | None | Quick removal, ultra-lightweight PCs |
Data compiled from manufacturer specifications and user testing (January 2026).
Common Under-Desk Mounting Problems and Solutions
Problem: Screws won’t hold in particle board or MDF desk
Cause: Particle board and MDF don’t hold screws as well as solid wood.
Solution: Use wood screws with sparse threads, drill slightly undersized pilot holes, fill with wood epoxy, then install screws. Alternatively, use M5 threaded inserts with epoxy for stronger hold.
Problem: Mini PC runs hotter after mounting under desk
Cause: Insufficient airflow or exhaust air trapped against desk bottom.
Solution: Reposition mount to desk edge where hot air can escape freely. Add 10-20mm spacers between bracket and desk to create air gap. Monitor temperatures and adjust fan curves if needed.
Problem: Adhesive mount fails after a few days
Cause: Surface not properly cleaned, temperature fluctuations, or weight exceeding capacity.
Solution: Remove adhesive residue with Goo Gone. Clean surfaces with isopropyl alcohol. Use stronger adhesive (3M VHB 5952 double-sided tape rated for 3-5 lbs) or switch to screw-mounted bracket. Note that most 2026 performance mini PCs are too heavy for adhesive mounting—use screw or clamp mounts instead.
Problem: Can’t access power button or front ports easily
Cause: Mini PC oriented incorrectly on mount.
Solution: Loosen bracket and rotate mini PC 90-180° so ports face forward or downward for easier access. Some brackets allow orientation adjustment without full removal.
Problem: Cables pull on mini PC and create strain
Cause: Insufficient cable management or cables too short.
Solution: Use longer cables to eliminate tension. Add cable clips under desk to support cable weight independently of mini PC. Create service loops (extra length) near connections.
Problem: Mini PC wobbles or shifts on mount
Cause: Mount not tightened properly or bracket design unsuitable for mini PC shape.
Solution: Tighten all mounting screws. Add rubber pads between mini PC and bracket to increase friction. If wobbling persists, switch to a VESA mount with direct screw attachment.
FAQ: Mounting Mini PCs Under Desks
Will mounting under my desk affect WiFi or Bluetooth performance?
Metal desks can slightly attenuate wireless signals, but the effect is minimal with modern WiFi 7 and Bluetooth 5.4 standards found in 2026 mini PCs. If you experience connectivity issues, position the mini PC near the desk edge rather than center, or use USB WiFi/Bluetooth adapters with extension cables to move the antenna away from metal.
Can I use Command strips to mount a mini PC?
Not recommended. Command strips are effective on walls but fail under desks due to gravity pulling perpendicular to the adhesive’s strongest bonding direction. Use proper 3M VHB tape rated for weight-bearing applications or screw-mounted brackets instead.
How much weight can standard desk materials support?
Solid wood desks support 5-15 lbs easily with proper screws. MDF and particle board support 3-8 lbs with threaded inserts or epoxy-reinforced screws. Hollow-core desks may not support any under-desk mounting—check by tapping the underside to identify solid vs. hollow areas.
Do I need to shut down my mini PC before installing the mount?
Yes, always power down completely and unplug all cables before mounting. This prevents damage from accidental drops and eliminates electrical shock risk.
Can I mount two mini PCs under one desk?
Yes, as long as you have adequate space and structural support. Mount them at opposite ends or sides of the desk to distribute weight and maintain access to both systems.
Will under-desk mounting void my warranty?
No, using mounting brackets doesn’t void warranties. However, physical damage caused during installation (dropped PC, stripped screws in PC case) won’t be covered. Follow installation instructions carefully.
What if my mini PC doesn’t have VESA holes?
Use adjustable clamp brackets designed for non-VESA devices. These grip the mini PC’s body rather than requiring specific mounting holes. Note that most 2026 mini PCs from major brands include VESA mounting patterns.
Should I mount with the PC horizontal or vertical?
Follow the manufacturer’s designed orientation. Most mini PCs are designed for horizontal placement. Mounting vertically can disrupt airflow, cause excessive fan noise, or stress internal components not designed for that orientation.
The Bottom Line: Under-Desk Mounting Is Practical and Straightforward
Can I mount a mini PC under my desk? Absolutely—and doing so offers meaningful workspace improvements through reclaimed desk space, cleaner cable management, and reduced dust exposure. The process takes 10-20 minutes with basic tools, and mounting hardware costs $20-50 for quality solutions.
Choose VESA-compatible screw mounts ($20-40) for permanent installations where maximum security matters. These brackets support 5-11 lbs and provide the most stable mounting for all mini PC sizes. Adjustable clamp brackets ($25-50) work excellently for renters or users who can’t drill into furniture, offering tool-free installation with adequate security for most mini PCs under 8 lbs.
Avoid adhesive-only solutions for 2026 performance mini PCs—modern models with high-wattage processors (Core Ultra 9, Ryzen 9 8945HS) use dense copper heatsinks that push weight to 3-5 lbs, exceeding most adhesive mount capacities. Adhesive failures are common under desks due to gravity and temperature variations. Reserve adhesive mounting only for ultra-lightweight compute sticks under 2 lbs. If you prefer not to drill, choose clamp-style brackets instead.
The most critical consideration isn’t the mounting hardware—it’s airflow. Position your mini PC at the desk edge rather than center, maintain 2-3 inches of clearance around vents, and ensure exhaust air can escape freely. Monitor temperatures for the first week after installation and adjust positioning if temps rise significantly compared to desktop placement.
For 2026, most mini PCs from Beelink, GEEKOM, Minisforum, ASUS NUC, and other major brands either include VESA mounting brackets or support universal aftermarket solutions. ASUS NUC systems specifically include VESA mounting kits in the retail package, maintaining the tradition established during Intel’s NUC product line era before the 2023 handover to ASUS.
Under-desk mounting transforms mini PCs from desktop appliances into integrated workspace solutions, delivering cleaner aesthetics and better functionality without compromising performance or accessibility.